background image

28

w

e

r

t

q

q

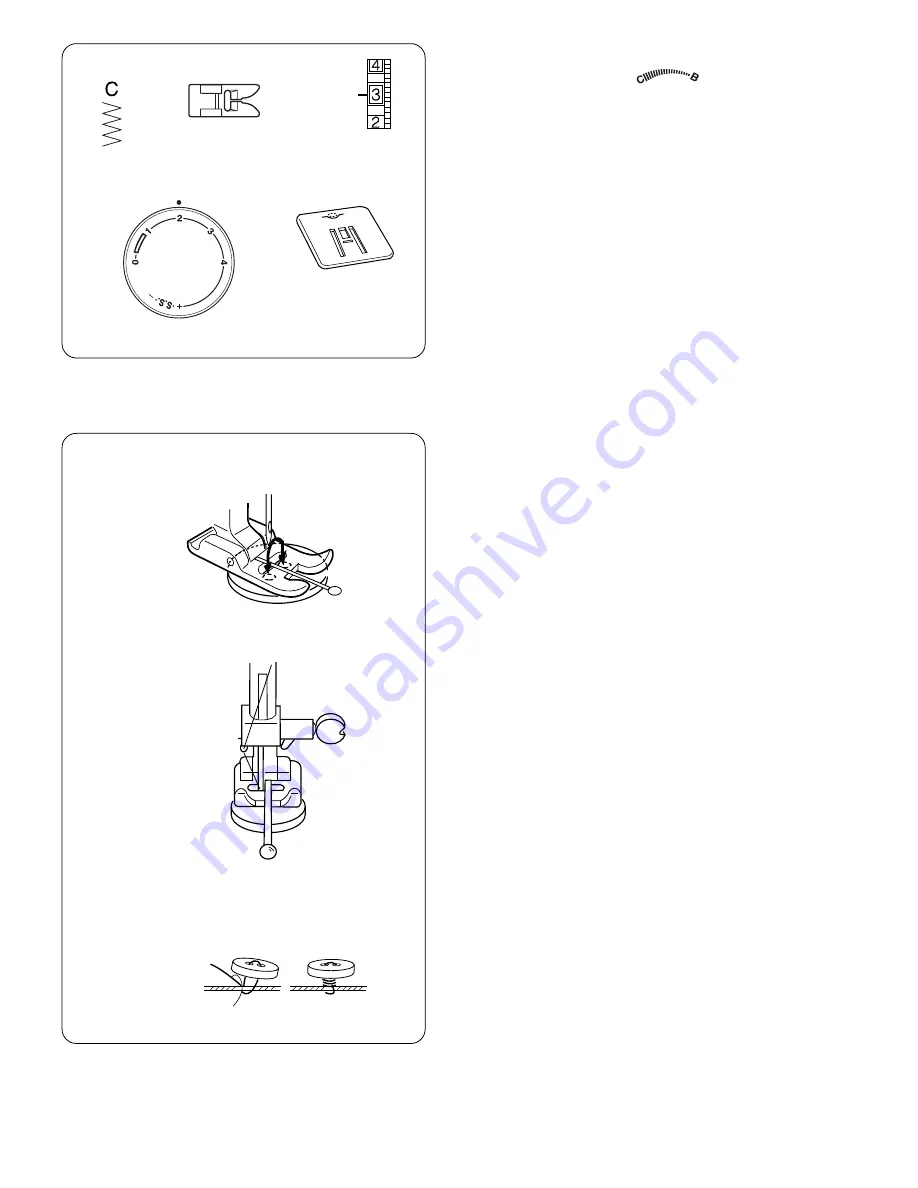
Pattern selector:

w

Presser foot:

Zigzag foot

e

Thread tension:

3–7

r

Stitch length:

Any

t

Darning plate

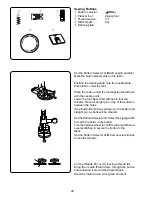
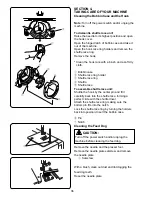
Sewing Buttons

Set the Pattern Selector at B (left needle position).
Mark the button placements on the fabric.

Position the darning plate onto the needle plate.
Place fabric under the foot.

Place the button under the foot aligning the left hole
with the needle point.
Lower the foot. Sew a few stitches to lock the
threads. Place a straight pin on top of the button in
between the holes.
(See illustration) When sewing over the button and
straight pin, a shank will be created.

Set the Pattern Selector at C. Select the zigzag width
to match the holes in the button.
Turn the balance wheel to confirm correct width. Sew
several stitches to secure the button to the
fabric.
Set the Pattern Selector at B. Sew several stitches
to lock the threads.

Cut the threads 20 cm (8˝) leaving a thread tail.
Bring the needle thread down through the button
hole and wind it around the thread shank.
Draw the thread to the wrong side and knot.

Summary of Contents for Sew Green

Page 1: ...Instruction Manual Mode d emploi Gebrauchsanleitung Elna Sew Green ...

Page 2: ...to the nearest authorized dealer or service center for examination repair electrical or mechanical adjustment 4 Never operate the appliance with any air opening blocked Keep ventilation openings of this sewing machine and foot controller free from accumulation of lint dust and loose cloth 5 Never drop or insert any object into any opening 6 Do not use outdoors 7 Do not operate where aerosol spray ...

Page 3: ...si les orifices d aération sont colmatés Tenir les orifices d aération de cette machine à coudre et le curseur d escamotage du pied de biche exempts de toute accumulation de peluches poussières et de morceaux de chiffon 5 Il ne faut jamais laisser tomber ou introduire d objet dans les orifices 6 Il ne faut pas l utiliser en plein air 7 Il ne faut pas la faire fonctionner si des produits en aérosol...

Page 4: ...in Betrieb wenn eine Luftöffnung blockiert ist Sorgen Sie dafür dass sich in den Luftöffnungen dieser Maschine und der Fußsteuerung keine Fusel Staub und Stoffreste ansammeln 5 Sorgen Sie dafür dass keine Gegenstände in die Öffnungen gelangen 6 Benutzen Sie die Maschine nicht im Freien 7 Benutzen Sie diese Maschine nicht wenn Aerosole Sprays verwendet oder Sauerstoff zugeführt wird 8 Stellen Sie b...

Page 5: ... Machine 16 Drawing Up Bobbin Thread 16 Thread Tension Dial 18 Stitch Selector Dial 18 Stitch Length Dial 18 Adjusting Stretch Stitch 20 Reverse Stitch Button 20 Darning Plate 20 SECTION 3 BASIC SEWING Straight Stitch Sewing 22 To change the direction 22 Seam Guide Line 24 Turn a Square Corner 24 Zigzag Stitching 24 Tricot Stitch 26 Super Stretch Stitch 26 Triple Stitch 26 Sewing Buttons 28 Button...

Page 6: ...fil 19 Sélecteur des Motifs 19 Contrôle de la longueur de point 21 Pour ajuster l équilibre des points élastiques 21 Bouton de marche arrière 21 Plaque de reprisage 21 SECTION 3 BASES DE LA COUTURE Point Droit 23 Comment Changer la Direction de la Couture 23 Guides de couture 25 Tourner à angle droit 25 Point Zigzag 25 Point pour tissu tricot point zigzag multiple 27 Point Super Stretch 27 Couture...

Page 7: ...srad 19 Stichmuster Selektor 19 Regler für die Stichlänge 21 Einstellen des Stretchstich Ausgleichs 21 Rückwärtstaste 21 Stopfplatte 21 TEIL 3 EINFACHES NÄHEN Nähen mit Garadstichen 23 Ändern der Nährichtung 23 Benutzen der Führungslinien 25 Ändern der Nährichtung um 90 25 Nähen mit Zick zack stichen 25 Trikotstich Mehrfach Zick Zack Stich 27 Superstretch Stich 27 Gerader Stretchstich 27 Annähen v...

Page 8: ...ial r Bobbin winder stopper t Bobbin winder spindle y Spool pins u Bobbin winder thread guide i Thread guide o Thread take up lever 0 Thread tension dial 1 Face plate 2 Needle plate 3 Extension table 4 Presser foot holder 5 Needle clamp 6 Needle 7 Presser foot 8 Carrying handle 9 Handwheel 0 Power switch 1 Machine socket 2 Free arm 3 Presser foot lifter ...

Page 9: ...de l aiguille 6 Aiguille 7 Pied de biche 8 Poignée de transport 9 Volant 0 Interrupteur 1 Boîtier de contact 2 Bras libre 3 Levier d élévation du pied TEIL 1 WICHTIGE TEILE DER MASCHINE Bezeichnungen der Teile q Rückwärtstaste w Stichprogramm Selektor e Knopf für Stichlänge r Spuleranschlag t Spuler y Garnrollenstifte u Fadenführung des Spulers i Fadenführung o Fadenhebel 0 Fadenspannungs Regler 1...

Page 10: ...the table Pull the table away from the machine SECTION 2 GETTING READY TO SEW Accessories Storage Box Sewing accessories are conveniently located in the extension table q Accessories storage box Free Arm Sewing Avoid fabric bunching around the needle when bartacking to reinforce pockets plackets and waistlines For stitching sleeves waistbands pant legs or any circular garment area For darning sock...

Page 11: ...antalons et autres vêtements cylindriques Il est également idéal pour repriser les chaussettes les genoux de pantalons et les coudes de chemises Freiarmnähen Freiarmnähen eignet sich zum Nähen von Ärmeln Bünden Hosenbeinen oder anderen röhrenförmigen Teilen Es ist außerdem nützlich zum Stopfen von Socken oder Knien und Ellbogen SECTION 2 SE PRÉPARER À COUDRE TEIL 2 VORBEREITUNGEN FÜR DAS NÄHEN Tab...

Page 12: ...tended when attaching or removing parts when clearning the machine Do not place anything on the foot control other wise the machine will run intermittently Presser Foot Lifter The presser foot lifter raises and lowers your presser foot You can raise it about 0 6 cm 1 4 higher than the normal up position for easy removal of the presser foot or to help you to place heavy fabric under the foot q Lowe...

Page 13: ...Heben und Senken des Nähfußes Der Nähfußhebel hebt und senkt den Nähfuß Sie können den Fuß etwa 0 6 cm über die normale gehobene Stellung heben damit der Nähfuß leichter entfernt werden kann oder wenn Sie dicken Stoff unter den Fuß legen wollen q Gesenkte Stellung w Normale angehobene Stellung e Zusätzlich angehobene Stellung Auswechseln des Nähfußes Entfernen Sie den Nähfuß wie folgt Bringen Sie ...

Page 14: ...fabrics and thicker threads and needles are used for sewing heavy fabrics Always test thread and needle size on a small piece of fabric which will be used for actual sewing Use the same thread for needle and bobbin When sewing stretch very fine fabrics and synthetics use a BLUE TIPPED needle The blue tipped needle effectively prevents skipped stitches Changing Needle Raise the needle by turning th...

Page 15: ...nne Stoffe normale Stoffe dicke Stoffe Stoffe feine Seide feine Baumwolle synthetische Baumwolle Polyester Leinen Baumwolle Pikee Kammgarn Strickwaren und dünne Gardinenstoffe Denim Tweed Gabardine schwere Gardinenstoffe Gardinen Garne feine Seide Baumwolle synthetische oder Polyester 50 Seide 50 80 Baumwolle 50 60 synthetische Baumwolle Polyester 50 Seide 40 50 Baumwolle 50 60 synthetische und Ba...

Page 16: ... for holding the spool of thread in order to feed thread to the machine To use pull up the spool pin Push down for storage Setting Spool Pins Removing or Inserting the Bobbin Case Open the hook cover q Hook cover Raise the needle by turning the handwheel toward you Take out the bobbin case by holding the latch w Latch ...

Page 17: ...n daß der Faden der Maschine richtig zugeführt werden kann Ziehen Sie den Garnrollenstift zur Benutzung nach oben heraus Schieben Sie ihn bei Nichtgebrauch wieder hinein um ihn geschützt aufzuheben Herausnehmen und Einsetzen der Spulenkapsel Öffnen Sie die Abdeckung des Greifers q Greiferabdeckung Drehen Sie das Handrad zu sich hin bis die Nadel in der höchsten Stellung steht Nehmen Sie dann die S...

Page 18: ...n it has made a few turns and cut the thread close to the hole in the bobbin n Depress the foot control again When the bobbin is fully wound stop the machine Return the bobbin winder spindle to its original position by moving the spindle to the left and cut the thread m Push the handwheel to the left original position Note Return the bobbin winder spindle when the machine stops Threading Bobbin Ca...

Page 19: ...la canette puis coupez le fil tout près de la canette n Appuyez à nouveau sur la pédale Quand la canette est complètement enroulée elle s arrête automatiquement Pour remettre le dévidoir à sa position initiale déplacez la broche vers la gauche et coupez le fil comme illustré m Poussez le volant vers l intérieur pour engager l embrayage REMARQUE Ne touchez pas à la broche du dévidoir pendant le fon...

Page 20: ...take up lever from right to left v Then draw the thread down and slip it into needle bar thread guide on the left b Thread the needle eye from front to back Note You may want to cut the end of thread with sharp scissors for easier needle threading Drawing Up Bobbin Thread z Raise the presser foot and hold the needle thread lightly with your left hand x Turn the handwheel slowly toward you with you...

Page 21: ...den mit Hilfe beider Hände in die Fadenführung x Halten Sie den Faden nahe der Garnrolle mit einer Hand und ziehen Sie ihn mit der anderen nach unten in Richtung der Oberfadenspannung und führen ihn um den Halter der Einstellfeder herum c Ziehen Sie den Faden straff nach oben und führen Sie ihn von links nach rechts durch den Fadenhebel v Ziehen Sie den Faden weiter nach unten und schieben Sie ihn...

Page 22: ...de bottomside of the fabric q Needle thread Top thread w Bobbin thread Bottom thread e Right side Top side of fabric r Wrong side Bottom side of fabric t Thread tension dial y Setting mark x Needle thread tension is too tight When the bobbin thread bottom thread will appear on the right side top side of the fabric Loosen the needle thread tension by moving the dial to a lower number c Needle threa...

Page 23: ... l aiguille au dessus du tissu et choissisez le motif désiré en tournant le sélecteur de motifs correspondant à la marque de réglage q Marque de réglage Stichmuster Selektor Bringen Sie die Nadel in die obere Stellung und drehen Sie dann den Stichmuster Selektor so daß die Markierung auf das gewünschte Stichmuster zeigt q Einstellmarke x Réduisez la tension du fil de l aiguille en bougeant le cadr...

Page 24: ...ng plate Position the darning plate with the 3 pins on the bottom Fit the darning plate pins into the needle plate holes The feed dogs will show through the darning plate holes is the recommended setting for buttonhole stitching Adjust the dial in the 0 5 4 range when you sew the zigzag stitch Adjusting Stretch Stitch Set the stitch length control at S S to sew the stretch stitch pattern sewing If...

Page 25: ...l équilibre des points élastiques Si les motifs de points élastiques sont inégaux lorsque vous cousez sur un tissu particulier modifiez les en tournant le sélecteur de longueur de point Si les motifs sont étirés modifiez les en réglant le sélecteur du coté du Si les motifs sont compressés modifiez les en réglant le sélecteur du côté du Einstellen des Stretchstich Ausgleichs Wenn die Stretchstichmu...

Page 26: ...e foot control Gently guide the fabric along the guide line letting the fabric feed by itself x For fastening the end of seams press the reverse stitch button and sew several reverse stitches Raise the presser foot and remove the fabric drawing the threads to the back c Draw the threads up and into the thread cutter To change the direction Stop the machine and turn the balance wheel toward you to ...

Page 27: ...ie den Nähfuß an und legen Sie den Stoff an eine Nahtleitlinie der Stichplatte Senken Sie die Nadel in den Stoff ab Senken Sie den Nähfuß und legen Sie die Fadenenden nach hinten Drücken Sie auf den Fußanlasser Führen Sie den Stoff nur locker an der Nahtleitlinie entlang so daß der automatische Transport nicht gestört wird x Um die Fadenenden am Ende einer Naht zu vernähen drücken Sie die Rückwärt...

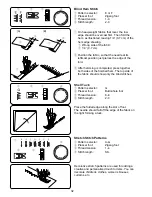
Page 28: ...urn a square corner 5 8 1 6 cm from the fabric edge Stop stitching and lower the needle by turning the handwheel counterclockwise Raise the presser foot and turn the fabric to line the edge with the 5 8 1 6 cm seam guide Lower the presser foot and begin stitching in the new direction Line up the fabric edge facing you with the cornering guide shown q Cornering guide q Pattern selector C w Presser ...

Page 29: ...ie Eckennähführung hilft Ihnen beim Nähen einer Ecke einen Saumabstand von 1 6 cm einzuhalten Wenn der Ihnen zugewandte Stoffrand wie dargestellt mit der Eckennähführung abschließt halten Sie mit dem Nähen an und senken die Nadel in den Stoff indem Sie das Handrad auf sich zu drehen Stellen Sie den Nähfuß hoch und drehen Sie den Stoff so dass der Stoffrand mit den 1 6 cm Nahtführungslinien abschli...

Page 30: ...This super stretch stitch is ideal for sewing swimwear and stretch velour because it provides the greatest amount of elasticity and strength Super stretch stitch will be done most successfully when the right side stitches of zigzag fall slightly off the edge of the fabric Place your fabric to allow a 1 6 cm 5 8 seam Trim the seam allowance after sewing Be careful not to cut the stitches q Pattern ...

Page 31: ... grande résistance ce point est particulièrement recommandé pour des coutures exigeant à la fois élasticité et solidité telles que les coutures d entrejambes d emmanchures ou la confection de sacs à dos Ce point peut également s utiliser pour les surpiqûres Gerader Stretchstich Dieser Stich wird mit zwei Vorwärtsstichen und einem Rückwärtsstich genäht die eine reißfeste Naht bilden Benutzen Sie ih...

Page 32: ...s to lock the threads Place a straight pin on top of the button in between the holes See illustration When sewing over the button and straight pin a shank will be created Set the Pattern Selector at C Select the zigzag width to match the holes in the button Turn the balance wheel to confirm correct width Sew several stitches to secure the button to the fabric Set the Pattern Selector at B Sew seve...

Page 33: ... den Nähfuß und verstellen Sie dann die Stichmuster Selekto bis sich die Nadelspitze genau über dern rechten Loch des Knopfs befindet Nähen Sie ungefähr 5 Stiche und bringen Sie dann die Nadel in die obere Stellung Stellen Sie die Stichmuster Selekto wieder auf B und nähen Sie einige Stiche um das Fadenende zu vernähen Couture des boutons q Motif de point w Pied de biche Pied zigzag e Tension du f...

Page 34: ... marking q of your buttonhole Stop sewing at a left stitch v Set the pattern selector dial at Sew 5 stitches Stop sewing at a right stitch b Set the pattern selector dial at Sew until you reach the back marking w of the buttonhole Stop sewing at a right stitch n Set the pattern selector dial at Sew a few bartacks and raise the needle from the fabric Set the stitch length dial to 0 and the pattern ...

Page 35: ... des points de boutonnière Réglez le sélecteur de longueur de point entre pour déterminer la densité du point de boutonnière Knopflochnähen in 4 Schritten q Stichmuster w Fuß Knopflochfuß e Oberdenspannung 1 5 r Stichlänge z Markieren Sie die Knopflochlänge vorsichtig auf dem Stoff Legen Sie den Stoff unter den Fuß wobei die Knopflochmarkierung auf Sie zu läuft x Ziehen Sie Unter und Oberfaden nac...

Page 36: ...abric should show only the blind stitches x Position the fabric so that the needle at its leftmost position just pierces the edge of the fold q Pattern selector G w Presser foot Buttonhole foot e Thread tension 6 8 r Stitch length 2 3 Shell Tuck Place the folded edge along the slot of foot The needle should fall off the edge of the fabric on the right forming a tuck q Pattern selector A G w Presse...

Page 37: ...ers du tissu w 0 7 cm x Placez le tissu afin que l aiguille pique juste le bord plié lorsqu elle parvient sur le côté gauche extrême Abaissez le pied presseur c Une fois la couture terminée ouvrez le tissu et repassez le Points stretch décoratifs q Motif de point A G w Pied de biche Pied Zigzag e Tension du fil 1 4 r Longueur de point S S Les motifs extensibles décoratifs sont utilisés pour ajoute...

Page 38: ...ure the threads at the other end Sew the decorative stitch between the gathering stitches Pull out the gathering stitches q 1 cm Baste or fuse with iron on fabric joiner applique pieces on the fabric Stitch around the applique making sure the needle falls along the outer edge of the applique When sewing corners lower the needle down into the fabric Raise the presser foot and pivot the fabric to th...

Page 39: ...Abstand auf den zu smokenden Bereich Verknoten Sie die Fäden entlang einem Ende Ziehen Sie vom anderen Ende die Unterfäden um die Kräuselung gleichmäßig zu verteilen und sichern Sie die Fäden Stellen Sie die Fadenspannung wieder auf die ursprüngliche Einstellung zurück Nähen Sie Zierstichmusterreihen zwischen den gekräuselten Stichen Entfernen Sie die gekräuselten Stiche am Ende q 1 cm Appliqué q ...

Page 40: ...uttle race ring r Shuttle t Shuttle race To assemble shuttle race unit Shuttle the hook by the center pin and fit it carefully back into the shuttle race forming a perfect circle with the shuttle driver Attach the shuttle race ring making sure the bottom pin fits into the notch Lock the shuttle race ring by turning the holders back into position Insert the bobbin case y Pin u Notch Cleaning the Fe...

Page 41: ... Sie die Kapsel aus der Maschine Drücken Sie die Halter des Greiferrings nach außen und nehmen Sie den Greiferring heraus Nehmen Sie den Greifer heraus Reinigen Sie den Greifer und die Greiferbahn mit einer Bürste und einem weichen trockenen Tuch q Spulenkapsel w Halter des Greiferrings e Greiferring r Greifer t Greiferbahn Zusammensetzendes Greifers Fassen Sie den Greifer an seinem Mittelstift un...

Page 42: ...chine other than explained in this manual To remove Push and twist to the left To replace Push and twist to the right CAUTION The bulb could be HOT Protect your fingers when handle it Oiling Unplug the machine Remove screw cap screw and face plate Apply a few drops of sewing machine oil to the points indicated by arrows in illustrations Machine should be oiled two or three times a year or more dep...

Page 43: ...ch links drehen Zum Ersetzen Drücken und nach rechts drehen Avertissement L ampoule risque d être TRÈS CHAUDE Protégez vous les doigts pour la toucher Warnung Die Glühlampe kann heiß sein Schützen Sie Ihre Finger Débrancher la machine Retirer le cache vis la vis et le volet frontal Mettre quelques gouttes d huile de machine aux points indiqués par des flèches sur l illustration Une machine doit êt...

Page 44: ...wn to the back when sewing is finished 6 The needle is too fine for the fabric being sewn 7 The pattern selector dial had been turned while the needle was in the material 1 The needle is incorrectly inserted 2 The needle is bent or blunt 3 The needle and or threads are not suitable for the work being sewn 4 The needle thread is not threaded properly 1 The needle thread tension is too tight 2 The m...

Page 45: ...a tension du fil de l aiguille est trop forte 2 La machine n est pas enfilée correctement 3 L aiguille est trop grosse pour le tissu cousu 4 Les points sont trop gros pour le tissu cousu En cousant des tissus très légers placez une feuille de papier en dessous du tissu cousu 1 La tension du fil de l aiguille est trop lâche 2 L aiguille est trop grosse ou trop fine pour le fil 1 Les griffes d entra...

Page 46: ...taub angesammelt 3 Die Spulenkapsel ist beschädigt und dreht sich nicht mehr leicht 1 Die Nadel ist nicht korrekt eingesetzt 2 Die Nadel ist verbogen oder stumpf 3 Die Nadelklemmschraube ist locker 4 Die Spannung des Oberfadens ist zu hoch 5 Sie haben den Stoff nach der Beendigung des Nähens nicht nach hinten gezogen 6 Die Nadel ist zu fein für die verarbeitete Stoffart 7 Sie haben die Stichmuster...

Page 47: ......

Page 48: ...Printed in Thailand 743 801 612 ...

Reviews: