ELNA XPRESSIVE II
57
User’s Guide
imagine a person in the middle of a circle
lying down horizontally and light shining
down on him or her.
2
In the Vertical Angle box, enter an angle
for the vertical light source.
To visualize how the light source works,
imagine a person in the middle of a circle
standing up vertically and light shining
down on him or her.
3
In the Intensity box, enter the intensity
setting based on how intense you want
the light source to be.
Viewing a design by
thread color order
Viewing a design by thread color lets you
view the stitches in your design window one
color at a time, which is important for viewing
a design’s sewing sequence. The View by
Color command follows a design’s thread
color order. For example, if Thread 1 is red,
Thread 2 is blue, and Thread 3 is yellow,
when you select View by Color, all your red
stitches appear first, blue stitches second
and so on.
To view a design by thread color:
1
Click the
tool on the ribbon.
2
From the draw ribbon, click the draw
ribbon mode setting
tool.
You see the Draw Ribbon Setting dialog
appear.
3
In the Stop at area, select one or more
machine commands you want the Play
backward one color button and Play
forward one color button to pause at as
the design sews out. For example, you
can enable the design to pause its
drawing whenever it encounters a Trim. If
you do not select any commands, the
design will pause at all color changes
while drawing.
Aligning and
Measuring Designs
Adding guidelines
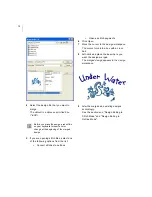
You can use guidelines to help you precisely
align text and segments in your embroidery
designs. Guidelines are straight horizontal or
vertical lines that you drag from the rulers
into your design. These guidelines are easy
to make and they are useful for setting
alignment lines across the length or width of
the design workspace.
To create a horizontal guideline:
1
Position the pointer inside the ruler at the
bottom of the window.
2
Hold down the left mouse button and drag
the guideline into the design window.
3
Release the mouse when the guideline is
in the position you want.
To create a vertical guideline:
1
Position the pointer inside the ruler at the
left side of the window.
2
Hold down the left mouse button and drag
the guideline into the design window.
3
Release the mouse when the guideline is
in the position you want.
Summary of Contents for XPRESSIVE 2
Page 1: ...Xpressive II User sGuide...
Page 10: ...8 Glossary 195 Index 221...
Page 22: ...20...
Page 48: ...46...
Page 62: ...60...
Page 148: ...146...
Page 184: ...182...
Page 190: ...188...
Page 196: ...194...
Page 230: ...228...


