background image

5

Enter the World of Wireless

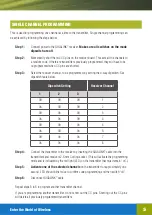
This is used for programming one channel at a time to the transmitter. Single channel programming can 
be achieved by following the steps below:

Step 1:


Connect power to the GIGALINK

 receiver.

 Make sure all switches on the mode 

dipswitch are off

.

Step 2:


Momentarily short the two CC pins on the receiver board. This sets all the channels to 
a random code. If there are transmitters previously programmed, they will have to be 
re-programmed when CC pins are shorted.

Step 3:


Select the receiver channel, to be programmed, by setting the 4-way dipswitch. See 
dipswitch table below.

Dipswitch Setting

Receiver Channel

1

2

3

Off

Off

Off

1

On

Off

Off

2

Off

On

Off

3

On

On

Off

4

Off

Off

On

5

On

Off

On

6

Off

On

On

7

On

On

On

8

Step 4:


Connect the transmitter to the receiver by inserting the GIGALINK

 cable into the 

transmitters and receivers 2.5-mm Coding socket. (This will activate the programming 
mode and is indicated by the red light (LED) on the transmitter that must remain “on”).

Step 5:


Activate one of the selected channels

 on the transmitter for approximately one 

second, LED should blink twice to confirm code programming and then switch “off”.

Step 6:


Disconnect GIGALINK

 cable. 

Repeat steps 3 to 6 to program another transmitter channel.

If you are programming another transmitter, do not short out the CC pins. Shorting out the CC pins 
will delete all previously programmed transmitters.

SINGLE CHANNEL PROGRAMMING

Summary of Contents for Gigalink GLR43308

Page 1: ...www elsema com Setup and programming instructions for the 8 channel Gigalink receiver GLR43308 and GLR2708 Programming Videos...

Page 2: ...emote Controls Please keep this setup instruction for future reference NOTES IMPORTANT WARNING AND SAFETY INSTRUCTIONS ______________________________________________________________ __________________...

Page 3: ...receiver The receiver s micro controller can store unlimited number of transmitters with a high security level using the encrypted 32 bit digital code Included with the receiver is the Gigalink progr...

Page 4: ...pins are shorted Do not do this step if you want to keep previously programmed transmitters Step 3 Connect the multi channel transmitter to the multi channel receiver by inserting the GIGALINK cable i...

Page 5: ...ng Receiver Channel 1 2 3 Off Off Off 1 On Off Off 2 Off On Off 3 On On Off 4 Off Off On 5 On Off On 6 Off On On 7 On On On 8 Step 4 Connect the transmitter to the receiver by inserting the GIGALINK c...

Page 6: ...Step 4 Press the transmitter button for 2 seconds Step 5 Remove the coding cable Step 6 Remove the jumper from the CC pin The receiver is now programmed with the transmitter s code Repeat the above s...

Page 7: ...omentary Relay on only while correct signal is received All Latching Outputs alternate at every correct incoming signal Momentary Latching Outputs 1 4 are momentary 5 8 are latching Security Latching...

Page 8: ...solutions Symptom Solution Receiver not responding to transmitter after programming Try to program the transmitter again but this time with the battery connected to the transmitter Check if GIGALINK...

Reviews: