Chapter 5
Installation
instruction designed to maximize the working life of the product, simplify installation, or
improve the appearance of the installed product.
5.2 Unpacking the Heater and Gathering Supplies
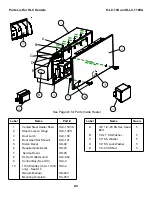
Parts Needed for Installation shipped with Heater:
•
Recirculating Style LC Heater
•
6 fender washers - ½”x2”
•
Template for mounting holes
•
6 feet self stick rubber seal
•
Post -installation checklist
•
(optional) Series 32A laydown propane tank, X-1025 bottle holder, or X-1050
bottle holder
•
(optional) Installation kit for propane fuel system
Additional parts required:
•
(6) ½” diameter grade 5 bolts 1 to 1 ½ inches longer than the thickness of the
front wall of the trailer with 12 flat washers, 6 lock washers and 6 nuts to match
•
Brackets and clips for attaching fuel lines, electrical lines, and thermostat probe to
the trailer walls
•
Suitable propane fuel line and fittings or HLC propane installation kit
•
12” of 4” double walled duct pipe (optional)
5.3 Heater Placement
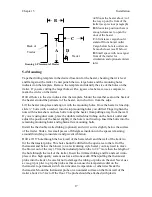
The primary consideration for the placement of the heater is the location of the hot air
outlet and the return air opening. These openings cannot be blocked with freight or other
objects. For good circulation and the most even heat, cargo should not be within 6 feet
straight out from these openings (it may be below them). As a result, the heater should be
mounted high enough to allow this without sacrificing too much cargo space. Mounting
the heater with the hot air outlet ¾ of the way up from the bottom of the trailer (or
slightly less) is a good compromise between lost cargo space and the reduced air
movement thru the trailer that comes from mounting the heater too close to the top of the
trailer. The heater must also be mounted where there is enough clearance to open the door
when the trailer is hooked up. All these considerations are shown in Drawing 1 below.
16

