Chapter 5
Installation
5.6.2 Installation Instructions for Series 32A Laydown Tank with H-LC-S32I
Installation Kit
These instructions are intended for general guidance only. Consult the
current regulations in your area or the latest standards, NFPA 58 for the
United States or CAN/CGA 149.2 for Canada, for exact requirements.
Before you begin mounting any components, it is recommended that you determine the
approximate mounting location of all components to ensure that all parts can be
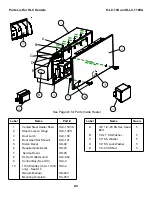
connected with the available lengths of hose and tubing. See the parts list for H-LC-S32I
installation kit for the order that the parts are connected and the length of included parts.
The recommended order of installation is:
1) Install the propane tanks or propane tank carriers.
Install the Series 32 propane tank following the instructions included with
product. Additional copies of the instructions are available from Elston
Manufacturing.
New tanks that are purchased empty come filled with air or an inert gas
that needs to be purged before the tanks are filled for the first time.
Remember to inform the propane supplier if your tank is new.
2) Attach hoses and fittings
Attach all fittings to the regulators, heater, and the tanks.
All joints with tapered pipe thread must be sealed with a joint sealant certified for
this with propane vapor. See the parts list for the H-LC-S32I installation kit for a
list of fittings that connect to the heater, regulators, and the tanks.
3) Mount the Low Pressure Regulators
The low pressure regulators (HLC-623) must be securely attached with the vent
opening facing straight down to the front wall of the trailer toward the curb (left)
side of the trailer at the correct distance for the HLC-908 hose to attach between
the regulator and the heater. The regulator is attached to the mounting bracket
with four #8/32 thread cutting screws, #8 lock washers, and #8 washers. The
mounting bracket should be attached with the included #12 sheet metal screws.
4) Mount the High Pressure Regulators
The high pressure regulator (HLC-629) and enclosure (HLC-909) should be
mounted near the propane tank with as much ground clearance as practical. The
enclosure must be bolted to a trailer support with the vent slots toward the bottom.
The regulator is attached to the enclosure with two #8/32 thread cutting screws,
#8 lock washer, and #8 washer.
5) Attach the hoses as necessary to the regulators.
6) Install the copper propane line
The copper line should be run as directly as possible between components while
maintaining adequate clearance from the exhaust system and areas with a high
risk of impact damages such as above the tires. Once the route for the copper
tubing is determined, any necessary holes in the frame or floor supports can be
drilled and installed with grommets and the tubing can be pulled into place,
trimmed to length, deburred, fitted with the correct nut, flared, and attached.
The 3/8” copper line must
21

