background image

9

10

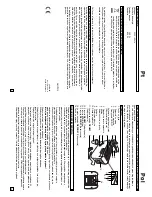
Pour the water from the measuring cup into the water bowl. 

A

void spilling water!

Close the cover

(8)
.

Connect the power plug to a suitable outlet, and then press the 

ON/OFF

button of the boiler 

(4)
.

The integrated control lamp illuminates.

The boilerplate of the heating unit begins heating the water in the water bowl.

Attention:

During and after use, certain parts of the device become very hot! Pay special attention

to boiling water and rising steam! Do not lift up the cover during use, as all the steam will escape.

Hot steam can cause high degree burns!

Risk of burning!

The device should not be moved around during use.

The water boils, and the steam escapes via the steam vent 

(9)
.

Once the water in the water bowl has entirely evaporated, the eggs are boiled, and signal is

audible. 

T

urn of

f the device by pressing the 

ON/OFF

button of the egg boiler

The control lamp

switches of

f. Carefully remove the cover

, making sure only to touch the handle. Lift the egg tray

out of the device. Briefly quench the eggs with running, cold water

The eggs are now ready to

serve. Remove the eggs from the egg tray with a cloth to prevent burns, and put them in the egg

cups.

CARE AND 

MAINTENANCE

Please also note the 

Safety advice

.

First allow the device to cool-down entirely

.

Caution!

The electric parts of the device should not be exposed to water!

T

OASTER

Remove the crumb compartment

(16)

from the bottom of the device.

C

lean the case with a soft, wet cloth, using a mild detergent or soap.

Never use corrosive or scouring detergents.

E

GG

BOILER

Clean the egg tray

, using water and dishwashing detergent.

T

o clean the case and water bowl, use water and a wet, soft cloth. Carefully dray the parts after

cleaning.

Never use corrosive or scouring detergents or utensils.

Decalcifying the water bowl:

Eggshells contain large amounts of lime. 

This lime will deposit in

the water bowl unless it is regularly decalcified. 

The first signs that the device needs to be

decalcified can be that the device turns itself of

f before the water boils. W

e

 recommend you

decalcify the device every 3-4 months. 

A

normal decalcifier can be used to do this. Follow the

instructions of the decalcifier manufacturer

. Dry the water bowl using a soft cloth.

The power cable can be rolled up on the cable coil in the bottom of the device.

W

e recommend you store the device in its carton after cleaning.

TECHNICAL

DA
T

A

Operational voltage

:

230V~ 50Hz

Power consumption

Egg boiler

:

300 W

T

oaster

:

800 W

INSTRUCTIONS ON ENVIRONMENT PROTECTION 

Do not dispose of this product in the usual household garbage at the end of its life cycle;

hand it over at a collection point for the recycling of electrical and electronic appliances.

The symbol on the product, the instructions for use or the packing will inform about the

methods for disposal. 

The materials are recyclable as mentioned in its marking. By recycling, material recycling or other

forms of re-utilization of old appliances, you are making an important contribution to protect our

environment. 

Please inquire at the community administration for the authorized disposal location.

GUARANTEE AND 

CUST

OMER 

SER

VICE

Before delivery our devices are subjected to rigorous quality control. If, despite all care, damage has

occurred during production or transportation, please return the device to your dealer

. In addition to

statutory legal rights, the purchaser has an option to claim under the terms of the following

guarantee:

For the purchased device we provide 2 years guarantee, commencing from the day of sale. During

this period we will remedy all defects free of charge, which can be demonstrably attributed to

material or manufacturing defects, by repair or exchange.

Defects which arise due to improper handling of the device and malfunctions due to interventions

and repairs by third parties or the fitting of non-original parts, are not covered by this guarantee.

061

1/T210

elta GmbH

Carl-Zeiss-Str

. 8

63322 Rödermark

GB

GB

GB

GB

Summary of Contents for T210

Page 1: ...GG COOKER 2 EN 1 GRILLE PAIN ET CUIT OEUFS 2 AZ 1 BEN REGGELI PIRÍTÓS KÉSZÍTŐ ÉS TOJÁSFŐZŐ CUOCIUOVA E TOSTAPANE 2 IN 1 TOSTADORA Y PREPARADOR DE HUEVOS 2 EN 1 2 EM 1 TORRADEIRA E COZEDOR DE OVOS 2 W 1 TOSTER I URZĄDZENIE DO GOTOWANIA JAJ 2 IN 1 ONTBIJTTOASTER EN EIERKOKER 2 2 S S Ý Ý 1 1 A A R R A A D D A A K K A A H H V V A A L L T T I I T T O O S S T T M M A A K K Ý Ý N N E E S S Ý Ý V V E E Y ...

Page 2: ...gskabel benutzt muss dieses für die entsprechende Leistung geeignet sein ansonsten kann es zu Überhitzung von Kabel und oder Stecker kommen Dieses Gerät ist weder für den gewerblichen Gebrauch noch für den Gebrauch im Freien geeignet Während des Gebrauchs das Gerät nie unbeaufsichtigt lassen Kinder können die Gefahren die im unsachgemäßen Umgang mit Elektrogeräten liegen nicht erkennen Deshalb ele...

Page 3: ...einlegen Jeder Brotschlitz ist für maximal eine Brotscheibe pro Röstvorgang ausgelegt Netzstecker 7 mit einer geeigneten Steckdose verbinden Mit dem Bräunungsregler 5 die gewünschte Bräunungsstufe auswählen 1 hellste Bräunung 7 dunkelste Bräunung Bei der ersten Benutzung wird eine niedrige Stufe empfohlen Einschalthebel 10 bis ganz nach unten drücken bis dieser automatisch einrastet Die im Bräunun...

Page 4: ... 3 Bread slots 4 ON OFF Switch Egg boiler 5 Browning adjuster 6 Measuring cup 7 Power cable and plug 8 Cover 9 Steam vent 10 Start lever 11 REHEAT control lamp 12 REHEAT Button 13 STOP Button 14 DEFROST Button 15 DEFROST control lamp 16 Crumb compartment SAFETY INFORMATION Incorrect operation and improper use can damage the appliance and cause injury to the user The appliance may be used only for ...

Page 5: ...signal is audible Then clean the device as specified in Care and Maintenance OPERATION T OASTER Place bread slices in the bread slots 3 Each slot should only contain one slice of bread per toasting run Connect the power plug 7 with a suitable outlet Using the browning adjuster 5 select the desired degree of browning 1 lightest browning 7 darkest browning During first use we recommend a low level P...

Page 6: ...s it is regularly decalcified The first signs that the device needs to be decalcified can be that the device turns itself off before the water boils We recommend you decalcify the device every 3 4 months A normal decalcifier can be used to do this Follow the instructions of the decalcifier manufacturer Dry the water bowl using a soft cloth The power cable can be rolled up on the cable coil in the ...

Page 7: ... d utilisation de rallonge s assurer s assurer que la puissance maximale du câble est bien adaptée à la consommation de l appareil pour éviter un échauffement anormal de la rallonge et ou de la prise Cet appareil n est pas destiné à une utilisation commerciale ni à une utilisation de plein air Ne jamais laisser l appareil en marche sans surveillance Les enfants peuvent ignorer les dangers encourus...

Page 8: ...ans les emplacements à pain 3 Chaque fente ne doit contenir qu une seules tranche de pain par utilisation Branchez le cordon d alimentation 7 sur une prise de courant adéquate Utilisez l ajusteur de cuisson 5 sélectionnez le niveau de cuisson désiré 1 cuisson la plus légère 7 cuisson la plus fortre Lors de la première utilisation nous recommandons une cuisson légère Appuyez sur le bouton de démarr...

Page 9: ...i tájékoztatóra Ha harmadik félnek adja át a készüléket a Használati Útmutatót is adja át FELÉPÍTÉS 1 Tojástartó 2 Víztartó edény 3 Kenyérpirító nyílások 4 ON OFF KI BE tojásfőző kapcsológomb 5 Pirításbeállító 6 Mérőpohár 7 Elektromos vezeték csatlakozóval 8 Fedő 9 Gőznyílás 10 Indítókar 11 REHEAT újramelegítés ellenőrzőfény 12 REHEAT újramelegítés gomb 13 STOP leállítógomb 14 DEFROST kiolvasztás ...

Page 10: ...ély A készülék egyes részei használat közben nagyon felforrósodnak Csak a kezelőszerveket és gombokat érintse meg MIELŐTT ELŐSZÖR HASZNÁLNÁ Távolítsa el a készülék minden csomagolóanyagát Működtesse a pirítót 4 5 alkalommal kenyér nélkül így megszabadul minden gyártási maradékanyagtól Eközben biztosítsa a helyiség megfelelő szellőzését pl nyusson ablakot Töltse félig a tojásfőzőt vízzel és tegye b...

Page 11: ...nagy mennyiségben tartalmaz meszet A mész tönkreteheti a víztartó edényt ha az nincs rendszeresen vízkőtlenítve Ha a készülék a víz felforrása előtt kikapcsol az az első jele lehet hogy vízkőtlenítésre van szükség Ajánlott a készüléket 3 4 havonta vízkőtleníteni Ehhez normál vízkőoldót használhatunk Kövesse a vízkőoldó gyártójának utasításait Szárítsa ki a víztartó edényt puha rongyal Az áramellát...

Page 12: ...e non ci sia pericolo che il cavo o la prolunga possano inavvertitamente essere tirati da qualcuno o possano far inciampare qualcuno durante l uso Se si adopera una prolunga accertarsi che sia adatta alla potenza elettrica dell apparecchio in caso contrario potrebbe verificarsi surriscaldamento della prolunga stessa e o della presa Il presente apparecchio non è adatto ad uso commerciale o per uso ...

Page 13: ...ervare il dispositivo nella sua confezione dopo il confezionamento UTILIZZO T OSTAPANE Mettere le fette di pane nel tostapane Ogni apertura può contenere solo una fetta Connettere la spina 7 ad una presa adatta Regolare il controllo della potenza 5 scegliere il desiderato livello di brunitura 1 il più leggero 7 più forte Durante il primo uso è consigliata una bassa temperatura Spostare la leva sta...

Page 14: ...on él ELEMENTOS 1 Bandeja para huevos 2 Bol de agua 3 Ranuras para el pan 4 Interruptor ON OFF encender apagar del Hervidor de Huevos 5 Ajustador de dorado 6 Taza de medida 7 Cable de alimentación con enchufe 8 Tapa 9 Salida de vapor 10 Palanca para empezar 11 Luz de control REHEAT recalentar 12 Botón REHEAT recalentar 13 Botón STOP parar 14 Botón DEFROST descongelar 15 Luz de control DEFROST desc...

Page 15: ...nes ANTES DEL PRIMER USO Quite todo el embalaje del aparato Active la tostadora al nivel máximo 4 o 5 veces sin pan para eliminar cualquier residuo de fabricación Asegúrese de que la habitación esté correctamente ventilada por ejemplo abriendo una ventana durante esta operación Llene el hervidor de huevos más o menos hasta la mitad con agua y coloque la bandeja para huevos Hierva entonces el agua ...

Page 16: ...que es necesario descalcificar es que el aparato se apaga solo antes de que hierva el agua Le recomendamos descalcificar el aparato cada 3 4 meses Se puede usar un descalcificador normal para hacerlo Siga las instrucciones del fabricante del descalcificador Seque el bol de agua con un paño suave El cable de alimentación se pede enrollar en la bobina de la parte inferior del aparato Le recomendamos...

Page 17: ...erem puxados ou de alguém tropeçar neles durante a utilização Se for utilizado um cabo de extensão terá de ser apropriado para o consumo de energia do aparelho caso contrário pode ocorrer um sobreaquecimento do cabo de extensão e ou da ficha Este aparelho não é adequado para uso comercial nem para utilização ao ar livre Nunca deixar o aparelho sem vigilância quando em uso As crianças não reconhece...

Page 18: ... aparelho na caixa após a limpeza FUNCIONAMENTO T ORRADEIRA Coloque fatias de pão nas fendas 3 Cada fenda comporta apenas uma fatia de pão por vez Conecte o fio 7 a uma tomada adequada Usando o ajuste do dourador 5 escolha o nível desejado de torração 1 pouco torrado 7 muito torrado Durante o primeiro uso recomendamos um nível mais baixo Desça a alavanca 10 o máximo até que trave no lugar A luz de...

Page 19: ...tku Przekazując urządzenie osobie trzeciej należy dołączyć do niego instrukcję obsługi BUDOWA 1 Tacka na jajka 2 Pojemnik na wodę 3 Otwory na pieczywo 4 Przełącznik ON OFF Automatu do gotowania jajek Włączenie wyłączenie 5 Regulacja procesu opiekania 6 Miarka 7 Kabel zasilania z wtyczką 8 Pokrywa 9 Otwory wentylacyjne 10 Dźwignia opiekania 11 Lampka kontrolna REHEAT Podgrzewanie 12 Przycisk REHEAT...

Page 20: ...zycisków PRZED PIERWSZYM UŻYCIEM Usuń wszystkie elementy pakujące Aby uniknąć powstawania przykrego zapachu uruchom toster bez pieczywa 4 5 razy na najwyższym poziomie Podczas tego procesu zapewnij odpowiednią wentylację pomieszczenia np otwórz okno Do połowy napełnij wodą automat do gotowania jajek następnie umieść jajka na tacce Zagotuj wodę aż urządzenie wyda dźwięk Wyczyść urządzenie jak zosta...

Page 21: ...orupki na jajka zawierają dużą ilość wapna Wapno to stopniowo będzie się osadzać na pojemniku na wodę odkamieniaj pojemnik regularnie Pierwszym sygnałem oznaczającym że urządzenie trzeba odkamieniać jest fakt iż wyłącza się ono automatycznie przed zakończeniem procesu gotowania Zaleca się odkamienianie raz na 3 4 miesiące Do tego celu użyj zwykłego odkamieniacza Postępuj zgodnie z instrukcją użyci...

Page 22: ...l gebruikt wordt moet deze voor het overeenkomstig vermogen geschikt zijn Anders kan het tot een oververhitting van de kabel en of stekker komen Dit apparaat is noch voor commercieel gebruik noch voor gebruik in openlucht geschikt Laat het apparaat tijdens het gebruik nooit onbewaakt achter Kinderen kunnen de gevaren die in de verkeerde omgang met elektro toestellen schuilen niet herkennen Laat el...

Page 23: ...ort Maak het apparaat schoon zoals aangegeven in Onderhoudsinstructies BEDIENING T OASTER Plaats de sneden brood in de broodsleuven 3 Elke sleuf mag per keer slechts één snede brood bevatten Sluit het netsnoer 7 aan op een geschikt stopcontact Met de roosterinstelling 5 stelt u de juiste bruiningsgraad in 1 lichtste 7 donkerste Bij het eerste gebruik adviseren we een lage bruiningsgraad Druk de st...

Page 24: ...u 3 Ekmek giriþ yeri 4 Yumurta piþirme cihazýnýn Aç Kapat tuþu 5 Kýzartma seviyesi ayarý 6 Ölçüm kaþýðý 7 Elektrik kablosu ve fiþi 8 Kapak 9 Buhar çýkýþ yeri 10 Çalýþtýrma kolu 11 Kontrol lambasý R R E E H H E E A A T T 12 R R E E H H A A E E T T tuþu 13 Stop tuþu 14 D D E E F F R R O O S S T T tuþu 15 D D E E F F R R O O S S T T kontrol lambasý 16 Kýrýntý kabý UVENLIK BILGISI Yanlýþ veya hatalý k...

Page 25: ...hazý temizlik ve bakým bölümünde anlatýldýðý gibi temizleyiniz K K U U L L L L A A N N I I M M T T O O S S T T M M A A K K I I N N E E S S I I Ekmekleri ekmek kýzartma yuvasýna 3 3 yerleþtiriniz Her yuvaya en çok bir tane ekmek dilimi yerleþtiriniz Elektrik kablosunu 7 7 uygu bir prize baðlayýnýz Kýzartma ayarý ile 5 5 arzulanan kýzarma seviyesini seçiniz 1 en açýk kýzartma 7 en koyu kýzartma Ýlk ...

Page 26: ...yýnýz Kesinlikle keskin veya agresif temizlik ilacý kullanmayýnýz S S u u h h a a v v u u z z u u n n u u k k i i r r e e ç ç t t e e n n a a r r ý ý n n d d ý ý r r m m a a Yumurta kabuklarý kireçten oluþur Bu kireç temizlenmediði sürece cihazýn içini kaplar Ýlk belirtiler su kaynamadan cihazýn kapanmasýdýr Cihazý ortalama her 3 4 ayda bir kireçten arýndýrýnýz Bunun için piyasada satýlan kireç çö...

Reviews: