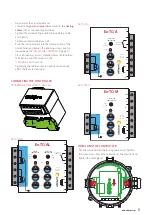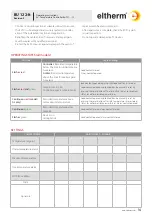
CONTROLLER
TEMPERATURE
LOW
ALARM
LED
x1
x10
x100
5
2
1
LIMITER
TEMPERATURE
HIGH
ALARM/
RESET
12
www.eltherm.com
12
Operating instructions
Ex – Temperature Controller Ex-TC/…-It
BU 122-It
Revision 2
ALARM & SETPOINT SETTINGS
ATTENTION
Theoretical setting range 999°C.
Max. permitted setting range < 450°C!
Controller reset
button
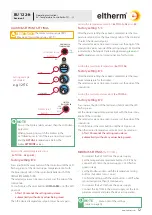
Setting example
(all models)
Ones
Tens
Hundreds
e.g. 125°C
Limiter reset
button
First set the limiters (alarm values), then the controllers
(setpoints).
When powering on, switch the limiters in the
Ex-TC/
AL
devices to “on” if there are no errors present
and the
ACTUAL
temperature is below the
limiter
SETPOINT
values.
NOTE
i
Factory setting: 5°C
After the alarm settings have been completed, set the tem-
perature setpoint. Use the blue rotary knobs of the controller
to select the desired setpoint.
The selected value can be seen in a recess at the edge of the
rotary knob. Values outside of the setting range (> 450) will be
indicated by a flashing LED alternating between
green
and
red
. Temperature control remains inactive for this time.
Factory setting:
0
°C
After the alarm settings have been completed, set the maxi-
mum temperature for the limiter.
The selected value can be seen in a recess at the edge of the
rotary knob.
Factory setting:
0
°C
Press the
reset button of the limiter and hold it until the LED
flashes
green
.
Set the desired upper temperature limit with the blue rotary
knobs of the controller
The selected value can be seen in a recess at the edge of the
rotary knob.
To confirm press the reset button until the LED goes out.
Then the desired temperature setpoint must be set again.
•
After 100 seconds the setting menu closes
automatically without any values being saved.
Setting the temperature setpoint (
Ex-TC/It-A, -AL
and
-M
)
Setting the maximum temperature (
Ex-TC/It-AL
)
Setting the overtemperature alarm (
Ex-TC/It-AL
)
Factory setting:
0
°C
Press and hold the reset button of the controller until the LED
flashes green. Set the desired upper temperature limit with
the blue rotary knobs of the controller (labelled with CON-
TROLLER TEMPERATURE).
The selected value can be seen in a recess at the edge of the
rotary knob.
To confirm press the reset button (
LOW ALARM
) until the LED
goes out.
•
After 100 seconds the setting menu closes
automatically without any values being saved.
Then the desired temperature setpoint must be set again.
Setting the undertemperature alarm
(
Ex-TC/It-A
,
-AL and -M
)
•
Disconnect the Ex-TC/M from the power supply
•
Set the temperature adjustment buttons to 9 9 9 and
connect Ex-TC/M to the power supply -> LED flashes
green
quickly
•
Set the Modbus address with the temperature setting
buttons (hundreds / tens / ones)
•
Confirm the setting with the reset button -> LED flashes
more slowly and is then lit continuously.
•
Disconnect the Ex-TC/M from the power supply
•
Connect the Ex-TC/M to the power supply, set the tem-
perature setpoint and place the device in operation.
MODBUS SETTINGS
(Ex-TC/It-M)
Make note of the settings
made on page 14.
NOTE
i

