background image

Slide the long Velvet Cover onto the border of the frame with the same 

length. Lift the corresponding border a tiny bit (1/4”) off the ground and 

slide the Velvet Cover onto the border with its long side facing up as 

shown below.

19

ASSEMBLY

Make sure the Aluminum Velvet Cover you are trying to put on 

has the same number as the Inner Frame.

6b)

After all the Velvet Covers have been mounted, tighten the Set Screws on 

the ends of each Velvet Covers, as shown below. The Set Screws should be 

already on the Velvet Covers. Make sure there are no gaps in between the 

Velvet Cover pieces before tightening the Set Screws. 

6c)

20

ASSEMBLY

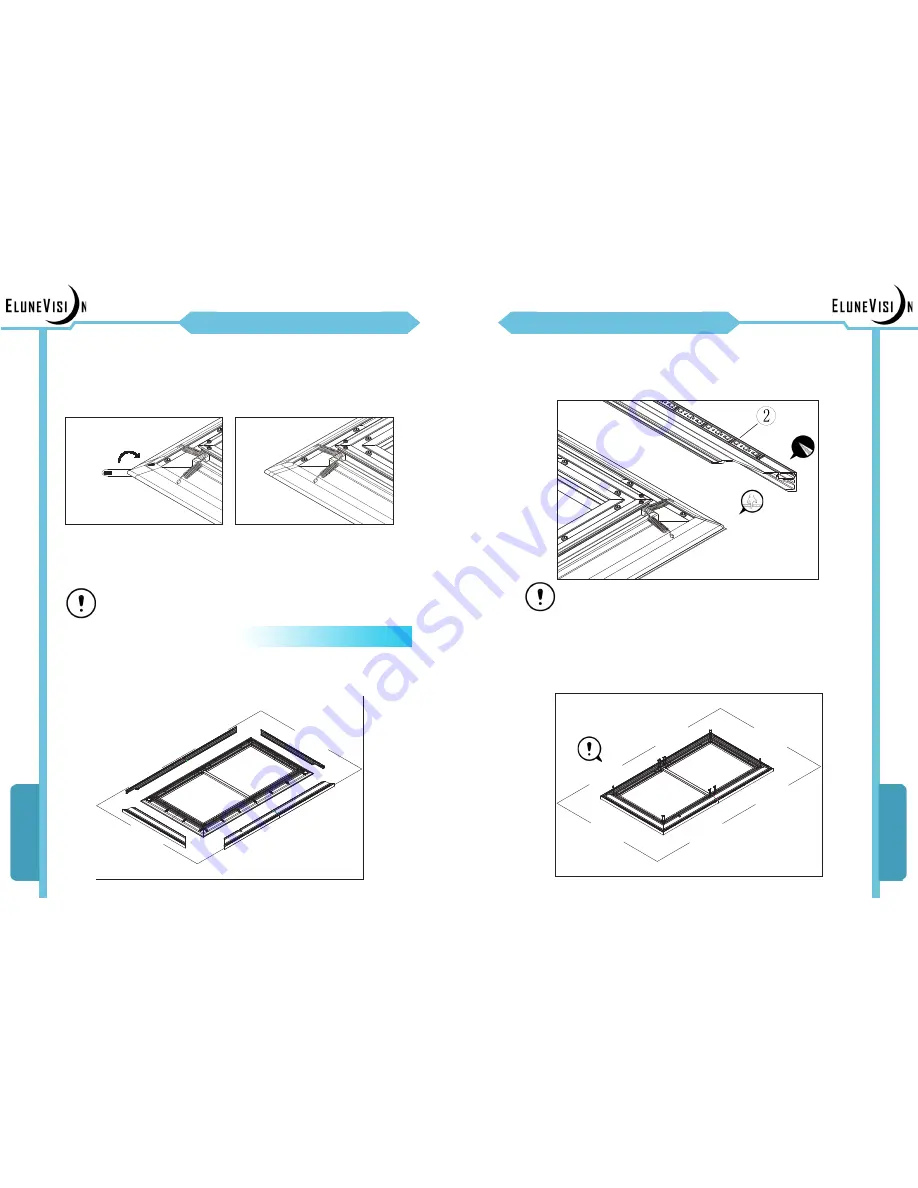
Velvet Cover

Once the screen fabric is in an acceptable condition, the aluminum velvet 

covers can be assembled. Lay the Velvet Covers around your screen 

matching their numbers with the aluminum frame numbers.

6a)

Do not proceed until the screen fabric is in acceptable condition 

as described above.

At each of the corners of the screen material there will be a flap of material 

with velcro attached facing upwards. Cut off the excess velcro so that 1/4” 

of the velcro is left between the frame and the material at the corner as 

indicated by the arrow below on the left. Flip the flap of material over and 

stick the velcro towards the frame as shown below on the right.

5i)

Repeat the above step for all four corners and check if all four corners 

are free of wrinkles. If the wrinkles still exist, repeat the above steps by 

pulling on the corner of the fabric a little more.

Summary of Contents for Elara NanoEdge

Page 1: ...User Guide Elara NanoEdge Fixed Frame Screen ...

Page 2: ... Brackets 21 Hanging Your Screen 22 Maintenance Guide General Notes 23 Cleaning Guide 24 Troubleshooting 25 The EluneVision Elara NanoEdge features include Modern thin frame design with black velvet border Spring mount design which ensures an even distribution of tension across fabric to avoid wrinkles on the screen surface High strength aluminum frames for long term durability The 1 2 gain Cinema...

Page 3: ...optional and available for purchase An LED lighting kit for the Elara NanoEdge is optional and available for purchase Please make sure you have sufficient space for your screen on the wall or preferred location Refer to the table below for screen sizes Screen Size Aspect Ratio Assembled Height Assembled Width Assembled Depth 92 16 9 81 46 2 106 16 9 93 53 2 120 16 9 106 60 2 135 16 9 119 67 2 GETT...

Page 4: ...ur own tools for this task to be com pleted Incorrect tools may cause damage to the hardware Special attention needed Please refer to the description whenever this icon present Detailed instructions are in the description which are not present in the diagram Assembling the screen requires two people we recommend you and your partner work together to assemble the screen Seek assistance when handlin...

Page 5: ...nsert the Joint Brackets into the other horizontal frame and join the two horizontal frame pieces together Push the two frames together make sure there is no gap and then tighten the Set Screws 2a Insert the Corner Brackets into both sides of the vertical frame and the horizontal frame Align the corner pieces and push the two frame pieces together Make sure there is no gap bigger than 1mm then tig...

Page 6: ...straight before proceeding Do not proceed until all the screws are tightened There should be no gap on the horizontal frames and less than 1mm gap on the four corners 10 ASSEMBLY Optional On select large sized screens only you will be provided with a middle Support Bar Insert both ends of the support bar into the middle of the horizontal frames until snug 2e If it is difficult to put the Support B...

Page 7: ...ting the back of the fabric Wear protective gloves to prevent scratches or other damage to fabric Make sure the ground is free of sharp objects and do not put any tools or other objects onto the fabric 3b 12 ASSEMBLY 4a 4b Gather the plastic rods and sort according to length The plastic rods will be inserted into the sleeves on the outermost part of the fabric The rods have red rubber caps on each...

Page 8: ...es of the fabric with plastic rods onto the edges of the aluminum frame as illustrated below 5b ASSEMBLY 14 The fabric and the frame will be joined with springs First the corners will be secured then the sides will be secured starting from the corners and moving towards the middle The shorter sides should be secured first for optimal tension The priority that the springs should be secured is below...

Page 9: ... damage to the screen as well as the flooring Do not slide or drag the screen across the floor 5f ASSEMBLY 16 Have one person hold the screen upright by the aluminum frame on the back and not by the fabric Carefully inspect the front of the screen fabric The fabric must wrap around the Aluminum Frame so that the sleeve of the fabric will not be shown over the 1 2 outer frame 5g To eliminate the wr...

Page 10: ...d the desired effect Check your corners before proceeding If there are any wrinkles on the corners you need to tension the fabric more so that the corners will be flat 5h Repeat step 5g Remove the springs around the corners and move the ma terial towards the corner as shown below Remount the springs and pull on the fabric manually as described above to get rid of wrinkles in the corner of the fabr...

Page 11: ...the screen fabric is in an acceptable condition the aluminum velvet covers can be assembled Lay the Velvet Covers around your screen matching their numbers with the aluminum frame numbers 6a Do not proceed until the screen fabric is in acceptable condition as described above At each of the corners of the screen material there will be a flap of material with velcro attached facing upwards Cut off t...

Page 12: ...n of the 4 edges need to be determined For screen specs please refer to General Dimensions page 4 7 Draw a center line for your screen in the desired location Mount the Hanging Bracket centered to your screen and 4 1 2 116 mm from the top of the screen Please make sure the wall you are mounting your screen to is able to support the weight of the screen We recommend using your own hardware for the ...

Page 13: ...erneath the screen when it is being mounted or hanging 8 Keep any spare parts and this instruction manual where they can ac cessed if needed Keep out of reach of small children 9 Make sure the mounting hardware is strong enough to support the weight of the screen and is suitable for the wall it is being installed on 10 When working with the LED strips ensure they are not plugged in to avoid electr...

Page 14: ...appear Check the tension of the screen material and smooth out the material evenly along the side of the Plastic Rod holding the screen Go through step 5g and make sure there is sufficient tension on the screen If done properly you should have very few to no wrinkles on the screen Consider leaving your screen in a warm environment for up to few weeks which will allow the fabric to relax and flatte...

Page 15: ......

Reviews: