background image

35

© 2022, Elon Group AB. All rights reserved.

To determine the ventilation level, slide the level 
indicator button (   

  ) on the hood 

control panel to the right / left with your finger (Fig. 37).

To activate the power-assisted ventilation feature, press 
the powerassisted ventilation button (   ) on the hood 
control panel (Fig. 38).
After 9 minutes, the ventilation level automatically 
becomes 9.

If you want to activate the standby mode without 
waiting for 30 seconds,
press the hood activation button (   ) on the hood 
control area for 2 seconds (Fig. 39).

To switch your appliance to automatic ventilation mode, 

first press the hood activation area, then the automatic 

ventilation button (   ).

Your appliance automatically adjusts the ventilation 

level according to the active cooking areas and cooking 

levels.

If you switch your appliance to automatic mode, the 

hood ventilation works as long as the cooking areas 

are working.

When all active cooking areas are closed, the hood 

ventilation level is gradually lowered to stand-by within 

5 minutes to remove residual steam and odours. 

During this process, the timer symbol lights up actively. 

(Fig. 41).

When the automatic mode and cooking areas 

are active on your appliance, press the automatic 

ventilation (  ) button to exit the automatic mode.

Fig. 37

Fig. 38

Fig. 39

Fig. 41

Fig. 40

Power-assisted ventilation feature is valid for 
9 minutes.

Automatic ventilation

Summary of Contents for CHF5708S

Page 1: ...User manual Kitchen fan Bruksanvisning Köksfläkt CHF5708S ...

Page 2: ...v vår produkt Denna bruksanvisning medföljer för att hjälpa dig att använda produkten Med hjälp av instruktionerna kan du lära dig om din nya produkt så snabbt som möjligt Kontrollera att produkten du har tagit emot är oskadad Om du upptäcker en transportskada var vänlig kontakta återförsäljaren som du köpte produkten av eller den lokala butiken som levererade den Publication date 2022 06 29 This ...

Page 3: ...3 2022 Elon Group AB All rights reserved WARRANTY Guarantee of quality for the consumer does not include wear parts GARANTI Kvalitetsgaranti gäller för konsument omfattar ej förbrukningsdelar ...

Page 4: ...4 2022 Elon Group AB All rights reserved CONTENTS INNEHÅLL ENGLISH 5 SVENSKA 49 ...

Page 5: ...OVE HOOD USAGE TYPE 16 ACTIVE CARBON FILTER REPLACEMENT 18 CLEANING AND PREVENTIVE MAINTENANCE 20 CLEANING OF THE METAL OIL FILTER AND WATER TANK 20 INDUCTION COOKING SYSTEM WORKING PRINCIPLES 22 COOKWARE 23 PACKING 25 INSTALLATION AND ASSEMBLY 26 ASSEMBLY 28 CONNECTION SCHEME 33 USE OF PRODUCT 34 POWER LEVELS 45 PROCESS PLATE 46 ACCESSORIES AND SPARE PARTS 47 AUTHORIZED SERVICE 48 ...

Page 6: ...this user manual for future reference at any time Make sure that this user manual is not separated from the product during the sale lending or transfer of the product Read the instructions carefully It contains very important information regarding installation usage and safety Do not perform electrical repairs on the product Check whether all the components are usable before installing the applian...

Page 7: ...upervision The appliance can be used by children under 8 years of age persons with limited physical mental and emotional abilities and persons with incomplete experience or knowledge only if they are under the supervision of a responsible person or have been informed about the safe use of the appliance and the dangers that may occur Cleaning and maintenance should not be done by children without s...

Page 8: ...cloth or other flammable materials before all components of the stove are sufficiently cooled Overheated greases and oils can easily catch fire When cooking food rich in oil keep it under supervision Do not place metal items such as knives forks spoons and lids on the stove as there is a possibility of overheating Do not use a steam cleaner Surface damage discolouration and stains due to unsuitabl...

Page 9: ...ntrol and do not rely on the pan sensor To prevent liquids from overflowing reduce heat input when boiling or heating liquids When your appliance is in operation and there is a water overflow or a wet cloth is placed your appliance shuts down to protect itself To restart your appliance you must unplug the power cord and plug it in again Do not leave an empty pot or pan on the heater components or ...

Page 10: ...tically reduces the power level of the cooking areas Before any cleaning or maintenance disconnect the product from the mains by unplugging or by turning off the cabinet s main switch Wear work gloves for all installation and maintenance operations The inside and outside of the appliance should be cleaned frequently AT LEAST ONCE A MONTH Also follow what is clearly stated in the maintenance instru...

Page 11: ... levels 1 9 P Front cooking area cooking pot size 190mm Front cooking area power value 2000 W 2800 W Rear cooking area cooking pot size 190mm Rear cooking area power value 1500 W 2000 W Stove power efficiency_EN 60350 2 1st cooking area power consumption 172 25 Wh kg 2nd cooking area power consumption 175 79 Wh kg 3rd cooking area power consumption 174 01 Wh kg 4th cooking area power consumption 1...

Page 12: ...12 2022 Elon Group AB All rights reserved Fig 1 Flow in Pro PRODUCT PERSPECTIVES 520 140 5 R 5 319 126 195 482 145 512 152 58 210 780 740 480 363 20 210 453 520 0 6 ...

Page 13: ...p AB All rights reserved Fig 2 1 Decorative Lid 2 Oil Filter 3 Carbon Filter 4 Carbon Filter Housing 5 Oil filter Bed 6 Control Panel 7 Water Tank 8 Elbow 9 Fladkanal 10 Flexi pipe PRODUCT OVERVIEW 1 2 3 5 6 7 8 9 10 4 ...

Page 14: ...consists of electronic sensor keys finger contact part and display panels Fig 3 Control panel located on the product 1 Stove Hood Panel 2 Timer Panel 3 Stove Panel Fig 4 Control panel detail Do not place wet towel or extremely hot pot on the Worktop control panel CONTROL PANEL 2 3 6 7 8 9 12 11 13 14 10 ...

Page 15: ... button 3 Hood level indicator button 4 Power assisted ventilation button 5 Timer button STOVE 6 3 level temperature button 7 Enabling stove zone reset button 8 Stove cooking level indicator button 9 Power assisted cooking button 10 Bridge button 11 Timer button 12 Pause Resume selection button 13 Power On Off button 14 Child Lock button ...

Page 16: ...cator Standby mode Pause mode Metal oil filter warning Active carbon filter warning Time display Error display Depending on the model you purchased the stove hood is in exhaust air mode or recirculating air mode Exhaust Air Mode The absorbed air is cleaned by the grease filters and is discharged through a piping system NOTICE Exhaust air or an active smoke must be transferred to a waste gas flue o...

Page 17: ...filter and then it is transferred back to the kitchen You need to install an active carbon filter in order to catch the substances which cause stink in the circulating air Consult your authorized dealer to know the different opportunities available for enabling the appliance to function in circulating air mode You can buy the accessories required for this process from the relevant outlets authoriz...

Page 18: ...ed carbon filter firstly remove the decorative grill Fig 5 Remove the grease filter Fig 6 Pull out the carbon filter set as shown in the figure Fig 7 Fig 5 1 Decorative Grill 1 Grease Filter 1 Carbon Filter Set Fig 6 Fig 7 2 3 1 ACTIVE CARBON FILTER REPLACEMENT 1 1 ...

Page 19: ...n filter housing is not disposable Fig 8 When the carbon filter expires replace it with a new one Do not wash in the dishwasher or by hand Pay attention to the direction of air flow when placing the carbon filter in its housing Fig 8 NOTICE Carbon and Helsa filters shouldn t be used without assemblying Carbon Filter Housing at the Fig 8 1 Insert the carbon filter as shown in the figure Fig 9 Fig 8...

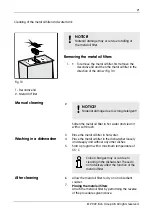
Page 20: ...d metal oil filters catch the grease particles from the moist and steam in the kitchen Clean the metal grease filters about every three months under normal use conditions 1 2 hours a day Do not use excessively effective acidic or alkaline cleaning agents You can clean the metal grease filters in the dishwasher or by hand Do not apply spray cleaning supplies directly to the product Do not keep flam...

Page 21: ...ishes Start a program with a maximum temperature of 55 C Allow the metal oil filter to dry on an absorbent coaster Placing the metal oil filters Attach the metal oil filter by performing the reverse of the procedures given above Fig 10 1 Decorative lid 2 Metal Oil Filter Removing the metal oil filters Manual cleaning Washing in a dishwasher After cleaning NOTICE Material damage may occur due to fa...

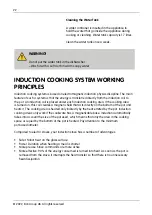
Page 22: ...e area in the cooking space occupied by the bottom of the pot is heated Pay attention to the minimum pot base diameter Compared to electric stoves your induction stove has a number of advantages Safer Minor heat on the glass surface Faster Duration when heating a meal is shorter More precise Stove commands are more active More effective 90 of the energy consumed is turned into heat As soon as the ...

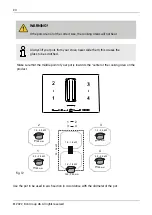
Page 23: ...with enamel base Pots with a rough bottom to prevent scratching the surface Containers Used Magnetic power is used to generate heat in induction stove Therefore the containers must contain iron With a simple magnet you can check if the pot is made of magnetic material Pots are not suitable unless they are magnetically detectable Recommended pot bottom diameters Never place hot pots or pans on the ...

Page 24: ...h section in accordance with the diameter of the pot Always lift your pots from your stove never slide them this causes the glass to be scratched Fig 12 WARNING If the pots are not of the correct size the cooking areas will not heat 1 2 3 4 190 mm 190 mm 1 5 2 0 kW 1 5 2 0 kW 190 mm 190 mm 2 0 2 8 kW 2 0 2 8 kW 190 385 mm 1 5 1 8 kW 1 5 1 8 kW W k 6 3 0 3 2 1 3 4 2 1 3 4 ...

Page 25: ...ses or disappears Sounds such as crackling and whistling may occur If the stove is used heavily the cooling fan can run automatically The cooling fan continues to run for a while after the stove has been turned off PACKING Fig 13 1 Product 2 Metal Oil Filter 3 Decorative Lid 4 Water Tank 5 Rectangular Tube 6 Short Elbow Short 7 Flexi pipe 8 Sealant Tape 9 Sealant and heat isolating material 10 Act...

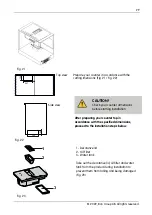
Page 26: ...ng on the ventilation ducts to be used CAUTION The furniture that the appliance will be mounted on should be resistant to 90 C temperature The durability of the furniture that will be mounted on should also be ensured after the cutting operations have been completed Particularly in thin plates the carrying capacity and durability should be provided with suitable support parts Consider the weight o...

Page 27: ... dimensions on Fig 14 in minimum machine dimensions Set your counter in accordance with the counter section in Fig 17 In built in installation Consider the bench cuts in Fig 18 600 140 800 Fig 16 Fig 17 Fig 18 x 17 10 40 6 0 7 R 5 0 784 2 750 2 524 2 490 2 0 0 6 ...

Page 28: ...ter top installation Consider the bench cuts in Fig 19 Consider the installation dimensions to prepare your counter before starting the assembly Fig 20 450 mm space is required to remove the water tank Fig 19 Fig 20 15 10 40 750 2 490 2 0 0 6 ASSEMBLY ...

Page 29: ...your counter top in accordance with the specified dimensions proceed to the installation steps below 1 Decorative lid 2 Oil Filter 3 Water tank Take out the decorative lid oil filter and water tank from the product during installation to prevent them from falling and being damaged Fig 23 CAUTION Check your counter dimensions before starting installation 1 2 3 300 99 257 125 52 Side view ...

Page 30: ...lating materials Fig 24 Separate the heat insulating material from the tape and attach it to your product Fig 25 1 Elbow pipe short Install the elbow pipe as in the arrow mark Fig 26 1 Sealant tape To prevent air outflow from the junction point of the product and the elbow pipe stick the joint part with sealing tape Fig 27 When placing the worktop product on the counter be careful not to damage it...

Page 31: ... on the elbow pipe as in the arrow mark Fig 29 1 Rectangular pipe 2 Flexi pipe After passing the Flexi pipe through your counter attach it to the rectangular pipe as in the arrow Fig 30 Fig 28 Fig 29 Fig 30 A B 1 2 1 2 When placing the worktop product on the counter be careful not to damage it Tape the junction point of the two pipes with sealant tape Complete the remaining part of your assembly w...

Page 32: ... on your counter with heat resistant silicone Fig 31 Fig 32 1 Protective Foil When you complete your installation remove the protective foil on the worktop product Fig 33 Fig 31 Built in installation Fig 32 Counter top installation Fig 33 After filling the remaining spaces with heat resistant silicone wipe the surface of your stove and counter with a damp cloth to prevent stains 1 2 11 2 1 ...

Page 33: ...2 Elon Group AB All rights reserved CONNECTION SCHEME 1 2 4 L N 220 240V 50 60Hz 12 3 4 L2 N2 220 240V L1 5 5 3 PE PE 380 415V 2N 50 60Hz 220 240V PE PE 220 240V N1 BLUE BLACK BROWN GREY BLUE BLACK BROWN GREY ...

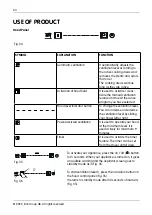
Page 34: ... change the ventilation level You can increase or decrease the ventilation level by sliding your finger left or right Power assisted ventilation It is used to operate your hood at the maximum level It is used actively for maximum 9 minutes Timer It is used to activate the timer feature The timer can be set from the stove control area To activate your appliance press the on off button for 3 seconds...

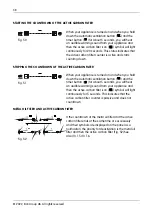
Page 35: ...first press the hood activation area then the automatic ventilation button Your appliance automatically adjusts the ventilation level according to the active cooking areas and cooking levels If you switch your appliance to automatic mode the hood ventilation works as long as the cooking areas are working When all active cooking areas are closed the hood ventilation level is gradually lowered to st...

Page 36: ... these 5 seconds At the end of 5 seconds the ventilation level and timer symbol you selected on the screen remain fixed The hood timer is limited to 95 minutes The timer can be set in increments of 5 minute Press the timer button on the hood control panel to activate the timer feature Determine the time you want to enter with the plus minus keys on the stove control panel Fig 43 After the set time...

Page 37: ...al oil filter symbol lights up in the background until it is disabled after 5 seconds After cleaning replacing your metal oil filter timer press the button for 3 seconds to reset the filter symbol and the metal oil filter countdown timer Fig 48 Your appliance will come with a passive carbon filter counter as factory default If you are to use the appliance with an active carbon filter you must acti...

Page 38: ...er button for about 5 seconds you will hear an audible warning sound from your appliance and then the active carbon filter icon symbol will light continuously for 5 seconds This indicates that the active carbon filter counter is passive and does not countdown If the countdown of the metal oil filter and the active carbon filter ends at the same time or successively and their symbols are displayed ...

Page 39: ... boost cooking mode selection button It use used to operate the cooking areas in maximum level Bridge button The Bridge button is used to operate the cooking areas in connection Pause Resume button It is used to suspend or reac tivate all active functions on the stove by bringing the cooking power to zero ON OFF button It is used to open and close the stove and hood control area Child Lock button ...

Page 40: ... flashes on the cooking ompartment display If the power level is not selected within 5 seconds the screen returns to standby mode Fig 54 3 LEVEL TEMPERATURE MODE Before you start cooking make sure that the bottom of the pot and the cooking surface are clean and dry If no suitable pan is placed on the stove the display will automatically turn off after 1 minute SYMBOL EXPLANATION TEMPERATURE C Used...

Page 41: ...ed cooking area Fig 55 Power assisted cooking button is valid For max 5 minutes Fig 55 CHILD LOCK POWER BOOST COOKING MODE SELECTION When you turn off your appliance while the key lock is active you cannot activate your appliance without disabling the child lock Power boost cooking cannot be activated on all stoves at the same time Front cooking areas have more power than rear areas Therefore if y...

Page 42: ...eat is detected in your appliance your stove will automatically turn off Detecting Small Items If an unsuitable or non magnetic pan such as aluminium or some other items knife fork key are left on the stove the stove will automatically switch to standby within 1 minute Automatic Shutdown Protection When the pot is removed your stove will enter standby mode after 1 minute and after 2 minutes the st...

Page 43: ...ts up on the active stove Fig 58 After stopping flashing the digits of the stove level after the stove compartment you have selected to activate the timer feature determine the time you want to enter with the buttons on the control panel Fig 59 Each time you touch the buttons of the timer the time decreases or increases by 1 minute The set time flashes 3 times on the display and the timer symbol l...

Page 44: ...ch time you touch the buttons of the timer the time decreases or increases by 1 minute The set time flashes 3 times on the display and the timer symbol lights up on the active stove Fig 60 When the timer expires the appliance beeps for 30 seconds then the relevant cooking area turns off USING THE TIMER AS ALARM AND POWER CUT Fig 60 When the timer alarm and power cut alarm are used together the dis...

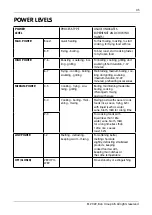
Page 45: ...ium duration 12 22 minutes preheating accessories MEDIUM POWER 4 5 Cooking frying sau téing grilling Boiling maintaining moderate boiling cooking Prolonged mixing pasta with sauce 3 4 Cooking boiling thick ening mixing Mixing pasta with sauce to cook foods rice sauce frying fish with liquid such as water wine broth milk for a long time 2 3 For cooking foods with liquid less than 1 litre water wine...

Page 46: ...ing 7 8 Cooking 4 5 Pan frying Frying with oil oil starts heating in 3rd minute 7 8 Cooking 4 5 Chicken Thawing Heating acces sories 1 Defrost 1 Pan frying Cooking 7 Cooking chicken and continuing boiling 6 7 Potatoes Frying potatoes Heating oil 9 Frying 9 EGG Frying Heating pan with butter or oily food 6 7 Cooking 5 6 Boiling Boiling water Booster 9 Boiling 6 7 Sauce Bechamel Sauce Boiling 6 7 Co...

Page 47: ... cause injuries If unauthorized accessories or unauthorized spare parts are used the manufacturer s warranty is terminated Purchase spare parts and accessories via contracted seller or customer service 1 2 3 4 Fig 61 YT207 1001 94 CIRCULATION KIT Order Code Explanation Amount Size mm 1 YT207 1001 13 F RBV 150 Pipe Bend Vertical90 4043078 1 227x174x94 10 2 YT207 1001 14 F VRO 500 150 flat duct 4040...

Page 48: ...SE REMEDY Product Does Not Work Check the power connection Mains voltage must be 220 240 V or 380 415 V and product must be plugged into a grounded socket Illumination lamp does not operate Check the power connection Mains voltage must be 220 240 V or 380 415 V and product must be plugged into a grounded socket Product s Air Intake is Weak Check The Alumi nium Filter The aluminium cartridge filter...

Page 49: ...OLER 58 DISPLAYER 59 TYP AV FLÄKT 59 BYTE AV KOLFILTER 61 RENGÖRING OCH UNDERHÅLL 63 RENGÖRING AV FETTFILTER OCH VÄTSKEBEHÅLLARE 63 OM MATLAGNING PÅ INDUKTIONSHÄLL 65 KOKKÄRL 66 PAKETETS INNEHÅLL 68 MONTERING INSTALLATION AV PRODUKTEN 69 MONTERING 71 KOPPLINGSSCHEMA 76 ANVÄNDNING AV SPISHÄLLEN 77 EFFEKTNIVÅER 88 TILLAGNINGSTIDER 89 TILLBEHÖR OCH RESERVDELAR 90 FEL OCH FELSÖKNING 91 ...

Page 50: ...en till andra se till att du också ger denna bruksanvisning och säkerhetsinformation Att bortse från denna bruksanvisning kan leda till allvarliga skador och defekter på enheten Silverline kommer ej att vara ansvarig för de ev fel som uppstår då hänsyn ej tas till denna bruksanvisning Figurerna i denna riktlinje syftar till att visuellt beskriva handhavandet I dessa figurer illustreras endast en m...

Page 51: ...a enheter vara helt isolerade alternativt måste enheten vara lufttät Använd en utsugskanal med en maximal diameter för montering på fläktar motorer Prestandan försämras och ljudnivån ökar om utsugskanalens diameter är mindre än produktens ingång utgång Utsugskanalen ska vara så kort som möjligt med så få böjar vinklar som möjligt Fast utsugskanal rekommenderas annars använd isolerad aluminiumkanal...

Page 52: ...m drivs med gas olja trä eller kol tar förbränningsluften och för ut gaserna genom en skorsten eller liknande En fläkt med hög effekt riskerar att vända denna luftström och därmed dra gaserna genom bostaden och ut genom fläktens kanal Detta innebär risk för förgiftning för personer som vistas i närheten av denna luftström Fig 1 Ett tillräckligt intag av frisk luft bör därför alltid säkerställas Fi...

Page 53: ...ån enheten vid strömuttaget vid fel eller skada av produkten Reparationer bör alltid utföras av auktoriserad eller behörig fackman Vid fel eller skador på enheten ska du bryta säkringen eller koppla ifrån enheten från strömuttaget och kontakta auktoriserad service Om strömkabeln är skadad ska den bytas ut av tillverkaren dennes service avdelning eller annan med motsvarande behörighet för att undvi...

Page 54: ...0x520x210 SPISHÄLL Effektnivåer 1 9 P Främre kokzon storlek 190mm Främre kokzon effekt 2000 W 2800 W Bakre kokzon storlek 190mm Bakre kokzon effekt 1500 W 2000 W Spishäll energieffektivitet_EN 60350 2 1 kokzon energikonsumtion 172 25 Wh kg 2 kokzon energikonsumtion 175 79 Wh kg 3 kokzon energikonsumtion 174 01 Wh kg 4 kokzon energikonsumtion 173 61 Wh kg Energieffektivitetsvärde 173 92 Wh kg FETTF...

Page 55: ...55 2022 Elon Group AB All rights reserved Fig 1 Flow in Pro sett uppifrån framifrån från sidan TEKNISK RITNING 520 140 5 R 5 319 126 195 482 145 512 152 58 210 780 740 480 363 20 210 453 520 0 6 ...

Page 56: ... All rights reserved Fig 2 1 Topp platta 2 Fettfilter 3 Kolfilter 4 Kolfilterskydd 5 Placering av fettfilter 6 Kontrollpanel 7 Vätskebehållare 8 Vertikal böj 9 Plattkanal 10 Utsugskanal PRODUKTÖVERSIKT 1 2 3 5 6 7 8 9 10 4 ...

Page 57: ...kt Dessa består av elektroniska sensorer touch och displaypaneler Fig 3 Kontrollpanelen på produkten 1 Spishällens panel 2 Timerpanel 3 Spishällens panel Fig 4 Kontrollpanelens delar Lägg inga våta handdukar eller extremt varma kokkärl på spishällens kontrollpanel KONTROLLPANEL 2 3 6 7 8 9 12 11 13 14 10 ...

Page 58: ...LARING FLÄKT 1 Automatisk ventilation 2 Aktivering av fläkt 3 Fläktnivå 4 Effektstyrd ventilation 5 Timer SPISHÄLL 6 3 temperaturlägen 7 Aktivera kokzon återställning 8 Effektval tillagning 9 Tillagningsfunktion 10 Bryggfunktion 11 Timer 12 Paus start 13 På av 14 Barnlås ...

Page 59: ...e Pause läge Varning fettfilter Varning kolfilter Tidsdisplay Felindikeringsdisplay Beroende på vilken modell du köpt är fläkten i antingen frånluftsläge eller recirkulationsläge Frånluftläge Den absorberade luften rengörs av fettfiltren och släpps ut genom en utsugskanal OBSERVERA Fläktens utsugskanal får aldrig anslutas till skorsten från kamin eller andra rökkanaler som används till att föra ut...

Page 60: ...tallera ett kolfilter för att fånga upp de ämnen som orsakar matos ånga i den cirkulerande luften Rådgör med din återförsäljare om vilka olika möjligheter som finns för att apparaten ska fungera i recirkulationsläge Du kan köpa de tillbehör som krävs för denna process från www silverlinevitvaror se Se under Tillbehör Sörj för tillräcklig ventilation för att avlägsna fukt ...

Page 61: ...rved BYTE AV KOLFILTER För att byta ut det aktiva kolfiltret ta först bort den dekorativa grillen fig 5 Ta bort fettfiltret fig 6 Dra ut kolfiltret enligt bilden fig 7 Fig 5 1 Dekorativ grill 1 Fettfilter 1 Kolfilter Fig 6 Fig 7 2 3 1 1 1 ...

Page 62: ...erhuset Kolfilterhuset är inte för engångsbruk fig 8 När kolfiltret går ut byt ut det mot ett nytt Tvätta inte i diskmaskin eller för hand Var uppmärksam på luftflödets riktning när ni placerar kolfiltret i sitt hölje fig 8 OBSERVERA Kol och Helsa filter bör inte användas utan montering av kolfilterhus vid bild 8 1 Sätt i kolfiltret enligt bilden fig 9 Fig 8 1 Kolfilterhus 2 Kolfilter Fig 9 4 1 2 ...

Page 63: ... riktning Rengöring av fettfilter Fettfilter fångar upp fettpartiklarna från fukt och ånga i köket Rengör aluminium fettfiltren ungefär var tredje månad under normala användningsförhållanden 1 2 timmars användning om dagen Använd inte alltför starka sura eller alkaliska rengöringsmedel Du kan rengöra aluminium fettfiltren i diskmaskinen eller för hand Applicera inte sprayrengöringsmedel direkt på ...

Page 64: ...r etc Starta ett program med en högsta temperatur på 55 C Låt fettfiltret torka på en absorberande yta Placering av fettfiltren Sätt tillbaka fettfiltret genom att göra ovanstående procedur i omvänd ordning Fig 10 1 Topp platta 2 Fettfilter Ta bort fettfiltret Tvätta för hand Tvätta i diskmaskinen Efter rengöring OBSERVERA Materialskador kan uppstå på grund av användning utan aluminium fettfilter ...

Page 65: ... kokkärlets botten värms upp Var uppmärksam på minsta storlek på kokkärl Jämfört med elektriska spisar har din induktionshäll ett antal fördelar Säkrare Mindre värme på glasytan Snabbare Varaktigheten vid uppvärmning av en måltid är kortare Mer exakt Spiskommandon är mer aktiva Mer effektiv 90 av energiförbrukningen förvandlas till värme Så snart kokkärlet tas bort från spishällen avbryts värmeöve...

Page 66: ...ten Kokkärl av metall med emaljbotten Kokkärl med grov botten som repar ytan Lämpliga kokkärl Magnetkraft används för att generera värme i induktionshällen Därför måste kokkärlen innehålla järn Med en magnet kan du kontrollera om kokkärlet är gjort av magnetiskt material Kokkärl är ej lämpliga om de ej är magnetiskt detekterbara Rekommenderade bottendiametrar Placera aldrig heta kokkärl eller kast...

Page 67: ...i enlighet med kokkärlets diameter Lyft alltid dina kokkärl från din spishäll för dem aldrig detta gör att glaset repas Fig 12 VARNING Om kokkärlen inte har rätt storlek blir inte kokzonerna varma 1 2 3 4 190 mm 190 mm 1 5 2 0 kW 1 5 2 0 kW 190 mm 190 mm 2 0 2 8 kW 2 0 2 8 kW 190 385 mm 1 5 1 8 kW 1 5 1 8 kW W k 6 3 0 3 2 1 3 4 2 1 3 4 ...

Page 68: ...rsvinner ljudet Sprakande visslande ljud kan förekomma Om spishällen används länge kan kylfläkten starta automatiskt Kylfläkten fortsätter att gå ett tag efter att spishällen har stängts av PAKETETS INNEHÅLL Fig 13 1 Produkt 2 Aluminium fettilter 3 Topp platta 4 Vätskebehållare 5 Rektangulär utsugskanal 6 Kort böj 7 Flexrör 8 Isoleringstejp 9 Tätningslist och värmeisolerande material 10 Kolfilter ...

Page 69: ...100mm djup beroende på vilka utsugskanaler som ska användas VARNING Interiören som apparaten ska monteras i på ska vara resistent mot 90 C temperatur Hållbarheten för de inventarier som spishällen ska monteras i på bör också säkerställas efter att utsågningen av hål har slutförts Särskilt i tunna bänkplattor bör bärighet och hållbarhet förses med lämpliga stöddelar Beräkna apparatens vikt och inkl...

Page 70: ... hålmåtten i Fig 16 som anger minsta mått för apparaten Montera spishällen i bänkskivan enligt Fig 17 Vid inbyggd installation tänk på utsågningen i bänkskivan Fig 18 600 140 800 Fig 16 Fig 17 Fig 18 x 17 10 40 6 0 7 R 5 0 784 2 750 2 524 2 490 2 0 0 6 ...

Page 71: ...eserved Vid inbyggd installation tänk på utsågningen i bänkskivan Fig 19 Tänk på installationsmåtten innan du börjar montera Fig 20 450mm utrymme krävs för att ta bort vätskebehållaren Fig 19 Fig 20 15 10 40 750 2 490 2 0 0 6 MONTERING ...

Page 72: ...ivan enligt de angivna måtten fortsätt till installationsstegen nedan 1 Topp platta 2 Aluminium fettfilter 3 Vätskebehållare Lyft bort topp plattan aluminium fettfiltret och vätskebehållaren från produkten under installationen för att förhindra att de faller ut och skadas Fig 23 VARNING Kontrollera din bänkskiva skåp innan installationen påbörjas 300 99 B 257 A 125 52 1 2 3 ...

Page 73: ...ch det värmeisolerande materialet Fig 24 Separera det värmeisolerande materialet från tejpen och fäst det på din produkt Fig 25 11 Kort böj Montera böjen enligt pilens markering Fig 26 1 Tätningslist För att förhindra luftutflöde från produktens vergångspunkt och böjen täta fogdelen med tätningstejp Fig 27 När du placerar bänkskivan på disken var försiktig så att du inte skadar den 1 1 ...

Page 74: ...ktangulära utsugskanalen på böjen i pilens riktning Fig 29 1 Rektangulär utsugskanal 2 Flexrör När du har monterat flexröret genom bänkskivan fäst det på den rektangulära utsugskanalen i pilens riktning Fig 30 Fig 28 Fig 29 Fig 30 A B 1 2 1 2 Täta med tätningsstejp vid förbindningspunkten vid de två rören Täta med tätningsstejp vid förbindningspunkten vid de två rören Komplettera den återstående d...

Page 75: ...u de återstående springorna med silikon Fig 31 Fig 32 1 Skyddsfolie När du är klar med installationen ta bort skyddsfolien på bänkskivan Fig 33 Fig 31 Built in installation Fig 32 Counter top installation Fig 33 Efter att ha fyllt de återstående springorna med värmebeständig silikon torka av spishällens yta med en fuktig trasa för att förhindra fläckar 1 2 11 2 1 ...

Page 76: ...22 Elon Group AB All rights reserved KOPPLINGSSCHEMA 1 2 4 L N 220 240V 50 60Hz 12 3 4 L2 N2 220 240V L1 5 5 3 PE PE 380 415V 2N 50 60Hz 220 240V PE PE 220 240V N1 BLUE BLACK BROWN GREY BLUE BLACK BROWN GREY ...

Page 77: ...troll fläkt För att ändra ventilationsnivån Du kan öka eller minska ventilationsnivån genom att skjuta fingret åt vänster eller höger Effektstyrd ventilation För att använda din fläkt på maximal nivå Den används aktivt i max 9 minuter Timer Aktiverar timerfunktionen Ti mer kan ställas in från spishäl lens kontrollområde För att aktivera din apparat tryck på på av knappen i 3 sekunder När din appar...

Page 78: ...kt ventilationsläge tryck först på fläktens kontrollpanelen och sedan på knappen för automatisk ventilation Din apparat justerar automatiskt ventilationsnivån efter de valda kokzonerna och tillagningsnivåerna Om du ställer in apparaten i automatiskt läge fungerar ventilationsfläkten så länge kokzonerna är aktiva När alla kokzoner är avstängda sänks entilationsnivån gradvis till stand by inom 5 min...

Page 79: ...kunder I slutet av dessa 5 sekunder blir ventilationsnivån och timersymbolen som du valde på skärmen fasta Timern är begränsad till 95 minuter Timern kan ställas in i steg om 5 minuter Tryck på timerknappen på fläktens kontrollpanel för att aktivera timerfunktionen Bestäm den tid du vill ange med plus minus tangenterna på spishällens kontrollpanel Fig 43 Efter att den inställda tiden blinkat i 3 s...

Page 80: ...mbolen Fig 47 När fettfiltret har använts i 60h blinkar fettfiltrets symbol en gång per sekund i totalt 5 sekunder Fettfiltrets symbol tänds i bakgrunden tills den deaktiveras efter 5 sekunder Efter rengöring byte av fettfiltret tryck på timern knappen i 3 sekunder för att återställa filtersymbolen och fettfiltrets nedräkningstimer Fig 48 Din apparat kommer fabriksinställd med en passiv kolfilter ...

Page 81: ...in apparat slås på och när du håller knappen för automatisk ventilation och timerknappen intryckt i cirka 5 sekunder hör du ett varningspip från din apparat och sedan lyser symbolen för kolfilter kontinuerligt i 20 sekunder Detta indikerar att kolfilterräknaren är passiv och inte räknar ned Om nedräkningen av fettfiltret och kolfiltret tar slut samtidigt eller successivt och deras symboler visas p...

Page 82: ... tillagningsni vån Knapp för detektering av spis häll För att bestämma tillagnings nivån Power boost tillagning Används för att hantera kokzonerna maximalt Bryggfunktion För att brygga ihop kokzoner Paus återgång Stänga av eller starta alla aktiva funktioner på spishällen genom att sätta tillagningsef fekten på noll På av Spishällens och fläktens på av Barnlås Förhindrar obehörig använd ning av sp...

Page 83: ...gsknapp nollan 0 blinkar på spishällens display Om effektnivån inte väljs inom 5 sekunder återgår dislplayen till standby läge Fig 54 3 TEMPERATURLÄGEN Innan du börjar laga mat se till att kokkärlets botten och tillagningsytan är rena och torra Om inget lämpligt kokkärl placeras på spisen stängs displayen av automatiskt efter 1 minut SYMBOL FÖRKLARING TEMPERATUR C För att smälta mat och tina upp f...

Page 84: ...nen i vald kokzon Power boost knappen är aktiv i max 5 minuter Fig 55 BARNLÅS VAL AV POWER BOOST När du stänger av apparaten medan knapplåset är aktivt kan du inte aktivera din apparat utan att inaktivera barnlåset Power boost tillagning kan inte aktiveras på alla kokzoner samtidigt De främre kokzonerna har högre effekt än de bakre Om du vill använda Power boost funktionen på någon av de främre ko...

Page 85: ...spishällen av automatiskt Upptäcka små föremål Om ett olämpligt eller icke magnetiskt kokkärl t ex av aluminium eller andra föremål kniv gaffel nyckel finns kvar på spishällen växlar den automatiskt till standby läge inom 1 minut Automatisk avstängning När gkokkärlet tas bort kommer såishällen att gå i standby läge efter 1 minut och efter 2 minuter stängs den av helt Spishällens akriva tider vid o...

Page 86: ...3 gånger på displayen och timersymbolen tänds på den aktiva kokzonen Fig 58 Efter att siffrorna slutar att blinka ska du aktivera timerfunktionen Välj den tid du vill ange med knapparna på kontrollpanelen Fig 59 Varje tryck på knapparna ökar minskar timern med 1 minut Den inställda tiden blinkar 3 gånger på displayen och timersymbolen tänds på den aktiva kokzonen Fig 59 När timern avslutats piper ...

Page 87: ...ycker på knapparna på timern minskar eller ökar tiden med 1 minut Den inställda tiden blinkar 3 gånger på displayen och timersymbolen tänds på den aktiva kokzonen Fig 60 När timern avslutas piper apparaten i 30 sekunder därefter stängs den valda kokzonen av ANVÄNDA TIMERN SOM ALARM OCH AVSTÄNGNING Fig 60 När timeralarmet och avstängningsfunktionen används samtidigt visar displayen den återstående ...

Page 88: ...ng ca 12 22 minuter MEDIUM EFFEKT 4 5 Kokning stekning grillning Kokning bibehållen moderat kokning matlagning långvarig Blanda pasta med såse 3 4 Tillredning kokning blandning Blanda pasta med sås laga mat ris sås stekning fisk med vätska som vatten vin buljong mjölk under lång tid 2 3 För matlagning med vätska mindre än 1 liter vatten vin buljong mjölk under lång tid mindre än 1 liter ris såser ...

Page 89: ...okning 5 6 Kött Värma 6 7 Kokning 4 5 7 8 Kokning 4 5 Fritera i olja 7 8 Kokning 4 5 Kyckling Tina Värma tillbehör 1 Tina 1 Steka i panna Kokning 7 Kokning kyckling Och fortsätta Kokning 6 7 Potatis Steka potatis Värma olja 9 Stekning 9 ÄGG Steka Stekpanna med Smör eller fet mat 6 7 Kokning 5 6 Kokning Koka vatten Booster 9 Kokning 6 7 Sås Bechamelsås Kokning 6 7 Kokning 6 7 Dessertvaniljsås Pannk...

Page 90: ...ning av felaktiga reservdelar eller tillbehör kan orsaka personskador Om felaktiga tillbehör eller reservdelar används gäller ej tillverkarens garanti Köp reservdelar och tillbehör via återförsäljare 1 2 3 4 Fig 61 YT207 1001 94 Tillbehör Bild Varukod Förklaring Antal Storlek mm 1 YT207 1001 13 Platt 90º vertikal böj 4043004 1 227x174x94 10 2 YT207 1001 14 Luftkanal PVC platt 4043001 2 500x222x89 ...

Page 91: ...odukten är ansluten till korrekt ström 220 240V Kontrollera att inga ledningar sitter löst Reservdel ska ev bytas Ingen belysning Ström lös anslut ning defekt lampa Kontrollera att produkten är ansluten till korrekt ström 220 240V Kontrollera att inga ledningar sitter löst Kontrollera om lampan är defekt Byt vid behov Fläkten suger inte tillräckligt Kontrollera fettfiltret Aluminium fettfiltret sk...

Page 92: ...Elvita products are distributed and marketed by Elon Group AB Elon Group AB Bäcklundavägen 1 702 03 Örebro Sweden ELON GROUP 46 0 10 220 40 00 ELONGROUP SE Support and service ELVITA SE ...

Reviews: