Machine Maintenance Procedures
3-17
WLAN (Wireless Local Area Network) Board Removal
0
Prerequisite:
Base Door Removal
1.
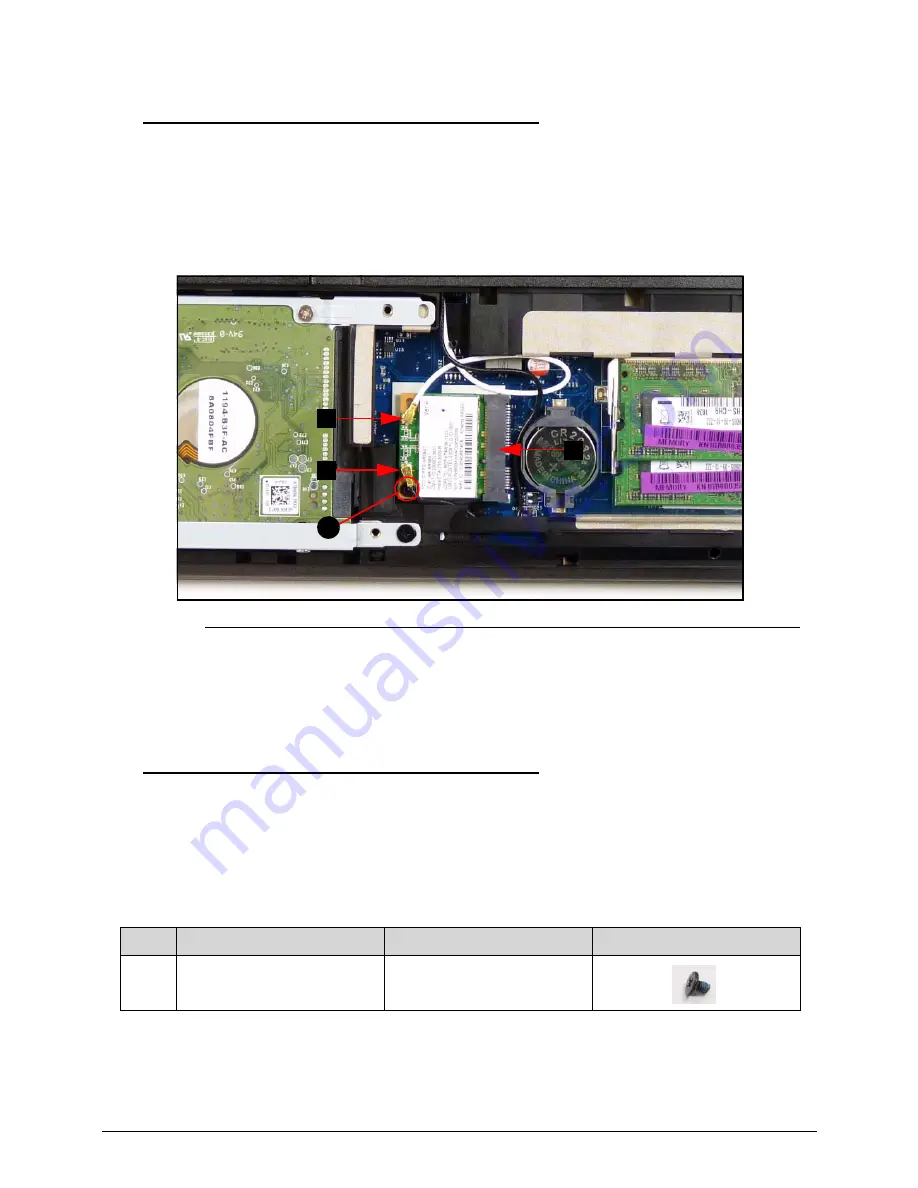
Find WLAN board (B) in the component bay.
(Figure 3-10)
2.
Disconnect main (B) and auxiliary (A) antenna cables from WLAN board. (Figure 3-12)
Figure 3-12.
WLAN Board
3.
Remove one (1) screw (C). (Figure 3-12)
4.
Remove WLAN board from mainboard connector (D). (Figure 3-12)
WLAN Board Installation
0
1.
Put WLAN board into mainboard connector (D). (Figure 3-12)
2.
Install and secure one (1) screw (D). (Figure 3-12)
3.
Install main (B) and auxiliary (A) antenna cables on WLAN board. (Figure 3-12)
4.
Install base door.
ID
Size
Quantity
Screw Type
D
M2.5*3.0
1
C
A
B
D
Summary of Contents for E644
Page 1: ...eMachines E644 E644G SERVICEGUIDE ...
Page 4: ...iv ...
Page 10: ...x ...
Page 11: ...CHAPTER 1 Hardware Specifications ...
Page 14: ...1 4 ...
Page 53: ...CHAPTER 2 System Utilities ...
Page 80: ...2 28 System Utilities ...
Page 81: ...CHAPTER 3 Machine Maintenance Procedures ...
Page 84: ...3 4 ...
Page 118: ...3 38 Machine Maintenance Procedures ID Size Quantity Screw Type B ICW50 CPU Thermal Screw 4 ...
Page 135: ...CHAPTER 4 Troubleshooting ...
Page 162: ...4 28 Troubleshooting ...
Page 163: ...CHAPTER 5 Jumper and Connector Locations ...
Page 172: ...5 10 Jumper and Connector Locations ...
Page 173: ...CHAPTER 6 FRU Field Replaceable Unit List ...
Page 174: ...6 2 Exploded Diagrams 6 4 FRU List 6 6 Screw List 6 18 ...
Page 191: ...CHAPTER 7 Model Definition and Configuration ...
Page 192: ...7 2 eMachines E644 7 3 eMachines E644G 7 8 ...
Page 200: ...7 10 Model Definition and Configuration ...
Page 201: ...CHAPTER 8 Test Compatible Components ...
Page 202: ...8 2 Microsoft Windows 7 Environment Test 8 4 ...
Page 212: ...8 12 Test Compatible Components ...
Page 213: ...CHAPTER 9 Online Support Information ...
Page 214: ...9 2 Introduction 9 3 ...
Page 216: ...9 4 Online Support Information ...


