Chapter 3
89
4.
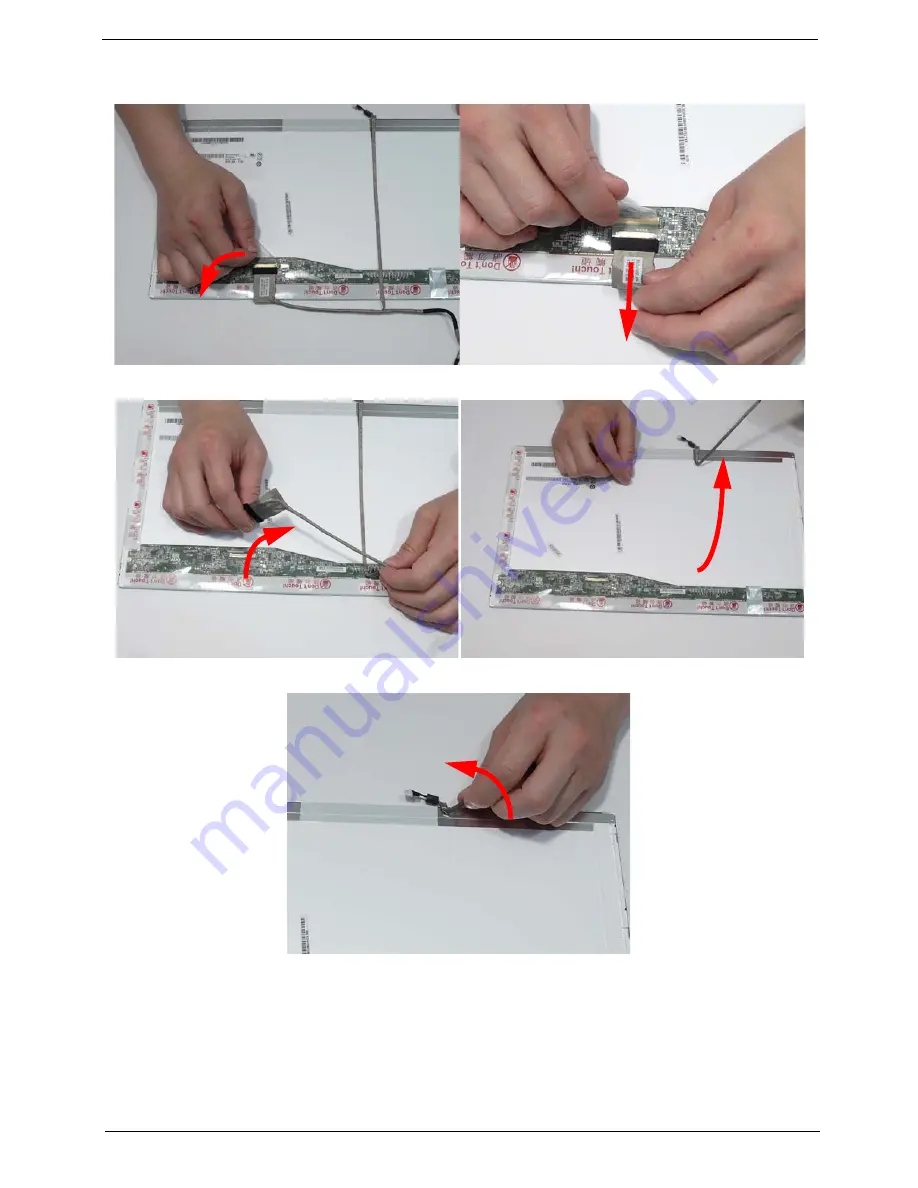
Turn the LCD panel over to expose the rear. Lift the adhesive protector and disconnect the cable from the LCD
Panel.
5.
Lift the cable as shown to disengage the adhesive strip securing it in place.
6.
Lift the FPC cable to disengage the remaining adhesive and remove the cable from the panel.
Summary of Contents for eMachines HM50-YK
Page 6: ...VI...
Page 10: ...X Table of Contents...
Page 14: ...4 Chapter 1 System Block Diagram...
Page 34: ...24 Chapter 1...
Page 72: ...66 Chapter 3 4 Disconnect the following four cables from the Mainboard A B C D...
Page 85: ...Chapter 3 79 4 Using both hands lift the Thermal Module clear of the Mainboard...
Page 87: ...Chapter 3 81 4 Lift the CPU Fan clear of the Mainboard as shown...
Page 93: ...Chapter 3 87 5 Lift the LCD Panel clear of the module...
Page 101: ...Chapter 3 95 9 The Antennas and cables appear as shown when correctly installed...
Page 106: ...100 Chapter 3 2 Replace the four screws and screw caps provided...
Page 111: ...Chapter 3 105 5 Replace the FFC and press down as indicated to secure it to the Upper Cover...
Page 122: ...116 Chapter 3 17 Replace the two screws securing the LCD Module to the Lower Cover...
Page 130: ...124 Chapter 3...
Page 154: ...148 Chapter 5...
Page 156: ...150 Chapter 6 eMachines HM50 YK Exploded Diagrams Main Assembly...
Page 166: ...160 Chapter 6 Screw List...
Page 167: ...Chapter 6 161...
Page 186: ...Appendix A 180...
Page 194: ...188 Appendix B...
Page 196: ...190 Appendix C...
Page 200: ...194...


