background image

22

49

50

51

Italiano

KOR

KOR

MANUTENZIONE

유지보수

유지 보수

  ATTENZIONE!

-  Prima di ogni intervento disinserire la spina.

-  Spegnere  il  motore  e  verificare  che  tutte  le  parti  in 

movimento siano ferme,

-  Smontare il sacco raccoglierba,

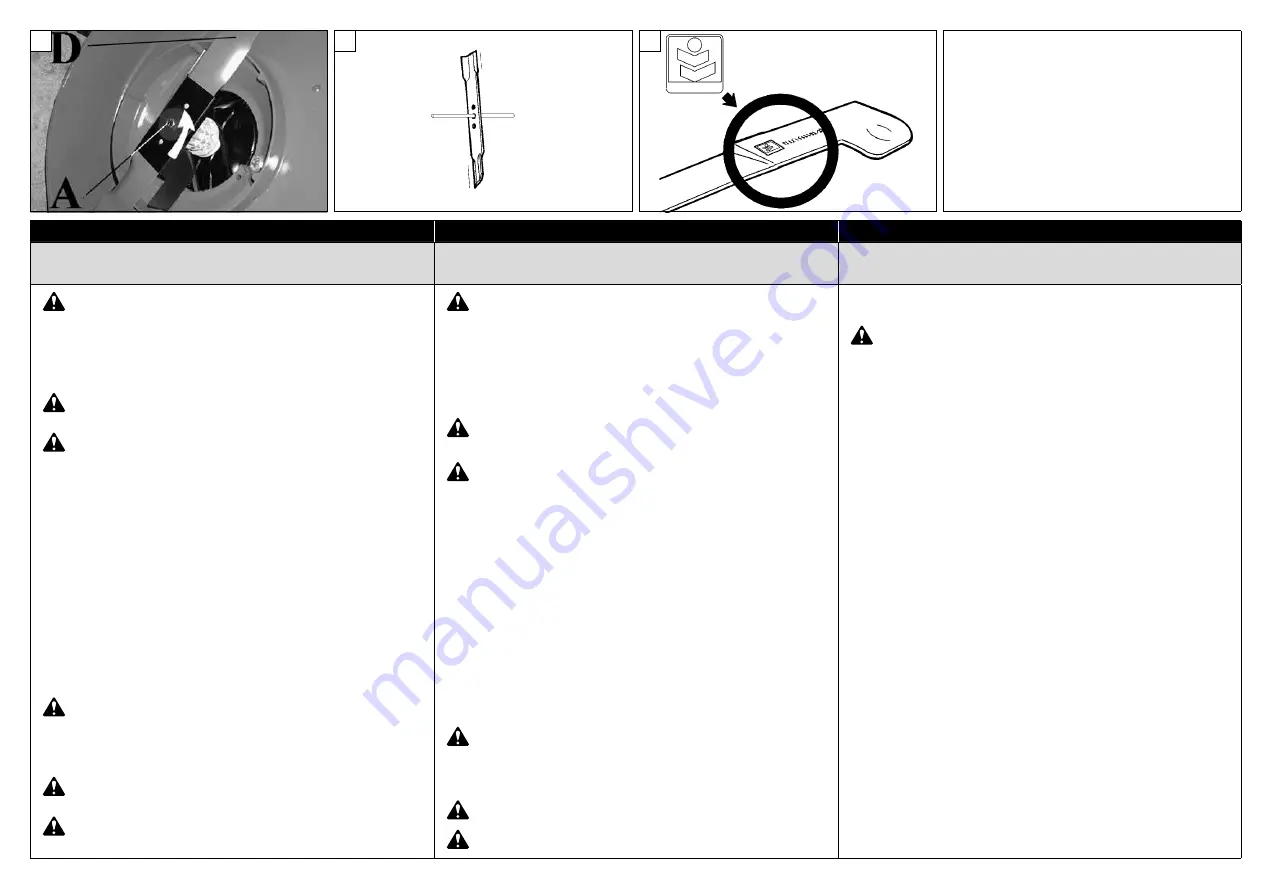
LAMA (Fig. 49)


  ATTENZIONE  –  Lavorare  con  guanti  di  protezione  per 

verificare lo stato delle lame.

  ATTENZIONE – Verificare periodicamente che il bullone 

(A, Fig.49) sia serrato a 35 Nm (3.5 kgm).

Se  con  il  trascorrere  del  tempo  la  falciatura  dell’erba  non  è  più 

soddisfacente,  probabilmente  le  lame  hanno  bisogno  di  essere 

affilate.  Una  lama  male  affilata  strappa  l’erba  e  provoca  un 

ingiallimento  del  prato.  Se  le  lame  sono  danneggiate  o  storte 

devono essere sostituite.

 - L’affilatura  delle  lame  è  un’operazione  molto  delicata.  Se  non 

viene  tenuto  conto  della  perfetta  equilibratura  delle  stesse 

(Fig.50),  possono  causare  vibrazioni  anomale  che  portano 

all’allentamento  delle  lame  con  pericolose  conseguenze  per 

l’operatore.

 - Le lame devono essere montate con il giusto verso. Il montaggio 

sbagliato  può  causare  un  errato  serraggio  con  conseguente 

allentamento  delle  lame  durante  il  lavoro  con  pericolose 

conseguenze per l’operatore.

Per questi motivi l’equilibratura e la sostituzione delle lame deve 

essere effettuata da un nostro 

Centro Assistenza Autorizzato

.

  ATTENZIONE:  Non  saldare,  raddrizzare  o  modificare  la 

forma di apparati di taglio danneggiati nel tentativo di 

ripararli.  Queste  operazioni  possono  determinare  il 

distacco dell’apparato di taglio e provocare lesioni gravi o 

letali.

  ATTENZIONE  –  Sostituire  sempre  anche  il  bullone 

(A, Fig.49).

  ATTENZIONE – Utilizzare sempre lame originali marcate 

(Fig.51).


경고

!


날(그림49)


경고 - 보호장갑을 착용 하고 날의 상태를 검사 하십시오.


경고 - 주기적으로 볼트가 35Nm(3.5Kgm)에 조여 있는지
확인 하십시오.(A, 그림49)

작업 시간에 따라 풀 베기가 만족스럽지 못 하면, 날을 
날카롭게 연마 하십시오. 무딘 날로 잔디를 깎으면 잔디끝이
노랗게 변합니다. 날이 손상되거나 비뚤어진 경우 교체 
하십시오.

 -

날은 세우는 작업은 섬세한 작업입니다. 완벽한 균형이
안되면(그림50) 비정상적인 진동을 일으킬 수 있으며 
작업자에게 위험한 결과를 초래 할 수 있습니다.

 -

날은 직각으로 조립 하십시오. 잘못된 조립은 조임 상태가 
불량하여 작업 중 날이 흔들릴 수 있으며 작업자가 위험에 
처 할 수 있습니다.

이런 이유로 날의 균형과 교체는 취급점에 문의 하십시오.

.


경고 - 날을 용접, 교정 형상을 수정하지 마십시오.
날의 일부분이 떨어져 치명적인 부상을 입을 수 있습니다.


경고 - 항상 볼트를 알맞은 위치에 있게 하십시오.(A, 그림49)


경고 - 항상 정품 표시가 있는 날을 사용하십시오.(그림51)


유지 보수 작업 전 플러그를 뽑아 주십시오.

모터를 정지하고 모든 부품들이 정지 하는지 

확인 하십시오.

풀통을 제거 하십시오.

풀통을 비우기 전 모터를 정지하고 플러그를
뽑아 주십시오. 풀 배출구 청소 전 사용 중
전선의 손상이 없는 지 확인 하십시오.

풀통

풀통이 잘 장착되어 있고 손상되지 않는지 자주 확인
하십시오.

망사부분이 막혀 있는지 확인 하십시오. 막힌 경우 
물로 씻어 완전히 건조한 후 조립 하십시오.

손상된 풀통이나 막힌 망사는 풀이 완전히 채워지지 
않습니다.

젖은 망사를 조립하는 경우 망사부분이 쉽게 
막힐 것입니다.

Summary of Contents for Comfort plus Series

Page 1: ...I D F GB E KOR OWNER S MANUAL MANUALE USO E MANUTENZIONE BETRIEBS UND WARTUNGSANLEITUNG MANUEL D UTILISATION ET D ENTRETIEN MANUAL DE USO Y MANTENIMIENTO 사용자 설명서 Pubbl 66120062 Feb 2018 ...

Page 2: ... Funktionsweise der verschiedenen Bauteile und Hinweise zu den anfallenden Kontroll und Wartungsarbeiten Anm Die in dieser Broschüre enthaltenen Beschreibungen und Abbildungen sind unverbindlich Der Hersteller behält sich das Recht vor eventuelle Veränderungen vorzunehmen ohne jeweils vorher eine Anpassung der vorliegenden Bedienungsanleitung vorzunehmen E INTRODUCCION TRADUCCIÓN DE LAS INSTRUCCIO...

Page 3: ...________ 30 TECHNICAL DATA _______________ 36 DECLARATION OF CONFORMITY ___ 38 MAINTENANCE CHART___________ 40 TROUBLE SHOOTING CHART ______ 42 WARRANTY CERTIFICATE _________ 45 INTRODUCCION ________________ 2 EXPLICACION SIMBOLOS Y ADVERTENCIÂS DE SEGURIDAD ___ 4 COMPONENTES DEEL CORTACESPED_ 6 NORMAS DE SEGURIDAD______ 14 17 MONTAJE _____________________ 19 PUESTA EN MARCHA ____________ 21 UTILI...

Page 4: ...dommagé D 1 Betriebsanleitung vor der Inbetriebsnahme lesen 2 ACHTUNG Das Annähern von Unbefugten an die Maschine während der Arbeit ist untersagt Gefahr projezierter Gegenstände 3 Bringen Sie das Stromkabel nicht mit den Schnittvorrichtungen in Berührung 4 Schnittgefahr durch scharfe Messer Ziehen Sie vor jedem Wartungseingriff bzw bei beschädigtem Kabel unbedingt den Stecker heraus E 1 Antes de ...

Page 5: ...r level 10 Serial number 11 CE conformity marking 12 Year of manufacture F 5 Type de machine TONDEUSE ÉLECTRIQUE 6 Dispositif à double isolation 7 Marque et modèle de la machine 8 Données techniques 9 Niveau de puissance acoustique garanti 10 Numéro de série 11 Label CE de conformité 12 Année de construction D 5 Gerät ELEKTRO RASENMÄHER 6 Vorrichtung mit doppelter Isolierung 7 Marke und Maschinenm...

Page 6: ...ra manillar 4 Deflector 9 Pulsador de seguridad 5 Clavija de conexiòn COMPONENTI DEL RASAERBA 9 Pulsante di sicurezza LAWNMOWER COMPONENTS 1 On Off switch 6 Cable clip 2 Handle 7 Cutting height adjustment 3 Grass box 8 Height adjusting knob 4 Rear deflcetor 9 Safety button 5 Plug COMPOSANTS DE LA TONDEUSE 1 Bouton de fonctionnement 6 Serre fìl 2 Guidon 7 Régl fauteur dei coupe 3 Bac de ramassage 8...

Page 7: ...nale In accordance with Directives 2011 65 CE and 2012 19 CE on the reduction of hazardous substances in electrical and electronic equipment ROHS and the disposal of waste from such equipment WEEE When the symbol depicting a crossed out refuse bin appears on equipment this means that it must be collected separately from other waste at the end of its working life When the equipment is no longer ser...

Page 8: ... 덮개를 올리고 사용하지 마십시오 그림5 11 작업자가 기계를 놓을 때는 엔진을 정지하고 평지에 놓아 주십시오 12 현지 규정의 조건에 따라 사용자의 사용 연령을 제한 할 수 있습니다 13 소유자 또는 사용자는 사고 타인의 재산 손해에 대한 책임이 있습니다 14 항상 엔진을 정지하고 플러그를 분리 할 경우 기계를 놓을 때 날 또는 데크의 이물질을 청소 할 때 풀통을 교체 할 때 기계 수리 할 때 장애물을 친 이후 비 정상적인 진동이 있을 때 즉시 확인 미치는 영향 에 따라 손상 가능 여부를 확인하고 수리를 한 이후 기계를 사용 하십시오 그림6 15 올바른 정품 의 날만 사용 하십시오 그림7 16 기계를 작동하기 전에 항상 날의 볼트 조립상태 마모 또는 손상을 확인 하십시오 17 라벨은 식별 가능한 상태로 유...

Page 9: ...9 5 6 7 KOR 안전 수칙 ...

Page 10: ...a percezione di segnali acustici di pericolo grida allarmi ecc è limitata Calzare guanti Fig 8 che permettano il massimo assorbimento delle vibrazione While working with the lawnmover always use safety protective approved clothing The use of protective clothing does not eliminate injury risks but reduces the injury effects in case of accident Consult your trusted supplier to choose an adequate equ...

Page 11: ...11 5 6 7 8 p n 001000939A p n 001000940A p n 001000835 p n 3155027R ...

Page 12: ...riore della carcassa FIXING HANDLE Fig 1 2 3 Lift the handle as in Fig 1 Tighten the knobs A Fig 3 after positioning the handle B at the correct height Choose one of the two positions C Fig 2 Attach the switch onto the handlebar using screws A Fig 4 keeping the plug turned toward the operator HANDLE HEIGHT ADJUSTMENT Fig 3 Unscrew knobs A and lift or lower the handle B RIGID BOX Assemble the box u...

Page 13: ...13 7 8 ...

Page 14: ...refully read the Safety Rules listed in this Manual Pag 11 Before starting the engine make sure the blade is free to turn EXTENSIONS CABLES RECOMMENDED LENGHT 230 V Fig 11 Lenght 0 20 meters 20 50 meters 50 100 meters Minimum conductor section 1 mm2 1 5 mm2 4 mm2 Don t use the lawnmower if the cords are damaged or worn Don t connect a damaged cord to the supply or touch a damaged cord before it is...

Page 15: ...15 NOTE ...

Page 16: ...run Do not mow up or down a slope but always across it if the slope is too steep do not mow Fig 18 Mow only in daylight or under strong artificial lighting Always check that rear deflector is properly in place Fig 19 If you strike an object stop the engine and check for any damage do not restart the engine before carrying out the necessary repairs Fig 20 Do not tilt the mower when starting the bla...

Page 17: ...17 21 22 23 24 ...

Page 18: ...tro Assistenza Autorizzato USE CUTTING ADJUSTING THE CUTTING HEIGHT DO THIS ONLY WITH THE MOTOR OFF AND THE MACHINE DISCONNECTED FROM THE ELECTRICAL SUPPLY Use lever A to adjust the cutting height to the desired position Fig 25 ENGINE STOPPING Release the lever B Fig 26 WARNING when the plug is removed or the lever released B the electric motor and the blade continue to turn for about 3 seconds WA...

Page 19: ...dicati dal costruttore WARNING Do not use the mower if the bag is worn or clogged with grass Stop the engine before taking the grass bag out NOTE If the grass is too high make two cuts the first one at maximum height the second at the desired height Mow the lawn in a spiral from the edge to the centre Fig 40 pag 25 PROHIBITED USES The lawnmower must only be used for cutting grassy areas in gardens...

Page 20: ...top the motor and disconnect the plug from the mains Fig 41 TRASPORTATION STORAGE To facilitate transport and storage the handle can be folded release knob and fold the upper handle NOTE be careful to prevent pinching or stretching of the electric cables Remove the grass catcher Only transport the lawnmower with the engine switched off WARNING When transporting the lawnmower on a vehicle ensure th...

Page 21: ...essere sostituita In order to achieve the best performance from your lawnmower in the years to come and at the same time to produce high quality work read carefully the following advices for adjustments and maintenance USE ONLY ORIGINAL PARTS Before cleaning or carrying out any repairs stop the motor and disconnect the plug from the mains MAINTENANCE OF THE CUTTING EQUIPMENT EXTRA MAINTANANCE ADVI...

Page 22: ...icolose conseguenze per l operatore Per questi motivi l equilibratura e la sostituzione delle lame deve essere effettuata da un nostro Centro Assistenza Autorizzato ATTENZIONE Non saldare raddrizzare o modificare la forma di apparati di taglio danneggiati nel tentativo di ripararli Queste operazioni possono determinare il distacco dell apparato di taglio e provocare lesioni gravi o letali ATTENZIO...

Page 23: ... X 플러그 전선 케이블 손상 마모 점검 X 교환 X 마모 손상 점검 X X 풀통 덮개 작동 점검 문제 해결 표 경고 항상 기계를 중지하고 플러그를 분리 기계의 작동을 필요로하는 작업을 제외하고 아래의 권장 조치를 모두 수행 하십시오 가능한 모든 원인을 확인 하고 계속 문제가 발행하는 경우 취급점에 문의 하십시오 이 차트에 표시되지 않은 문제가 발생되는 경우에도 가까운 취급점에 문의 하십시오 문제점 원인 해결 모터 작동 되지 않거나 몇초만 작동 1 플러그 접촉 불량 2 케이블 손상 3 1600 W 모터 과부하 1 정확한 플러그 체결 2 취급점에서 케이블 교체 3 시간을 두고 재사용 모터 작동 되나 날이 회전하지 않음 경 고 모 터 회 전 시 절 대 날 을 만 지 지 마 십 시 오 즉시 모터 정지 가까운 취급...

Page 24: ...OFÁSICO 단상 Tensione Voltage Tension Spannung Tensión 볼트 230 V Intensitá nominale Current input Intensité nominale Leistungsaufnahme Intensidad nominal 전류 8 0 A Frequenza Frequency Fréquence Frequenz Frecuencia 주파수 50 Hz Altezza di taglio Cutting height Hauteur de coupe Schnitthöhe Altura de corte 절단 높이 MIN 28 mm MAX 75 mm Capacità del sacco Grass catch capac Capacité du sac a herbe Volumen grasfan...

Page 25: ... EC EN ISO 3744 91 3 92 4 Incertezza Uncertainty Incertitude Unsicherheit Incertidumbre 오차 dB A 1 0 1 0 Livello potenza acustica garantita Guaranteed sound power level Niveau puissance acoustique assuré Garantierter akustischer Schalleistungspegel Nivel potencia acústica garantizado 보장 음력 레벨 dB A LWA 2000 14 EC EN ISO 3744 92 0 93 0 Livello di vibrazione Vibration level Niveau de vibration Vibrati...

Page 26: ...are sous sa propre responsabilité que la machine erklärt auf eigene Verantwortung daß die Maschine declara bajo su responsabilidad que la máquina 책임하에 아래의 항목 기계를 정의 1 Genere rasaerba elettrico 1 Type electric lawnmower 1 Catégorie tondeuse électrique 1 Baurt elektro rasenmäher 1 Género cortacésped eléctrico 1 종류 전기 잔디깎기 2 Marca Tipo 2 Trademark Type 2 Marque Type 2 Marke Typ 2 Marca Tipo 2 상표 종류 è...

Page 27: ...ustica garantita Guaranteed sound power level Niveau de puissance acoustique garanti Garantierter akustischer Schalleistungspegel Nivel de potencia acústica garantizado 보장 음력 레벨 Nome e indirizzo Name and address of Nom et adresse du Name und Anschrift der Nombre y dirección del Tipo del dispositivo di taglio lama rotativa Type of cutting device rotary blade Genre du dispositif de coupe lame rotati...

Page 28: ...macchina durante tutta la sua vita GB WARNING This owner s manual must stay with the machine for all its life F ATTENTION Ce manuel doit accompagner le moteur tout au long de sa vie D ACHTUNG Bewahren Sie diese Anleitung für die gesamte Lebensdauer des Geräts auf E ATENCIÓN Este manual debe acompañar a la máquina hasta su desguace KOR 경고 본 사용자 설명서는 기계가 폐기 될 때 까지 보관 하십시오 ...

Reviews: