34
300 l grass catchers:
Into the openings in the lid insert the handle and slide washers on
to its threaded ends. Insert the piece assembled in this way through the openings in the
top bracket on the frame and secure the handle using nuts. Do not tighten them yet!
360 l grass catchers:
Into the openings in the lid insert the handle and slide washers
(black) on to its threaded ends. Also slide the metal sheet and also one more set of washers
on to them. Insert the piece assembled in this way through the openings in the top bracket
on the frame, slide more washers on to the threaded ends and secure everything using
nuts. Do not tighten them yet!
3.3.2k
Bolt the lid to the frame and tighten the bolts.
3.3.2l
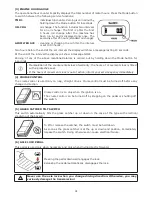
Insert the emptying lever into the holes in the brace inside the catcher.
Into the lower end of the lever inside, insert a bolt and push its threaded portion through
the hole. Secure it from above with a nut and tighten it.
3.3.2m
Firmly tighten the nuts securing the handle and tighten the nuts securing the top bracket
of the frame. This completes the installation of the grass catcher.
3.3.2n
BALANCING AFTER INSTALLATION
Take hold of the grass catcher and hang it on the hangers on the rear plate of the machine.
Check its fit to the fenders. Correct any imbalance by loosening the bolts in the front tube and/or the
bolts in the side braces, evening it up and retightening the bolts.
On a properly adjusted grass catcher the space between the rear plate of the machine and
the front tube (
3
) ((
(
(
(
(
(
(
(
3.3.2c
) is no greater than 5 mm.
If the catcher cannot be fit in the manner explained above, balance it by shifting its hangers on the
rear plate.
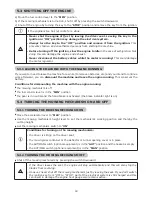
After balancing the catcher, adhere the triangular sticker (included) on its lid. Place it
across from the sticker that is already adhered to the machine’s cover. The tips of the
triangles must be in opposing positions.
3.3.2o
3.4 INSPECTING BEFORE STARTUP
3.4.1 CHECKING THE ENGINE OIL
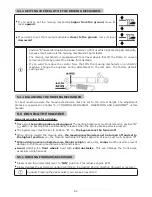
Before checking the oil, the tractor must be in a horizontal position. The oil cap can be accessed by lifting
the seat. Unscrew the dipstick, wipe it clean, reinsert it and screw it back in. Then unscrew it again and
read the oil level.
Oil level on dipstick:
(1) - (ADD) oil is low
(2) - (FULL) oil is full
The oil level must be between the two marks on the dipstick. If it is not, add motor oil until it reaches
the “
FULL
” mark. The oil type is designated in a separate manual from the engine manufacturer.
The oil must be checked before every ride.
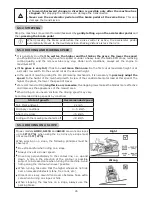
3.4.2 BATTERY INSPECTION
Check the battery according to the manual provided by its manufacturer.
Summary of Contents for EF106J Starjet
Page 2: ...2 1 2 1 3 1 1 3 2a ...
Page 3: ...3 1 3 2b 1 3 2c 1 3 2d ...
Page 4: ...4 3 1 3 3 1a 3 3 1b ...
Page 5: ...5 3 3 1c 3 3 1d 3 3 2a ...
Page 6: ...6 3 3 2b 3 3 2c 3 3 2d ...
Page 7: ...7 3 3 2e 3 3 2f 3 3 2g ...
Page 8: ...8 3 3 2h 3 3 2i ...
Page 9: ...9 3 3 2j 3 3 2k ...
Page 10: ...10 3 3 2l 3 3 2m 3 3 2n ...
Page 11: ...11 3 3 2o 3 4 5 ...
Page 12: ...12 3 4 6 4 1a ...
Page 13: ...13 4 1b 4 2 1a ...
Page 14: ...14 4 2 1b 5 6a 5 6b 6 2 2 ...
Page 15: ...15 6 3 3a 6 3 3b 6 3 6a 6 3 6b 6 3 7a ...
Page 16: ...16 6 3 7b 6 3 7c 6 3 7d ...
Page 17: ...17 6 3 7e 6 3 8 6 3 9a 6 3 9b ...
Page 18: ...18 6 3 9c 6 3 10a 6 3 10b 6 3 10c ...
Page 19: ...19 6 3 10d 6 3 10e 6 3 10f 6 3 11 ...
Page 20: ...20 6 3 12a 6 3 12b 6 3 14 ...
Page 21: ...21 6 4 ...
Page 341: ...341 ...
Page 342: ...342 ...
Page 343: ...343 ...

