54
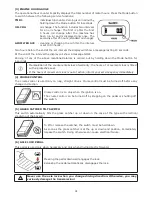
Under the metal plate, loosen the nut on the tensioning mechanism with the toothed belt
(
3
) such that it can turn with mild resistance from the washer under the nut.
Loosen the safety nut (
1
), turn the nut (
2
) rightward and check the tension of the toothed
belt.
6.3.9b
The belt is properly tensioned, when exerting
4 kPa
of pressure halfway between pulleys
(
3
) and (
4
) the belt sags about
0.5 cm
.
6.3.9c
To measure the force, use, for example, a standard dynamometer available in stores that
carry them.
Tighten the safety nut (
1
) of the tensioning device and retighten the nut on the tensioning mechanism
with the toothed belt (
3
).
Put the plastic cover back on and tighten its mounting bolt.
6.3.10 MOWING MECHANISM - REMOVAL
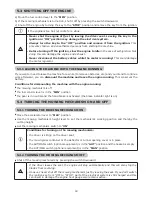
Set the mowing mechanism to the lowest position by setting the adjustment lever to
position 1.
Slightly raise the grass removal tube (
1
) and slide it off the two pins welded to the frame
of the mowing mechanism. Then either slide the tube 10 cm to the rear (
2
) and secure it,
or completely remove it from the machine through the rear plate.
6.3.10a
Remove the spring (
3
) from the shoulder of the tension pulley and loosen the spring
upward (
4
).
6.3.10b
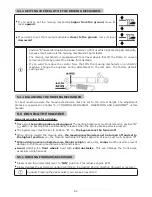
Stand on the right side of the machine. Push the tensioner pulley toward the large pulley.
This loosens the V-belt. Then remove the belt.
6.3.10c
Slide the spring pins (
7
) from both the rear mowing mechanism suspension shaft pin (
8
).
Screw out the nut (
5
) from the front shaft pin and pull out the shaft pin (
6
).
6.3.10d
Use pliers to remove all pins from the mowing mechanism suspension. When pulling them
out, make sure that you don’t injure your hands or fingers.
Remove the V-belt from the pulley of the electromagnetic connector.
6.3.10e
Slowly slide the mowing mechanism to one side of the machine.
6.3.10f
6.3.11 STEERING MAINTENANCE
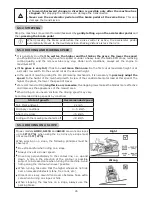
Regularly check to see that there is no excessive play between the steering rack and pinion.
If there is too much play, reduce it.
6.3.11
Ignoring this maintenance can cause damage to the steering.
How to adjust the play:
Loosen the two M12 nuts (
1
) on the eccentric bolt.
On the hexagonal eccentric (
2
) place an appropriate wrench and turn it until the the play
is reduced to the minimum.
Tighten both M12 nuts (
1
) to 35 - 45 Nm.
Summary of Contents for EF106J Starjet
Page 2: ...2 1 2 1 3 1 1 3 2a ...
Page 3: ...3 1 3 2b 1 3 2c 1 3 2d ...
Page 4: ...4 3 1 3 3 1a 3 3 1b ...
Page 5: ...5 3 3 1c 3 3 1d 3 3 2a ...
Page 6: ...6 3 3 2b 3 3 2c 3 3 2d ...
Page 7: ...7 3 3 2e 3 3 2f 3 3 2g ...
Page 8: ...8 3 3 2h 3 3 2i ...
Page 9: ...9 3 3 2j 3 3 2k ...
Page 10: ...10 3 3 2l 3 3 2m 3 3 2n ...
Page 11: ...11 3 3 2o 3 4 5 ...
Page 12: ...12 3 4 6 4 1a ...
Page 13: ...13 4 1b 4 2 1a ...
Page 14: ...14 4 2 1b 5 6a 5 6b 6 2 2 ...
Page 15: ...15 6 3 3a 6 3 3b 6 3 6a 6 3 6b 6 3 7a ...
Page 16: ...16 6 3 7b 6 3 7c 6 3 7d ...
Page 17: ...17 6 3 7e 6 3 8 6 3 9a 6 3 9b ...
Page 18: ...18 6 3 9c 6 3 10a 6 3 10b 6 3 10c ...
Page 19: ...19 6 3 10d 6 3 10e 6 3 10f 6 3 11 ...
Page 20: ...20 6 3 12a 6 3 12b 6 3 14 ...
Page 21: ...21 6 4 ...
Page 341: ...341 ...
Page 342: ...342 ...
Page 343: ...343 ...


