background image

2.

IDENTIFICATION OF THE MACHINE AND COMPONENTS

2.1 IDENTIFICATION OF THE MACHINE

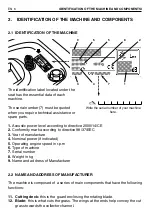
The identification label located under the
seat has the essential data of each
machine.

The serial number (7) must be quoted
when you require technical assistance or
spare parts.

1.

Acoustic power level according to directive 2000/14/CE

2.

Conformity mark according to directive 98/37/EEC 

3.

Year of manufacture

4.

Nominal power (if indicated)

5.

Operating engine speed in r.p.m

6.

Type of machine

7.

Serial number

8.

Weight in kg

9.

Name and address of Manufacturer

2.2 NAME AND ADDRESS OF MANUFACTURER

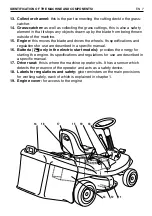
The machine is composed of a series of main components that have the following
functions:

11. Cutting deck:

this is the guard enclosing the rotating blade.

12. Blade:

this is what cuts the grass. The wings at the ends help convey the cut

grass towards the collector channel.

EN 6

IDENTIFICATION OF THE MACHINE AND COMPONENTSI

Write the serial number of your machine

here.

3

4

7

1

6

9

5

8

2
Summary of Contents for EF63C/6,5M

Page 1: ...OLO IN PIANO REGGIO EMILIA ITALY TEL 0522 956611 TELEFAX 0522 951555 EMAIL service emak it INTERNET http www emak it 71505055 0 IT DE GEBRUIKERSHANDLEIDING NL MANUEL D UTILISATION FR OPERATOR S MANUAL EN EMAK PUBBL 001100902 EF63C 6 5M OM63C 6 5M TONDEUSE AUTOPORTÉE RIDER RIDING MOWER AUFSITZMÄHER RIDER RASAERBA RIDER ZITMAAIER RIDER ...

Page 2: ...lla garanzia e il declino di ogni responsabilità del Costruttore riversando sull utilizzatore gli oneri derivanti da danni o lesioni proprie o a terzi Nel caso dovesse riscontrare qualche leggera differenza fra quanto qui descritto e la macchina in suo possesso tenga presente che dato il continuo miglioramen to del prodotto le informazioni contenute in questo manuale sono soggette a modifiche senz...

Page 3: ...r la sicurezza 15 5 2 Criteri di intervento dei dispositivi di sicurezza 15 5 3 Operazioni preliminari prima di iniziare il lavoro 16 5 4 Uso della macchina 19 5 5 Uso sui terreni in pendenza 25 5 6 Trasporto 25 5 7 Alcuni consigli per eseguire un buon taglio 26 6 MANUTENZIONE 27 Contiene tutte le informazioni per mantenere efficiente la macchina 6 1 Raccomandazioni per la sicurezza 27 6 2 Manuten...

Page 4: ...za o del funzionamento sono evidenziati secondo questo criterio oppure Fornisce precisazioni o altri ele menti a quanto già precedentemente indicato nell intento di non danneggiare la macchina o causare danni Possibilità di lesioni personali o a terzi in caso di inos servanza Possibilità di gravi lesioni personali o a terzi con pericolo di morte in caso di inosservanza Tutte le indicazioni anterio...

Page 5: ...nzina non si siano dissolti ricollocare e serrare bene i tappi del serba toio e del contenitore della benzina 4 Sostituire i silenziatori difettosi 5 Prima dell uso procedere sempre ad una verifica generale per controllare che la lama le viti e il gruppo di taglio non siano usurati o danneggiati Sostituire in blocco la lama e le viti danneggiate o usurate per mantenere l e quilibratura C UTILIZZO ...

Page 6: ...ta illeggibile contattate il vostro Rivenditore per sostituirla Il loro significato è spiegato qui di seguito IT 5 NORME DI SICUREZZA anomalo controllare immediatamente le cause 11 Disinnestare la lama durante il trasporto e ogni volta che non venga impiegata 12 Fermare il motore e disinnestare la lama prima di fare rifornimento di carburante prima di togliere il sacco raccoglierba 13 Ridurre il g...

Page 7: ...indicata 5 Velocità di esercizio del motore in giri min 6 Tipo di macchina 7 Numero di matricola 8 Peso in kg 9 Nome e indirizzo del Costruttore 2 2 IDENTIFICAZIONE DEI COMPONENTI PRINCIPALI La macchina è composta da una serie di componenti principali a cui corrispondo no le seguenti funzionalità 11 Piatto di taglio è il carter che racchiude la lama rotante 12 Lama è l elemento preposto al taglio ...

Page 8: ...specifico libretto 16 Batteria solo nei modelli con avviamento elettrico fornisce l ener gia per l avviamento del motore le sue caratteristiche e norme d uso sono descritte in uno specifico libretto 17 Sedile di guida è la postazione di lavoro dell operatore ed è dotato di un sensore che ne rileva la presenza ai fini dell intervento dei dispositivi di sicu rezza 18 Etichette di prescrizioni e sicu...

Page 9: ... taglio portarlo alla mas sima altezza e prestare la massima attenzione al momento della discesa dal pallet di base La dotazione comprende la viteria necessaria al completamento del montaggio una siringa per lo scarico dell olio motore Inoltre nei modelli con avviamento elettrico un carica batterie 2 chiavi d avviamento un fusibile di ricambio da 6 3 A da conser vare per eventuali necessità 3 2 MO...

Page 10: ...A BATTERIA solo nei modelli con avvia mento elettrico La batteria 1 è alloggiata sotto il sedile 1 Collegare il connettore della batteria 2 al connettore della macchina 3 2 ricaricare la batteria seguendo le indica zioni del libretto 6 2 5 Evitare assolutamente di avviare il motore prima della completa ricarica Attenersi alle istruzioni del Costruttore della batteria relative alla sicurezza nella ...

Page 11: ...ti 5 e montare i due tiranti 6 fissandoli per mezzo delle viti 7 3 agganciare tutti i profili in plastica 8 ai tubi del telaio anteriore 4 aiutandosi con un cacciavite 9 4 introdurre la maniglia 10 nei fori della copertura 11 e fissare il tutto al telaio mediante le viti 12 5 montare la maniglia posteriore 13 e fissarla con le viti 14 IT 10 SBALLAGGIO E COMPLETAMENTO 7 5 12 10 1 1 4 5 1 14 13 6 4 ...

Page 12: ...e aziona il freno Occorre prestare la massima attenzione a non indugiare trop po nella fase di frizione per non provocare il surriscaldamento e il conseguente danneggiamento della cinghia di trasmissione del moto Durante la marcia non tenere il piede appoggiato sul pedale 4 3 LEVA FRENO STAZIONAMENTO Il freno di stazionamento impedisce alla macchina di muoversi dopo averla par NOTA IMPORTANTE IT 1...

Page 13: ...do le indicazioni riportate sull etichetta L innesto della retromarcia deve avvenire da fermo 4 5 LEVA REGOLAZIONE ALTEZZA TAGLIO Questa leva ha cinque posizioni indicate da 1 a 5 sulla relativa targhetta corrispondenti ad altrettante altezze di taglio comprese fra 3 e 7 5 cm Per passare da una posizione all altra occorre spostare lateralmente la leva e riposizionarla in una delle tacche di arrest...

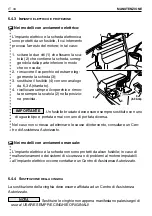
Page 14: ...ta cor rispondono a STARTER avviamento a freddo LENTO regime minimo del motore VELOCE regime massimo del motore La posizione STARTER provoca un arricchimento della miscela e deve essere usata in caso di avviamento a freddo e solo per il tempo strettamente necessario Durante i percorsi di trasferimento scegliere una posizione intermedia fra LENTO e VELOCE Durante il taglio dell erba portare la leva...

Page 15: ... ARRESTO spegnimento del motore STARTER avviamento a freddo LENTO regime minimo del motore VELOCE regime massimo del motore La posizione STARTER provoca un arricchimento della miscela e deve essere usata in caso di avviamento a freddo e solo per il tempo strettamente necessario Durante i percorsi di trasferimento scegliere una posizione intermedia fra LENTO e VELOCE Durante il taglio dell erba por...

Page 16: ... in grado di ridurre i riflessi e la capacità di attenzione Rientra nella responsabilità dell utilizzatore la valutazione dei rischi potenziali del terreno su cui si deve lavorare nonchè prendere tutte le precauzioni necessarie per garantire la sua e altrui sicurezza in particola re su pendii terreni accidentati scivolosi o instabili Non lasciare la macchina ferma nell erba alta con il motore in m...

Page 17: ...i assicurano che il lavoro si svolga in modo proficuo e nella massi ma sicurezza 5 3 1 REGOLAZIONE DEL SEDILE Il sedile si regola facendolo scorrere lungo le asole del supporto 1 Allentare le quattro viti 1 2 trovata la posizione serrare a fondo le quat tro viti 1 5 3 2 PRESSIONE DEI PNEUMATICI La corretta pressione dei pneumatici è essenziale per mantenere l allineamento del piatto di taglio e ot...

Page 18: ... motore 2 con l aiuto di un cac ciavite 2 secondo le precise modalità indicate nel manuale del motore il livello dell olio deve essere compreso fra le tacche MIN e MAX dell astina 3 3 rimontare sempre il tappo 1 e la copertu ra motore 2 Per il rifornimento di carburante da eseguire a motore fermo 1 svitare il tappo 4 del serbatoio posto die tro al sedile 2 fare il rifornimento utilizzando un imbut...

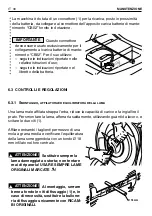
Page 19: ...tà di frenata della macchina sia adeguata alle condizioni di impiego evitando di iniziare il lavoro se si nutrono dubbi sulla efficienza del freno Nel caso di necessità regolare il freno 6 3 4 e se permangono dubbi sulla sua efficienza occorre consultare un Centro di Assistenza Autorizzato 5 3 7 CONTROLLO DELLA LAMA Indossare guanti robusti per maneggiare la lama Controllare che la lama sia ben af...

Page 20: ...enuto Nei modelli con avviamento manuale 5 afferrare l impugnatura della fune d avviamento e dare uno strappo deciso 6 ad avviamento avvenuto riaccompagnare l impugnatura nella sua sede 7 Dopo qualche secondo di funzionamento portare la leva dell acceleratore in posizione VELOCE e quindi su LENTO Lo starter deve essere disinserito appena possibile il suo impiego a motore già caldo può imbrattare l...

Page 21: ...ento Raggiungere la velocità voluta agendo sull acceleratore e sul cambio per passa re da una marcia a un altra occorre azionare sempre la frizione premendo il pedale 4 2 Il rilascio del pedale deve essere sempre graduale per evitare che un innesto troppo brusco della trazione possa causare l im pennamento e la perdita di controllo del mezzo 5 4 3 FRENATURA Per frenare 1 rallentare dapprima la vel...

Page 22: ...tità d erba da asportare non sia eccessiva onde evitare che la lama si possa bloccare Secondo le condizioni del prato altezza densità e umidità dell erba su terreni pianeg gianti si possono seguire queste indicazioni di massima Erba medio alta e densa prato umido 1ª marcia Erba medio bassa prato asciutto 2ª marcia Nei tagli su terreni in pendenza occorre ridurre la velo cità di avanzamento per gar...

Page 23: ...esta operazione deve sempre avvenire a motore spento In caso di intasamento del canale di espulsione dovuto ad accumulo d erba per riempimento del sacco o per una velocità elevata in rapporto alla quantità di erba tagliata occorre 1 arrestare l avanzamento disinnestare la lama e spegnere il motore 2 togliere il sacco 3 rimuovere l erba accumulata agendo dalla parte della bocca di uscita del canale...

Page 24: ...contenitori con l erba tagliata all interno di un locale Dopo ogni utilizzo ripulire l esterno della macchina svuotare il sacco e scuoterlo per ripulirlo dai residui d erba e terriccio Ripassare le parti in plastica della carrozzeria con una spugna imbevuta d acqua e detersivo facendo ben attenzione a non bagnare il motore i componenti dell impianto elettrico e la scheda elettronica Non usare mai ...

Page 25: ...eriodo di inattività superiore a 1 mese seguire le indicazioni contenute nel libretto di istruzioni del motore e lubrificare tutte le arti colazioni secondo quanto indicato 6 2 1 Nei modelli con avviamento elettrico Provvedere a scollegare i connettori 2 e 3 della batteria 1 La batteria deve essere conservata in un luogo fresco e asciutto Ricaricare sempre la batteria prima di un lungo periodo di ...

Page 26: ...l cambio in folle o la frizione disinnestata Inserire sempre una marcia bassa e il freno di stazionamento prima di lasciare la macchina ferma e incustodita Nei terreni in pendenza occorre iniziare la marcia avanti con particolare cautela per evitare l impennamento della macchina Ridurre la velocità d avanzamento prima di affrontare un pendio special mente in discesa 5 6 TRASPORTO Se la macchina de...

Page 27: ...a troppo 6 Nei periodi più caldi e secchi è opportuno tenere l erba leggermente più alta per ridurre il disseccamento del terreno 7 Se l erba è molto alta è meglio eseguire il taglio in due passate a distanza di un giorno la prima con il taglio ad altezza massima ed eventualmente a scia ridotta e la seconda all altezza desiderata 8 L aspetto del prato sarà migliore se i tagli saranno eseguiti alte...

Page 28: ...icurezza Non disperdere mai nell ambiente olii esausti benzina e ogni altro prodotto inquinante 6 1 1 POSIZIONAMENTO IN VERTICALE Per accedere più comodamente alla parte inferiore è possibile posizionare la macchina in verticale Disporre la macchina su un terreno solido e piano e avvalersi dell apporto di almeno due persone in grado di eseguire l operazione con com petenza e sicurezza 1 Svuotare i...

Page 29: ...UTENZIONE PERIODICA 6 2 1 MANUTENZIONE E LUBRIFICAZIONE GENERALE Seguire lo schema che riporta i punti soggetti a verifiche lubrificazione e manu tenzione periodiche con l indicazione del tipo di lubrificante da impiegare e della periodicità da osservare negli interventi IT 28 MANUTENZIONE 25 ORE 25 ORE OLIO SAE 30 ...

Page 30: ... 5 BATTERIA Solo nei modelli con avviamento elettrico È fondamentale effettuare un accurata manutenzione della batteria per garan tirne una lunga durata La batteria della vostra macchina deve essere tassativamente caricata prima del primo utilizzo e successivamente in caso di inattività della macchina e alla successiva messa in servizio Leggere e rispettare attentamente la procedura di ricarica de...

Page 31: ...EQUILIBRATURA DELLA LAMA Una lama male affilata strappa l erba riduce la capacità di carico e fa ingiallire il prato Per smontare la lama afferrarla saldamente utilizzando guanti da lavoro e svitare le due viti 1 Affilare entrambi i taglienti per mezzo di una mola a grana media e verificare l equilibratura della lama sorreggendola con un tondo Ø 18 mm infilato nel foro centrale Sostituire sempre l...

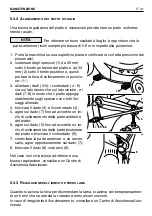
Page 32: ... il piatto appoggi stabilmente sugli spessori con tutti i fis saggi allentati 4 bloccare il dado 3 e il controdado 4 5 agire sul dado 7 fino ad avvertire un ini zio di sollevamento della parte anteriore del piatto 6 agire sul dado 5 fino ad avvertire un ini zio di sollevamento della parte posteriore del piatto e bloccare il controdado 6 7 controllare la parte anteriore e se neces sario agire oppor...

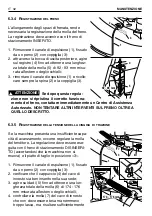
Page 33: ...ON TENTARE ALTRI INTERVENTI SUL FRENO OLTRE A QUELLO DESCRITTO 6 3 5 REGISTRAZIONE DELLA TENSIONE DELLA CINGHIA DI TRAZIONE Se la macchina presenta una insufficiente capa cità di avanzamento occorre regolare la molla del tenditore La regolazione deve essere ese guita con il freno di stazionamento DISINSERI TO accertandosi che la macchina non si muova e il piatto di taglio in posizione 3 1 Rimuover...

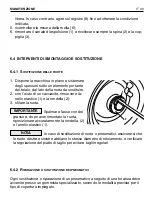
Page 34: ...cciavite rimuovere l a nello elastico 1 e la rondella 2 3 sfilare la ruota Spalmare l asse con del grasso e dopo aver rimontato la ruota riposizionare accuratamente la rondella 2 e l anello elastico 1 In caso di sostituzione di ruote o pneumatici assicurarsi che le ruote destre e sinistre abbiano lo stesso diametro di rotolamento e verificare la regolazione del piatto di taglio per evitare tagli i...

Page 35: ...usibile bruciato deve essere sempre sostituito con uno di uguale tipo e portata e mai con uno di portata diversa Nel caso non si riesca ad eliminare le cause di intervento consultare un Cen tro di Assistenza Autorizzato Nei modelli con avviamento manuale L impianto elettrico e la scheda non sono protetti da alcun fusibile in caso di malfunzionamento dei sistemi di sicurezza o di problemi al motore...

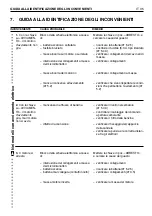
Page 36: ...ssa dei microinterruttori batteria scarica batteria mal collegata contatti incerti massa motore incerta Mettere la chiave in pos ARRESTO e cercare le cause del guasto ricaricare la batteria 6 2 5 sostituire il fusibile 6 3 A tipo ritardato 6 4 3 verificare i collegamenti dei cavi neri di massa verificare i collegamenti verificare i collegamenti a massa verificare che siano rispettate le condi zion...

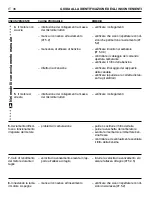
Page 37: ...za di taglio manca il consenso all inserimento verificare i collegamenti verificare che siano rispettate le condi zioni che permettono l avviamento 5 2 verificare il livello nel serbatoio 5 3 3 controllare il cablaggio del comando apertura carburante verificare il filtro della benzina verificare il fissaggio del cappuccio della candela verificare la pulizia e la corretta distan za fra gli elettrod...

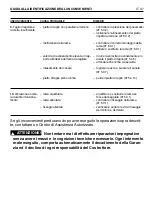
Page 38: ...re e serrare le viti di fissaggio del motore e del telaio piatto di taglio non parallelo al terreno inefficienza della lama velocità di avanzamento elevata in rap porto all altezza dell erba da tagliare intasamento del canale piatto di taglio pieno d erba lama squilibrata lama allentata fissaggi allentati 9 Taglio irregolare e raccolta insufficiente 10 Vibrazione anoma la durante il funziona mento...

Page 39: ...ci posteriori 13 x 5 00 6 Pressione gonfiaggio anteriore 1 8 bar Pressione gonfiaggio posteriore 1 3 bar Peso complessivo 125 kg Velocità di avanzamento a 3000 min 1 in 1ª 2 5 km h in 2ª 4 0 km h in 3ª 8 0 km h in Retromarcia 3 5 km h Diametro interno di sterzata diametro minimo di erba non tagliata 1 5 m Altezza di taglio 3 7 5 cm Larghezza di taglio 62 cm Capacità del sacco 140 litri 670 960 720...

Page 40: ...validate the gua rantee and the manufacturer will decline all responsibility placing the blame with the user for any damage or injury to himself or others in such cases Since the product is continually being improved you may find slight differences between your machine and the descriptions contained in this manual Certain modifications can be made to the machine without prior warning and without t...

Page 41: ...working efficiently and safely 5 1 Safety recommendations 15 5 2 Why the safety devices cut in 15 5 3 Preliminary operations before starting work 16 5 4 Using the machine 19 5 5 Using on slopes 25 5 6 Transporting 25 5 7 Advice on how to obtain a good cut 26 6 MAINTENANCE 27 All the information for maintaining the machine in peak efficiency 6 1 Safety recommendations 27 6 2 Routine maintenance 28 ...

Page 42: ... operation are highlighted and signify the following or These give details or further informa tion on what has already been said and aim to prevent damage to the machine Non observance will result in the risk of injury to oneself or others Non observance will result in the risk of serious injury or death to oneself or others Whenever a reference is made to a position on the machine front back left...

Page 43: ...d avoid creating any source of ignition until the petrol vapours have dissi pated replace all fuel tank and container caps securely 4 Replace faulty silencers 5 Before use always visually inspect to see that the blade blade bolts and cutter assembly are not worn or damaged Replace the worn or damaged blade and bolts in sets to preserve the balance C OPERATION 1 Do not operate the engine in a confi...

Page 44: ...rt of the machine If a label should fall off or become illegible contact your Retailer to replace it Their meaning is explained below EN 5 SAFETY before restarting and operating the equipment If the machine starts to vibrate abnormally inspect it immediately 11 Disengage the blade when transporting or whenever it is not in use 12 Stop the engine and disengage the blade before refuelling before rem...

Page 45: ...manufacture 4 Nominal power if indicated 5 Operating engine speed in r p m 6 Type of machine 7 Serial number 8 Weight in kg 9 Name and address of Manufacturer 2 2 NAME AND ADDRESS OF MANUFACTURER The machine is composed of a series of main components that have the following functions 11 Cutting deck this is the guard enclosing the rotating blade 12 Blade this is what cuts the grass The wings at th...

Page 46: ... a specific manual 16 Batteria only in the electric start models provides the energy for starting the engine Its specifications and regulations for use are described in a specific manual 17 Driver seat this is where the machine operator sits It has a sensor which detects the presence of the operator and acts as a safety device 18 Labels for regulations and safety give reminders on the main provisi...

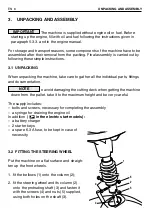
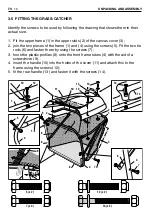
Page 47: ... avoid damaging the cutting deck when getting the machine down from the pallet take it to the maximum height and be very careful The supply includes bolts and screws necessary for completing the assembly a syringe for draining the engine oil In addition in the electric start models a battery charger 2 starter keys a spare 6 3 A fuse to be kept in case of necessity 3 2 FITTING THE STEERING WHEEL Pu...

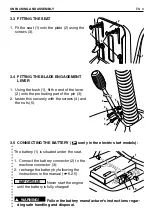
Page 48: ...5 3 5 CONNECTING THE BATTERY sonly in the electric start models The battery 1 is situated under the seat 1 Connect the battery connector 2 to the machine connector 3 2 recharge the battery by following the instructions in the manual 6 2 5 Never start the engine until the battery is fully charged Follow the battery manufacturer s instructions regar ding safe handling and disposal WARNING IMPORTANT ...

Page 49: ...crews 5 Fit the two tie rods 6 and fasten them by using the screws 7 3 hook the plastic profiles 8 onto the front frame tubes 4 with the aid of a screwdriver 9 4 insert the handle 10 into the holes of the cover 11 and attach this to the frame using the screws 12 5 fit the rear handle 13 and fasten it with the screws 14 EN 10 UNPACKING AND ASSEMBLY 7 5 12 10 1 1 4 5 1 14 13 6 4 7 11 13 14 12 10 4 2...

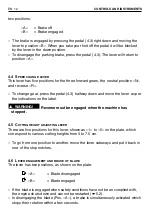
Page 50: ...d in the second part it works the brake Do not keep the pedal half way of clutch engagement or disengagement as this can cause overheating and damage the transmission belt When the machine is in movement keep your foot off the pedal 4 3 PARKING BRAKE LEVER This lever stops the machine from moving when it has been parked There are NOTE IMPORTANT EN 11 CONTROLS AND INSTRUMENTS B A 4 2 4 3 4 4 4 1 R ...

Page 51: ...label Reverse must be engaged when the machine has stopped 4 5 CUTTING HEIGHT ADJUSTING LEVER There are five positions for this lever shown as 1 to 5 on the plate which correspond to various cutting heights from 3 to 7 5 cm To go from one position to another move the lever sideways and put it back in one of the stop notches 4 6 LEVER ENGAGEMENT AND BRAKE OF BLADE The lever has two positions as sho...

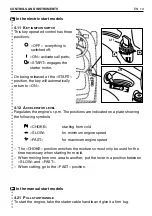
Page 52: ...re indicated on a plate showing the following symbols CHOKE starting from cold SLOW for minimum engine speed FAST for maximum engine speed The CHOKE position enriches the mixture so must only be used for the time necessary when starting from cold When moving from one area to another put the lever in a position between SLOW and FAST When cutting go to the FAST position In the manual start models 4 ...

Page 53: ...lowing symbols OFF for switching off the engine CHOKE starting from cold SLOW for minimum engine speed FAST for maximum engine speed The CHOKE position enriches the mixture so must only be used for the time necessary when starting from cold When moving from one area to another put the lever in a position between SLOW and FAST When cutting go to the FAST position EN 14 CONTROLS AND INSTRUMENTS 4 12...

Page 54: ...der the effect of medicines or other substances that can reduce your reflex actions and your ability to concentrate It is the user s responsibility to assess the potential risk of the area where work is to be carried out as well as to take all the necessary steps to ensure his own safety and that of others particularly on slopes or rough slippery and unstable ground Do not leave the machine stoppe...

Page 55: ...E STARTING WORK These controls ensure that the work gives the best results and is done in maxi mum safety 5 3 1 SEAT ADJUSTMENT Adjust the seat by sliding it along the bracket slots 1 Loosen the four screws 1 2 once you have found the right position se curely tighten the four screws 1 5 3 2 TYRE PRESSURE Having the correct tyre pressure is essential for ensuring that the cutting deck is perfectly ...

Page 56: ... plug 1 remove the engine cover 2 with the aid of a screwdriver 2 by closely following the methods de scribed in the engine manual make sure the oil level is between the MIN and MAX marks on the dipstick 3 3 always refit the plug 1 and engine cover 2 To refuel to be done when the machine has stopped 1 unscrew the plug 4 from the tank located behind the seat 2 refuel using a funnel but do not compl...

Page 57: ...Make sure that the machine s braking capacity is adequate for the conditions of usage Avoid starting the machine if you have doubts on the brake efficiency If necessary adjust the brake 6 3 4 and if you still have doubts on its effi ciency consult a Licensed Service Centre 5 3 7 CHECKING THE BLADE Wear strong gloves when handling the blade Check that the blade is sharpened properly and firmly fixe...

Page 58: ...ine 6 release the key once the engine has started In the manual start models 5 take the starter cable handle and firmly tug it 6 once the engine has started put the handle back in its seat 7 After the machine has run for a few seconds put the accelerator lever on START and then on SLOW he choke must be closed as soon as possible Using it when the engine is already warm can foul the spark plugs and...

Page 59: ...l gradually to begin the movement Reach the desired operating speed using the accelerator and gear lever To change gear the clutch must always be used by pushing the pedal 4 2 The pedal must be released gradually as sudden en gagement may cause tipping up and loss of control of the vehicle 5 4 3 BRAKING To brake 1 first slow down the machine by reducing the engine speed 2 push the pedal right down...

Page 60: ... the quantity of grass to be remo ved is not too much that the blade can block According to the lawn condition height density and dampness of the grass On flat ground these general conditions can be followed Medium high and dense grass wet lawn 1st gear Medium low grass dry lawn 2nd gear When cutting on sloping ground the forward speed must be reduced to ensure safe conditions 1 2 5 5 Lower the sp...

Page 61: ...th the engine turned off If the collector channel gets blocked due to accumulated grass cuttings filling up the grass catcher or an excessively high speed with relation to the quantity of grass cuttings you need to 1 stop forward movement immediately disengage the blade and stop the en gine 2 remove the grass catcher 3 rremove the accumulated cuttings reaching them from the exit of the collector c...

Page 62: ... grass catcher and do not leave con tainers full of cut grass inside a room After each mowing clean the outside of the machine empty the grass catcher and shake it to remove residual grass and earth Clean the plastic parts of the body with a damp sponge using water and deter gent taking care not to wet the engine the electrical parts or the electronic card Never use hose nozzles or harsh detergent...

Page 63: ...ine is likely to be unused for a long period more than 1 month follow the instructions in the engine manual Lubricate all joints as indicated 6 2 1 In the electric start models Disconnect the connectors 2 and 3 of the battery 1 The battery must be kept in a cool and dry place Before a long stora ge period more than 1 month always charge the battery and then recharge befo re using again 6 2 5 Empty...

Page 64: ...eutral or with the clutch out Always engage a low gear and the parking brake before leaving the machine at a stopped and unattended Take care when beginning forward movement on sloping ground to prevent the risk of tipping up Reduce the forward speed before going on a slope particularly downhill 5 6 TRANSPORTING If the machine is transported on a truck or trailer use suitable equipment for lifting...

Page 65: ... the next 6 During hot and dry periods the grass should be cut a little higher to prevent the ground from drying out 7 If the grass is very tall it should be cut twice in a twenty four hour period The first time at maximum cutting height possibly reducing the cutting width and the second cut at the height desired 8 The appearance of the lawn will improve if you alternate the cutting in both direct...

Page 66: ...f and others Never get rid of used oil fuel or other pollutants in unauthor ised places 6 1 1 LIFTING THE LIFT VERTICALLY In order to have easy access to the lower part of the machine you can lift it verti cally Place the machine on firm and flat ground At least two com petent people should be involved in this operation to assure the necessary safety 1 Empty the fuel tank 2 bring the cutting deck ...

Page 67: ...l over 6 2 ROUTINE MAINTENANCE 6 2 1 MAINTENANCE AND GENERAL LUBRICATION Follow the diagram showing the points requiring checks lubrication and routine maintenance together with the type of lubricant to be used and the frequency required EN 28 MAINTENANCE 25 HOURS 25 HOURS OIL SAE 30 ...

Page 68: ...does not need changing or topping up 6 2 5 BATTERY Only in the electric start models To ensure long life to the battery it is essential to keep it carefully maintained The battery on your machine must be charged before using for the first time and subsequently if the machine is stored before you next start up To ensure long life to the battery it is essential to keep it carefully maintai ned Failu...

Page 69: ...CING THE BLADE A badly sharpened blade tears at the grass reduces collection and makes the lawn turn yellow To dismantle the blade hold onto it tightly using work gloves and loosen the two screws 1 Sharpen the two cutting edges using a medium grade grinding wheel and check the balance by holding the blade up with a round 18 mm Ø bar inserted in the central hole Always replace the damaged or bent b...

Page 70: ... 8 so that the deck is resting firmly on the blocks 4 tighten the nut 3 and the locknut 4 5 turn the nut 7 until the front part of the deck just begins to rise 6 turn the nut 5 until the rear part of the deck just begins to rise and tighten the locknut 6 7 check the front part and if necessary turn the nut 7 8 tighten the nut 8 on the pin 9 If you are unable to adjust the cutting deck properly con...

Page 71: ...ATTEMPT ANY OTHER WORK ON THE BRAKE THAN WHAT IS DESCRIBED HERE 6 3 5 ADJUSTING THE TENSION OF THE DRIVE BELT If you should notice that forward drive power has dropped it will be necessary to adjust the spring of the stretcher Make the adjustment with the parking brake DISENGAGED to make sure that the machine does not move and with the cutting deck in position 3 1 Remove the collector channel 1 fa...

Page 72: ...e changed 2 using a screwdriver remove the snap ring 1 and the washer 2 3 pull out the wheel Smear some waterproof grease on the axle and after refitting the wheel carefully refit the washer 2 and the snap ring 1 Should you replace wheels or tyres ensure that the right and left wheels are of the same rolling diameter and check that cutting deck is ad justed properly to prevent an uneven cut 6 4 2 ...

Page 73: ...rect position A blown fuse must always be replaced by one of the same type and ampere rating and never with one of another rating If you cannot find out why the fuse has blown consult a Licensed Service Centre In the manual start models The electric system and the card are not protected by any fuses If the safety system fails to work properly or there are engine problems due to the electric system...

Page 74: ... of the microswitches disconnected flat battery badly connected battery poor contact engine badly earthed Turn the key to STOP and look for the cause of the problem recharge battery 6 2 5 replace fuse 6 3 A delayed 6 4 3 check connections of black earth leads check connections check earth connections check that the conditions allowing the start are met 5 2 check the level in the tank 5 3 3 check t...

Page 75: ...gh in relation to cutting height you are not ready to engage the blade check connections check that the conditions allowing the start are met 5 2 check the level in the tank 5 3 3 check the wiring of the fuel open com mand check the fuel filter check that spark plug caps are firmly fitted check that the electrodes are clean and have the correct gap check connections clean or replace the air filter...

Page 76: ... check and tighten all the fixing bolts of the engine and frame cutting deck not parallel to the ground blade cutting badly forward speed too high compared to height of grass collector channel is blocked cutting deck full of grass blade unbalanced blade loose fixing bolts loose 9 Uneven cut and poor grass collection 10 Unusual vibrations while working If problems continue after having carried out ...

Page 77: ...Rear tyres 13 x 5 00 6 Front tyre pressure 1 8 bar Rear tyre pressure 1 3 bar Overall weight 125 kg Forward speed at 3000 min 1 in 1st 2 5 km h in 2nd 4 0 km h in 3rd 8 0 km h in Reverse 3 5 km h Inside turning circle minimum diameter of uncut grass 1 5 m Cutting height 3 7 5 cm Cutting height 62 cm Grass catcher capacity 140 litres 670 960 720 1310 703 1805 1028 1054 ...

Page 78: ...bricante siendo el usuario responsable por daños o lesiones propias o a terceros En caso de que encontrara alguna leve diferencia entre lo descrito en este manual y la máquina en su poder tenga presente que dado el continuo mejoramiento del pro ducto la información contenida en este manual está sujeta a modificaciones sin aviso previo u obligación de actualización conservándose las características...

Page 79: ...5 1 Medidas de seguridad 15 5 2 Criterios de intervención de los dispositivos de seguridad 15 5 3 Operaciones preliminares antes de comenzar el trabajo 16 5 4 Uso de la máquina 19 5 5 Uso de la máquina en pendientes 25 5 6 Transporte 25 5 7 Consejos para efectuar un buen corte del césped 26 6 MANTENIMIENTO 27 Contiene la información necesaria para mantener eficiente la máquina 6 1 Medidas de segur...

Page 80: ...dad o funcionamiento se ponen de relieve según este criterio o Suministra aclaraciones u otros detalles relativos a lo anteriormente descrito con la intención de no dañar la máquina o causar daños Posibilidad de lesiones personales o a terceros en caso de incumplimiento Posibilidad de graves lesiones personales o a terceros con peligro de muerte en caso de incumplimiento Todas las indicaciones ant...

Page 81: ...ble y los vapores de gaso lina se hayan disuelto después del reabastecimiento volver a colocar siempre y cerrar bien los tapones del depósito y del contenedor de gasolina 4 Cambiar los silenciadores defectuosos 5 Antes del uso proceder a una inspección general sobre todo del aspecto de la cuchilla y controlar que los tornillos y el grupo de corte no estén desgastados o dañados Sustituir en blo que...

Page 82: ...ionario para sustituirla El significado de las etiquetas se explica a continuación ES 5 NORMAS DE SEGURIDAD si la máquina empieza a vibrar en modo anó malo controlar inmediatamente las posibles causas 11 Desacoplar la cuchilla durante el transporte y cada vez que no se utilicen 12 Parar el motor y desacoplar la cuchilla antes de reponer combustible antes de quitar la bolsa de recolección 13 Dismin...

Page 83: ...inal si indicada 5 Régimen de trabajo del motor en r p m 6 Tipo de máquina 7 Número de matrícula 8 Peso en kg 9 Nombre y dirección del Fabricante 2 2 IDENTIFICACION DE LOS COMPONENTES PRINCIPALES La máquina está formada por algunos componentes principales que desempeñan las siguientes funciones 11 Plato de corte es el cárter que encierra la cuchilla rotativa 12 Cuchilla son los elementos predispue...

Page 84: ...ecífico 16 Batería en los modelos con arranque eléctrico suministra la energía para el arranque del motor Sus características y normas de uso se describen en un manual de instrucciones específico 17 Asiento del conductor es el puesto de trabajo del operador y está dotado de un sensor que detecta su presencia a fin de la intervención de los dispositivos de seguridad 18 Etiquetas de prescripción y d...

Page 85: ...varlo a la máxima altura y prestar la máxima atención al momento de la bajada del pallet de base El equipamiento comprende los tornillos necesarios para completar el montaje una jeringa para descargar el aceite del motor Además en los modelos con arranque eléctrico un cargador de batería 2 llaves de encendido un fusible de repuesto de 6 3 A conservar en caso de eventuales necesidades 3 2 MONTAJE D...

Page 86: ... BATERIA sólo en los modelos con arranque eléctri co La batería 1 está instalada debajo del asien to 1 Enchufar el conector de la batería 2 al conector de la máquina 3 2 recargar la batería siguiendo las instruccio nes contenidas en el manual 6 2 5 Es absolutamente nece sario evitar de poner en marcha el motor antes de ejecutar la recarga completa Atenerse a las medidas de seguridad suministradas ...

Page 87: ... y montar los dos tirantes 6 fijándolos por medio de los tornillos 7 3 enganchar todos los perfiles de plástico 8 en los tubos del bastidor anterior 4 con la ayuda de un destornillador 9 4 introducir el asa 10 en los orificios de la cubierta 11 y fijar el conjunto al basti dor mediante los tornillos 12 5 montar el asa posterior 13 y fijarla con los tornillos 14 ES 10 DESEMBALAJE Y MONTAJE FINAL 7 ...

Page 88: ...rta como freno Es necesario prestar la máxima atención a no pararse demasia do durante la fase de embrague para no provocar el recalentamiento y el consi guiente daño de la correa de transmisión del movimiento Durante la marcha es aconsejable no tener el pie apoyado sobre el pedal 4 3 PALANCA DEL FRENO DE ESTACIONAMIENTO El freno de estacionamiento desempeña la función de impedir que la máquina se...

Page 89: ...según las instrucciones indicadas en la etiqueta La marcha atrás se debe engranar con la máquina parada 4 5 PALANCA DE REGULACIÓN DE LA ALTURA DE CORTE Esta palanca tiene cinco posiciones de 1 a 5 indicadas en la respectiva placa que corresponden a las cinco alturas de corte comprendidas entre 3 y 7 5 cm Para pasar de una posición a la otra es necesario mover en sentido lateral la palanca y coloca...

Page 90: ... a Posición CEBADOR arranque en frío Posición LENTO corresponde al régimen mínimo del motor Posición RAPIDO corresponde al régimen máximo del motor La posición CEBADOR produce un enriquecimiento de la mezcla y se debe utilizar en caso de arranque en frío y sólo por el tiempo estrictamente necesario Durante el avance elegir una posición intermedia entre LENTO y RAPIDO Durante el corte es oportuno l...

Page 91: ...ARADA apagado del motor Posición CEBADOR arranque en frío Posición LENTO corresponde al régimen mínimo del motor Posición RAPIDO corresponde al régimen máximo del motor La posición CEBADOR produce un enriquecimiento de la mezcla y se debe utilizar en caso de arranque en frío y sólo por el tiempo estrictamente necesario Durante el avance elegir una posición intermedia entre LENTO y RAPIDO Durante e...

Page 92: ...stancias que disminuyen los reflejos y la capacidad de con centración El usuario es responsable de la evaluación de los riesgos potenciales del ter reno sobre el cual se debe trabajar así como de tomar todas las precaucio nes necesarias para garantizar su seguridad y la de terceros especialmente en pendientes terrenos accidentados resbaladizos o inestables No dejar la máquina parada en la hierba a...

Page 93: ...tos controles aseguran que el trabajo se desempeñe en modo provechoso y en la máxima seguridad 5 3 1 REGULACIÓN DEL ASIENTO El asiento se regula haciéndolo deslizar a lo largo de los orificios del soporte 1 Aflojar los cuatro tornillos 1 2 al encontrar la posición apretar a fondo los cuatro tornillos 1 5 3 2 PRESIÓN DE LOS NEUMÁTICOS La correcta presión de los neumáticos es esencial para mantener ...

Page 94: ...l motor 2 utilizando un destornillador 2 según los modos indicados en el manual del motor el nivel del aceite debe estar com prendido entre las muescas MIN y MAX de la varilla 3 3 colocar siempre el tapón 1 y la cubierta del motor 2 Para el reabastecimiento del combustible a realizar con el motor parado 1 quitar el tapón del depósito 4 instalado debajo del asiento 2 restaurar el nivel de combustib...

Page 95: ...ad de frenado de la máquina sea adecuada a las condicio nes de funcionamiento evitando comenzar el trabajo en caso de dudas sobre la efi ciencia del sistema de frenos Si es necesario regular el freno 6 3 4 y en caso de dudas sobre su eficiencia es necesario consultar un Centro de Asistencia Autorizado 5 3 7 CONTROL DE LA CUCHILLA Utilizar guantes robustos para manipular la cuchilla Controlar que l...

Page 96: ...és de la puesta en marcha En los modelos con arranque manual 5 coger la empuñadura del cable de arranque y darle un tirón fuerte 6 después del arranque acompañar la empuñadura en el alojamiento 7 Después de unos segundos de funcionamiento llevar la palanca del acelerador a la posición RAPIDA y luego a LENTO El cebador se debe desactivar lo más antes posible Su uso con el motor ya caliente puede en...

Page 97: ... el movimiento Alcanzar la velocidad deseada interveniendo en el acelerador y en el cambio Para cambiar marcha es necesario apretar siempre el pedal del embrague 4 2 IEs necesario soltar el pedal gradualmente para evitar que un acoplamiento demasiado brusco de la tracción pueda empinar y causar la pérdida de control del medio 5 4 3 FRENADO Para frenar 1 bajar la velocidad de la máquina disminuyend...

Page 98: ...ra evitar que la cuchilla se pueda bloquear según las condiciones del prado altura densidad y humedad del césped en ter renos llanos se pueden seguir estas indicaciones de carácter general Césped medio alta y densa prado húmedo 1ª marcha Césped medio bajo prado seco 2ª marcha Durante los cortes en terrenos en pendiente es necesario disminuir la velocidad de avance para garantizar las condiciones d...

Page 99: ...sta operación se debe efectuar siempre con el motor apa gado En caso de atascamiento del canal de expulsión debido a la acumulación de césped porque la bolsa se ha llenado o debido a una velocidad elevada respecto a la canti dad de césped cortado es necesario 1 parar la máquina desacoplar la cuchilla y apagar el motor 2 quitar la bolsa 3 sacar el césped acumulado por la boca de salida del canal 5 ...

Page 100: ... nedores con la hierba cortada en el interior de un local Después de cada uso limpiar el exterior de la máquina vaciar la bolsa de recolec ción y sacudirla para limpiarla de los residuos de césped y mantillo Repasar las partes de plástico de la carrocería con una esponja embebida con agua y detergente prestando atención de no mojar el motor los componentes de la insta lación eléctrica y la tarjeta...

Page 101: ...ad superior a 1 mes seguir las indica ciones contenidas en el manual de instrucciones del motor y lubricar todas las articu laciones según las indicaciones 6 2 1 En los modelos con arranque eléctrico Desconectar los conectores 2 e 3 de la batería 1 La batería se debe guar dar en un lugar fresco y seco Recargar siem pre la batería antes de un largo periodo de inactividad más de 1 mes y recargarla d...

Page 102: ...io en punto muerto o el embrague desengranado Engra nar siempre una marcha baja y el freno de estacionamiento antes de abando nar la máquina parada En los terrenos en pendiente es necesario comenzar la marcha con especial atención para evitar que la máquina se pueda empinar Disminuir la velocidad de avance antes de comenzar una pendiente especial mente en bajada 5 6 TRANSPORTE Si la máquina debe s...

Page 103: ...ás calurosos y secos es aconsejable mantener la hierba ligera mente más alta para prevenir la aridez del terreno 7 Si el césped está muy alto es aconsejable efectuar el corte en dos pasadas a distancia de un día la primera con las cuchillas a la altura máxima y eventualmente con ancho de corte reducido y la segunda a la altura deseada 8 El aspecto del prado será mejor si los cortes se efectuarán a...

Page 104: ...u seguridad y la de terceros No arrojar nunca en el ambiente aceites usados gasolina o cualquier otro producto contaminante 6 1 1 COLOCACIÓN VERTICAL Para acceder cómodamente a la parte inferior es posible colocar la máquina en verti cal Colocar la máquina en un terreno firme y llano y hacerse ayudar por almenos dos personas competentes capaces de ejecutar la operación en segu ridad 1 Vaciar el ta...

Page 105: ... 2 1 MANTENIMIENTO Y LUBRICACIÓN GENERAL Atenerse al esquema que indica los puntos en los que hay que efectuar comproba ciones lubricaciones y operaciones de mantenimiento periódico con la indicación del tipo de lubricante a utilizar y de la frecuencia de dichas operaciones ES 28 MANTENIMIENTO 25 HORAS 25 HORAS ACEITE SAE 30 ...

Page 106: ... 6 2 5 BATERÍA Sólo en los modelos con arranque eléctrico Es fundamental efectuar un cuidadoso mantenimiento de la batería para garantizar una larga duración de la misma La batería de su máquina debe ser absolutamente cargada antes del primer uso y en lo sucesivo regularmente en caso de inactividad de la máquina y la sucesiva puesta en servicio Leer y respetar atentamente el procedimiento de recar...

Page 107: ...hilla mal afilada arranca la hierba reduce la capacidad de carga y amarillea el prado Para desmontar una cuchilla cogerla firmemente utilizando guantes de tra bajo y desenroscar los dos tornillos 1 Afilar ambas cuchillas por medio de una muela de grano medio y controlar el balanceado de la cuchilla sosteniéndola con una barra redonda de diámetro Ø18 mm introducida en el orificio central Sustituir ...

Page 108: ...oye establemente en los espesores con todas las fijaciones flojas 4 bloquear la tuerca 3 y la contratuerca 4 5 intervenir en la tuerca 7 hasta notar que comience la elevación de la parte anterior del plato 6 intervenir en la tuerca 5 hasta notar que comience la elevación de la parte posterior del plato y bloquear la contratuerca 6 7 controlar la parte anterior y si es necesario intervenir correcta...

Page 109: ...oriza do NO INTENTAR OTRAS INTERVENCIONES EN EL FRENO A EXCEPCION DE LAS DESCRITAS 6 3 5 REGULACIÓN DE LA TENSIÓN DE LA CORREA DE TRACCIÓN Si la máquina presenta una insuficiente capacidad de avance es necesario regular la tensión del resorte del tensor La regulación se debe ejecutar con el freno de estacionamiento DESENGRANA DO comprobando que la máquina no se mueva y el plato de corte en la posi...

Page 110: ...da a sustituir 2 Utilizando un destornillador extraer el anillo elástico 1 y la arandela 2 3 extraer la rueda Repartir la grasa en el eje y después de haber montado la rueda colo car cuidadosamente la arandela 2 y el anillo elástico 1 En caso de cambio de las ruedas o neumáticos comprobar que las ruedas derechas e izquierdas tengan el mismo diámetro de rodamiento y comprobar la regulación del plat...

Page 111: ...a Un fusible quemado debe ser siempre sustituido con uno de igual tipo y carga y jamás con uno de carga diferente Si no se logra eliminar las causas de la intervención consultar un Centro de Asi stencia Autorizado En los modelos con arranque manual La instalación eléctrica y la tarjeta no están protegidas por ningún fusible En caso de anomalías en los sistemas de seguridad o de inconvenientes en e...

Page 112: ...asa de los microinterruptores batería agotada batería mal conectada contactos inse guros masa motor insegura Poner la llave en la pos PARADA y buscar las causas de la falla recargar la batería 6 2 5 sustituir el fusible 6 3 A tipo retarda do 6 4 3 comprobar las conexiones de los cables negros de la masa comprobar las conexiones comprobar las conexiones de la masa comprobar que se hayan respetado l...

Page 113: ...a la altura del corte falta habilitación al acoplamiento comprobar las conexiones comprobar que se hayan respetado las condiciones de puesta en marcha 5 2 comprobar el nivel del tanque 5 3 3 controlar las conexiones del comando apertura combustible comprobar el filtro de la gasolina comprobar la fijación del capuchón de la bujía comprobar la limpieza y la correcta distancia entre los electrodos co...

Page 114: ...rnillos de fijación del motor y del bastidor plato de corte no paralelo al terreno cuchilla no eficiente velocidad de avance elevada en rela ción a la altura de la hierba a cortar atascamiento del canal lato de corte lleno de hierba cuchilla desequilibrada cuchilla floja fijaciones flojas 9 Corte irregular y recolección insuficien te 10 Vibración anómala durante el funciona miento Si las anomalías...

Page 115: ...0 4 Neumáticos posteriores 13 x 5 00 6 Presión neumático anterior 1 8 bar Presión neumático posterior 1 3 bar Peso total 125 kg Velocidad de avance a 3000 min 1 en 1ª 2 5 km h en 2ª 4 0 km h en 3ª 8 0 km h en marcha atrás 3 5 km h Diámetro interior de viraje diámetro mínimo de césped no cortado 1 5 m Altura de corte 3 7 5 cm Anchura de corte 62 cm Capacidad de la bolsa 140 litri 670 960 720 1310 7...

Reviews: