4
EmberGlo
A Division of Midco International Inc
8471 11
3.
To Remove.
-
Disconnect the water riser tube.
-
Disconnect electric wiring at the two terminals.
-
Remove 16 hex nuts. Note: Remove food drawer and hold screws up to prevent turning.
-
Lift off generator.
4.
To Replace.
-
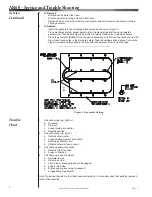
Install the gaskets in the discharge plate grooves as shown in
Figure 3
.
-
Place discharge plate & gasket assembly on the steamer (gasket facing up towards
generator) so that steam holes line up with the twelve round holes in steam chamber.
-
Place the generator (#5655-90) on the above assembly so that mounting holes line up with
the sixteen round holes in the discharge plate. Tape the carriage bolts in place from inside
steam chamber and then tighten the nuts with lock washers. Remove all the tape.
__________________________________________
1. Unit will not heat up; light out.
a. No power.
b. Plug out.
c. Loose internal connection.
d. Defective switch.
2. Unit will not heat up; light on.
a. Defective thermostat.
b. Loose heating element connection.
c. Defective generator unit.
d. Defective thermal fuse or open
3. Unit heats up light will not light.
a. Defective light in switch.
b. Loose connection.
4. Unit heats up; does not steam.
a. No water in pan.
b. Defective pump.
c. Cam, pins or linkage broken or disengaged.
d. Leak in inlet tube.
e. Dip tube spring assembly misaligned.
f.
Clogged steam generator.
Note: If electrical trouble is other than loose connections, it is recommended that parts be replaced
rather than repaired.
Trouble
Chart
Service
Continued
AR60 - Service and Trouble Shooting
LG
70
71
Figure 3. Generator Casting


