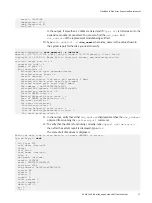
serial: P9GZS0JW
temperature: 32 C
temp_threshold: 85
- slot_id: 1
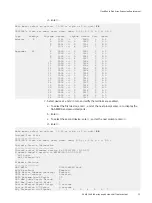
In the output, if more than 12 disks are listed and if
Viper LCC
is listed as an ID, the
expansion module is connected. You can also find the
dev_name
and
sas_address
of the replacement module being verified.
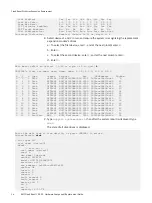
10. Type
sudo smartctl -x
<dev_name>
where <dev_name> is the value shown in
the system report for the disk you need to verify.
maginatics@dpcdd6:~$
sudo smartctl -x /dev/sdr
smartctl 6.2 2013-07-26 r3841 [x86_64-linux-3.16.0-38-generic] (local build)
Copyright (C) 2002-13, Bruce Allen, Christian Franke, www.smartmontools.org
⋮
relative target port id = 2
generation code = 4
number of phys = 1
phy identifier = 1
attached device type: expander device
attached reason: power on
reason: unknown
negotiated logical link rate: phy enabled; 6 Gbps
attached initiator port: ssp=0 stp=0 smp=1
attached target port: ssp=0 stp=0 smp=1
SAS address = 0x5000604800a0ef03f
attached SAS address = 0x500604800a0ef03f
attached phy identifier = 9
Invalid DWORD count = 2
Running disparity error count = 2
Loss of DWORD sychronization = 5
Phy reset problem =0
Phy event descriptors:
Invalid word count: 2
Running disparity error count: 2
Loss of dword synchronization count: 5
Phy reset problem count: 0
11. In the output, verify that either
sas_address
displayed matches the
sas_address
obtained from running the
system-report
command.
12. To verify that the disk is functioning correctly, type
support system-report
,
then after the system report is displayed, type
disk
.
The state of all disk drives is displayed.
Enter the data item to view details, or press <ENTER> to return
System Report>
disk
- id: Viper LCC
scsi_name: /dev/sg34
disks:
- slot_id: 0
scsi_name: /dev/sg19
host: 8
dev_name: /dev/sdr
vendor: HITACHI
model: HUS72403CLAR3000
revision: c250
sas_address: 0x5000cca05837e626
status: OK
insert: 0
remove: 0
indent: 0
fault_sensed: 0
fault_reqstd: 0
device_off: 0
ei: 0
ti: 0
CloudBoost Disk Array Expansion Replacement
Verify the disk array expansion shelf replacement
57
Summary of Contents for CloudBoost 100
Page 1: ...EMC CloudBoost 100 Version 2 0 Hardware Component Replacement Guide P N 302 002 471 REV 02 ...
Page 6: ...FIGURES 6 EMC CloudBoost 100 2 0 Hardware Component Replacement Guide ...
Page 8: ...TABLES 8 EMC CloudBoost 100 2 0 Hardware Component Replacement Guide ...
Page 14: ...CloudBoost 100 Overview 14 EMC CloudBoost 100 2 0 Hardware Component Replacement Guide ...
Page 20: ...Disk Drive Replacement 20 EMC CloudBoost 100 2 0 Hardware Component Replacement Guide ...


