background image

General Manual Electric Winches with UMPH rope-English Rev.1.1 – 10-12-2014 


Installation of gear units classified under Directive 94/9/EC 

  Category 2D gear units must be installed in compliance with the provisions of standards EN 

1127-1 and EN 50281-1-2. The installer must, therefore, be fully informed and trained for this 

application. 

  The installation technician must be aware of the ATEX class of the installation area, as well 

as the risks associated with the presence of a potentially explosive atmosphere, with 

particular attention to explosion and fire hazards, and thereby adopt the necessary safety 

precautions. 

  All maintenance, assembly and disassembly work must be done 

outside the explosion ha-

zard area 

by trained personnel. 

  Check that all accessory components (cables, joints, cable glands, cooling units, etc.) comply 

with the Essential Health and Safety Requirements of the ATEX directives. Handle them with 

extreme care to avoid altering their characteristics. 

  Clean the gear unit thoroughly after installation. 


4.2  GEARBOX LUBRICATION 


Check the winch datasheet (annex 1) for the type of oil used for your winch. 


  EMCÉ winches are usually delivered with lubricating oil. Nevertheless check oil level at 

installation and fill up if necessary. For further details see section (7).  

  Lubricating oil temperature shall never exceed 100 °C. 


4.3  ROPE 


4.3.1  Fitting the fiber rope to the winch drum 


  Before fitting the rope the cable anchor on the drum should be positioned to an 

easily accessible position. During fitting of the rope the winch must be isolated from 

the main supply.   

  On winches with a pressure roller the spring tensions must be removed before and 

during the installation of the rope. 


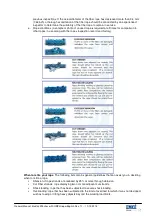
Changing the winch rotation by reversing the wire dead end connection is only possible when the winch is 

equipped with two wedge pockets or two cable clamp mounting positions.  


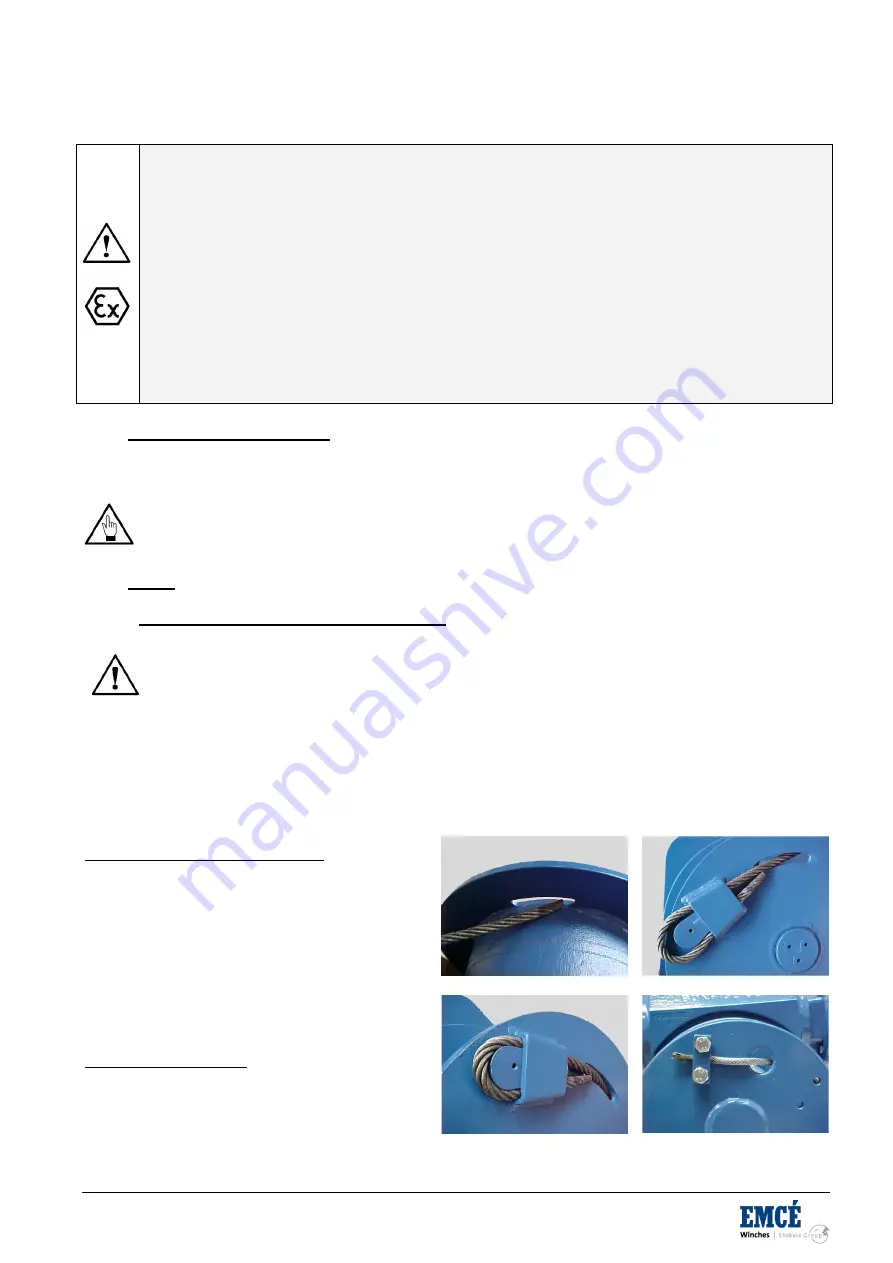
Fit wire dead end from the inside of the drum to the outside through the slotted hole in one of the drum flanges 

(see picture 4.3.1)


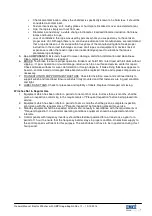
Fastening with pocket and wedge 

The wire dead end shall be fitted in the pocked as 

to make an eye around the wire wedge with free 

end fitted backwards through the pocket (see 

picture 4.3.2). 


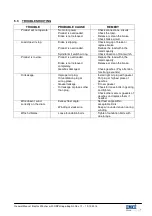
Pull the wire from the opposite side to press wire 

and wedge into the pocket (see picture 4.3.3). The 

free end of the wire end shall at al times be 5 

times the rope diameter and the rope end shall be 

prevented from fraying.


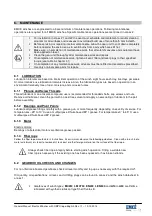
Fitting with wire clamp 

Fit the wire as shown on picture 1 and through the 

wire clamp on the drum flange. 

Tighten wire clamp bolts according to the table in 

section 4.1(see picture 4.3.4). 


Picture  4.3.1 

Picture  4.3.2 


Picture 4.3.3 

Picture 4.3.4 

Summary of Contents for 1004156

Page 1: ...SR 30 E 1004156 Planetary Winches...

Page 2: ...Particularly significant sections of the manual and important specifications are highlighted by symbols whose meanings are given below DANGER WARNING This symbol indicates situations of serious danger...

Page 3: ...re limited to the duration of the expressed warranty period as set forth above EMC s maximum liability is limited to the purchase price of the product and in no event shall EMC be liable for any conse...

Page 4: ...TION 4 2 GEARBOX LUBRICATION 4 3 ROPE 4 4 START UP SEQUENCE 5 WORKING WITH THE MACHINE 5 1 START NORMAL OPERATION and STOP 5 2 INSPECTIONS 5 3 TROUBLE SHOOTING 6 MAINTENANCE 6 1 LUBRICATION 6 2 GEARBO...

Page 5: ...erforming any maintenance or close inspection to the winch ensure that the product is not under load and that the power supply is switched off and disconnected 5 Check controls of the product and its...

Page 6: ...es 32 Never lift loads exceeding maximum safe working load W L L 33 Beware of snatch loads on the winch Any sudden loading can cause excessive acceleration forces on the winch system resulting excessi...

Page 7: ...For outdoor applications onshore IP 55 motors can be supplied For offshore applications motors with protection class IP 56 TENV can be supplied 2 3 OPTIONS EMC winches can be supplied with a large nu...

Page 8: ...perated Some winches can be equipped with a friction clutch Friction clutches can be supplied in manual and remote versions Note that for most lifting applications the use of a clutch in the driveline...

Page 9: ...correct angle Plain drum Grooved drum 1 layer cable only Grooved drum multi layer spooling Min Recom max Max Min Recom max Max Min Recom max Max Standard cables 0 5 1 5 2 0 0 2 5 4 0 0 5 1 5 2 5 Rotat...

Page 10: ...equipped with an emergency stop that allows to switch of the winch in case of an emergency situation The operators of the winch must be instructed about the location of the emergency stop s The emerge...

Page 11: ...h Rev 1 1 10 12 2014 3 3 5 Handling of the winch For lifting the winch following possibilities should be used starting from the top 1 Use the lifting lugs on the frame if applied 2 Use the holes in th...

Page 12: ...foundation shall be flat and stiff to avoid anomalous tensions which could cause the quick wear of internal parts Position the winch onto the foundation and check winch foundation feet for perfect sti...

Page 13: ...up if necessary For further details see section 7 Lubricating oil temperature shall never exceed 100 C 4 3 ROPE 4 3 1 Fitting the fiber rope to the winch drum Before fitting the rope the cable anchor...

Page 14: ...ell as those persons directly involved in the handling and installation Wear suitable protective clothing such as overalls industrial gloves helmet eye protectors and safety footwear Failure to wear s...

Page 15: ...s If a loop forms in the rope ensure that it does not tighten to form a kink Ensure that the reel stand is mounted so as not to create a reverse bend during reeving i e for a winch drum with an overla...

Page 16: ...fitted must be checked and re adjusted if necessary after the rope has been installed Record the following details on the Certificate after installation has been completed type of equipment location...

Page 17: ...optional manual operated clutch the clutch must be engaged before the below operation of the winch can be performed Before start up Turn speed control potentiometer on main control panel in position...

Page 18: ...peration of the clutch Closing Close the bandbrake when available Turn the drum shaft up till the pins claws of the clutch are placed before the corresponding openings on the winch drum Depending on t...

Page 19: ...opening on the side of the crank should be placed over the locking pin In case the winch is equipped with a self braking worm gearbox reduction of 80 to 100 the load will be sustained by the gearbox...

Page 20: ...connections if in doubt check phase cycle voltage dip during operation and current supply Fix loose wiring or exposed wiring or connections 4 CONTROLS During operation of winch verify response to cont...

Page 21: ...at all times for comparison to other ropes in use along with the ropes inspection record and history When to retire your rope The following list contains general guidelines that can assist you in dec...

Page 22: ...l brake surfaces for wear deformation or foreign deposits If brake lining thickness appears to be worn contaminated or damaged brake band should be replaced Clean and replace components as necessary 7...

Page 23: ...rloaded Brake is not released completely Gearbox damaged Reduce the load within the rated capacity Release or clean the brake Check gearbox Pay attention for strange sounds Oil leakage Improper oil pl...

Page 24: ...relatively free of dust moisture and corrosive fumes 6 1 1 Pinions and Screw Threads Thread lubricant or an antiseize compound use is recommended for threaded shafts cap screws and nuts Remove old lu...

Page 25: ...e oil analysis by a laboratory is recommended Old lubricating oils shall be disposed according to applicable rules 6 3 SLEWING GEARS 6 3 1 Lubrication The slewing gear and pinions should be greased Th...

Page 26: ...General Manual Electric Winches with UMPH rope English Rev 1 1 10 12 2014 ANNEX I PRODUCT DATASHEET AND CERTIFICATES...

Page 27: ......

Page 28: ......

Page 29: ......

Page 30: ......

Page 31: ...General Manual Electric Winches with UMPH rope English Rev 1 1 10 12 2014 ANNEX II TECHNICAL INFORMATION COMPONENTS...

Page 32: ...tion of all gear unit components keys seals gaskets vents etc If any such components are damaged they must be replaced and the reason for the damage identified 1 3 Requesting technical assistance For...

Page 33: ...ents with original spare parts Use the lubricants oil and grease recommended by the Manufacturer Do not dump polluting materials into the environment Dispose of all such materials as stipulated by app...

Page 34: ...e gear unit always replace gaskets and seals with new original ones If a bearing requires replacement it is good practice to also replace the other bearing supporting the same shaft We recommend repla...

Page 35: ...ipment Do not dump into the environment and dispose of in compliance with applicable legislation If a leak is found identify the cause of the fault repair it and refill with lubricant before operating...

Page 36: ...Contaminant in oil Replace oil Gears damaged Contact authorized workshop Bearing axial backlash too high Contact authorized workshop Bearings defective or worn Contact authorized workshop Abnormal ru...

Page 37: ...3 15 12 2010 INSTALLATION USE AND SERVICE MANUAL 300 SERIES GEARBOXES ANNEX 1 LUBRICANT FILL QUANTITY N B The quantities indicated are approximate only Fill the unit according to the position of the l...

Page 38: ...s English Rev 1 3 15 12 2010 INSTALLATION USE AND SERVICE MANUAL 300 SERIES GEARBOXES N B The quantities indicated are approximate only Fill the unit according to the position of the level plug or lev...

Page 39: ...Technical Data 300 series gearboxes English Rev 1 3 15 12 2010 INSTALLATION USE AND SERVICE MANUAL 300 SERIES GEARBOXES ANNEX 2 Mounting positions A T O B U P...

Page 40: ...Technical Data 300 series gearboxes English Rev 1 3 15 12 2010 INSTALLATION USE AND SERVICE MANUAL 300 SERIES GEARBOXES ANNEX 3 Plug positions...

Page 41: ...Technical Data 300 series gearboxes English Rev 1 3 15 12 2010 INSTALLATION USE AND SERVICE MANUAL 300 SERIES GEARBOXES...

Page 42: ...not be increased Under these operating conditions rated speed increases by factor 1 2 The relative values for starting and breakaway torque are reduced by factor 0 82 and for starting current by facto...

Page 43: ...12 In case a doubt for your application please consult EMC indicating the complete operating conditions Ventilation The distance between air intake of the motor and walls or other machinery must be a...

Page 44: ...it against restarting Cleaning Depending on the local conditions air passages should be cleaned regularly Bearing lubrication Maintenance free life for motors with permanent lubrication at ambient tem...

Page 45: ...ect in delta of the rated motor voltage to terminals U1 and V1 Repeat the measurement The motor can be put into operation when the resistance is above 0 5 M Insulation resistance is temperature depend...

Page 46: ...cover 7 Fixing screw terminal board 22 Fixing screw fan cover 8 Gasket terminal box 23 Fan 9 Terminal box 24 Fixing bolt end shield non drive end 10 Fixing screw terminal box 25 Fixing bolt end shield...

Page 47: ...General Manual Electric Winches with UMPH rope English Rev 1 1 10 12 2014 ANNEX III DRAWINGS SCHEMATICS...

Page 48: ...AYER GEAR TYPE DEPTH RADIUS PITCH GROOVE PIPE LENGTH PIPEO CABLE O ESTIMATED WEIGHT EXTRA S GEARBOX MOTOR DRUM WORKING LOAD LIMIT W L L A3 SR0 0030 00 005 1004156 24 11 2014 BADEECO SR 30 EBCS GENERAL...

Page 49: ......

Page 50: ......

Page 51: ......

Page 52: ......

Page 53: ...3 x 4 0 0 V P E 5 0 H z 3 x 4 0 0 V P E 5 0 H z 3 x 4 0 0 V P E 5 0 H z...

Page 54: ...Manuf act urer Type Quant it y Descript ion Collector materiallist detail...

Page 55: ...Manuf act urer Type Quant it y Descript ion Collector materiallist detail...

Page 56: ...Manuf act urer Type Quant it y Descript ion Collector materiallist detail...

Page 57: ...Manuf act urer Type Comp Descript ion Quant it y Material Detail...

Page 58: ...Manuf act urer Type Comp Descript ion Quant it y Material Detail...

Page 59: ...Manuf act urer Type Comp Descript ion Quant it y Material Detail...

Page 60: ...Manuf act urer Type Comp Descript ion Quant it y Material Detail...

Page 61: ...Manuf act urer Type Comp Descript ion Quant it y Material Detail...

Page 62: ...Manuf act urer Type Comp Descript ion Quant it y Material Detail...

Page 63: ...hes guide lines are given in EN 14492 1 section 5 12 The electrical devices on a winch shall contain a device for isolation of the electrical equipment from the mains power supply so that work may be...

Page 64: ...ht 0 125 Mechanisms subjected very rarely to the maximum load and normally to light loads L2 Moderate 0 25 Mechanisms subjected fairly frequently to the maximum load but normally to rather moderate lo...

Page 65: ...General Manual Electric Winches with UMPH rope English Rev 1 1 10 12 2014 Notes...

Page 66: ...General Manual Electric Winches with UMPH rope English Rev 1 1 10 12 2014...

Reviews: