background image

- 5 - 

AF-116131.1                                                                                                                                                                       EN 

 
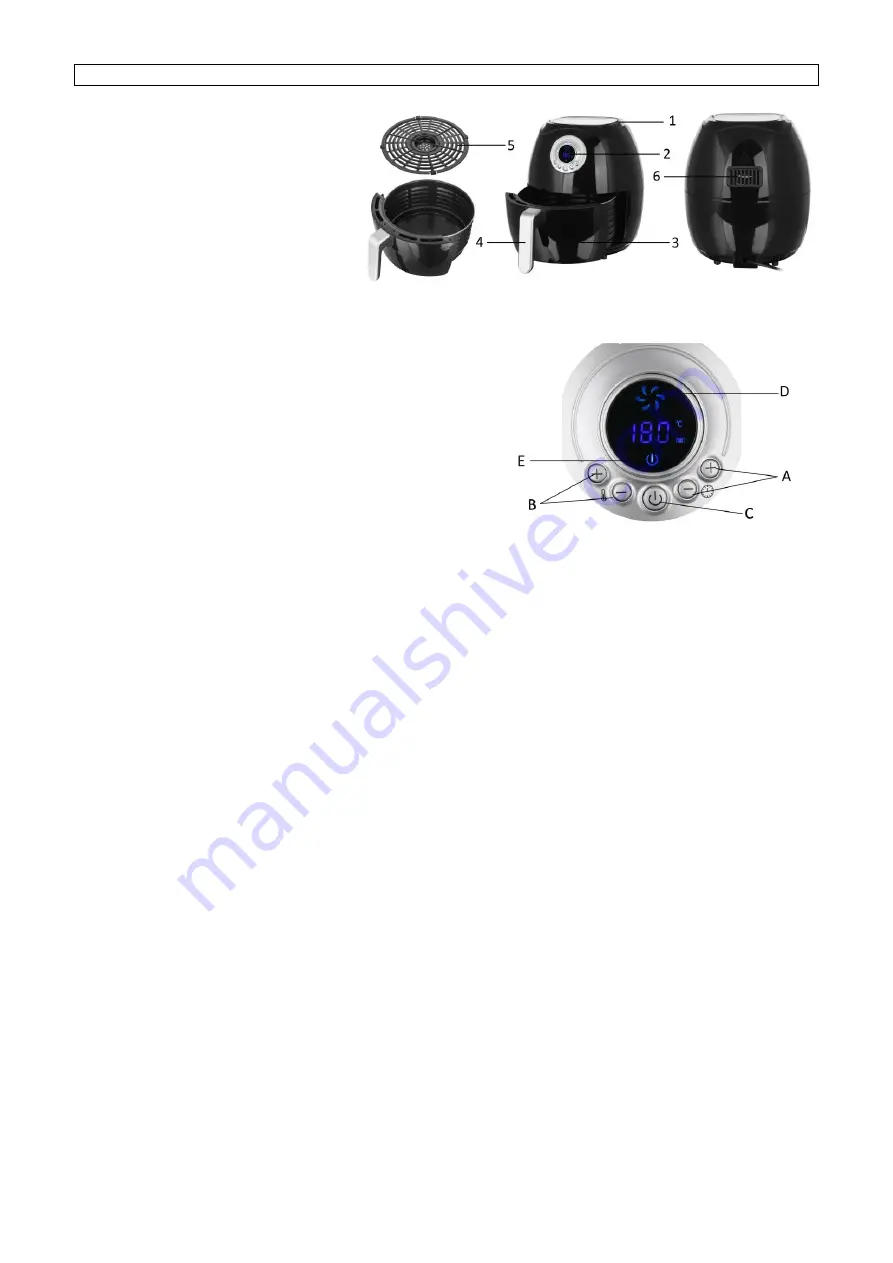
PARTS DESCRIPTION 
1.


Air inlet 

2.


Digital display and control buttons 

3.


Basket 

4.


Basket handle  

5.


Frying grill 

6.


Air outlet 

 
Digital display and control buttons 
A.


Timer control (Press “+” or “-” to adjust the time from 1 to 30 minutes) 

B.


Temperature  control  (Press  “+”  or  “-”  to  adjust  the 

temperature from 80

 to 200

C.


ON/off button 

D.


Blower icon 

E.


On/off icon 

 
BEFORE USE 
First read all instructions before use and retain the manual for later reference. Only plug this appliance into an 
earthed socket. Before first use, remove the packing materials. Clean the basket and frying grill. (See “cleaning 
and maintenance”) Wipe  inside  and outside of the  appliance  with a soft cloth. Make sure that the electrical 
parts remain dry. This appliance heats food at all directions and most of the ingredients do not need any oil. 
Note: Always use the frying grill with the silicone cases attached. They will help to stabilize the frying grill in 
the basket during cooking. 
 
USE 
1.


Place the appliance on a dry, stable and heat-resistant surface. 

2.


Since the appliance becomes hot during use, make sure that it is not too close to other objects. 

3.


Pull out the basket from the appliance by the basket handle. Put the frying grill into the basket. 

4.


Place the ingredients into the basket. (Do not exceed the MAX level indicated inside the basket.) Slide the 
basket  into  the  appliance.  Make  sure  they  are  placed  correctly  and  closed  completely.  Otherwise  the 
appliance will not work.  
Caution: Do not fill the basket with oil or any other liquid. Do not touch the basket during use or after use 
in short time as it gets very hot. Only hold the basket by the handle. 

5.


Connect the power plug to a suitable outlet. The machine is standby.  

6.


Press the on/off button once, the temperature and timer control buttons are activated. Then press “+” or 
“-” to set your desired temperature (5 degrees / press) and timer (1 minute / press) for the ingredients. 
You can also long press “+” or “-” for rapid adjustment. 

7.


Press the on/off button again; the machine starts working. The blower icon and on/off icon are all blinking.  

8.


When the whole cooking process is finished the appliance will stop working and the timer will ring 5 times. 
You can also manually turn off the machine by pressing the on/off button. The blower will stop in a few 
seconds, and then the timer will ring 5 times. 

9.


Pull out  the  basket  from  the  appliance  by the  basket  handle.  Check  if the  ingredients  are  ready.  If  not, 
simply slide the basket back into the appliance. Set the temperature and the timer to a few extra minutes. 
Then press the on/off button to run the machine again. NOTE: You can also pull out the basket to check 

Summary of Contents for Smart Fryer AF-116131

Page 1: ......

Page 2: ...1 Content Inhalt Teneur Contenuto Instruction manual English 2 Bedienungsanleitung Deutsch 9 Mode d emploi Fran ais 18 Manuale d istruzioni Italiano 26...

Page 3: ...f experience and knowledge if they have been given supervision or instruction concerning use of the appliance in a safe way and understand the hazards involved 2 Children shall not play with the appli...

Page 4: ...tempt to open the housing of the appliance or to repair the appliance yourself This could cause electric shock 16 Never leave the appliance unattended during use 17 This appliance is not designed for...

Page 5: ...Make sure before each use of the appliance that the heating element and surroundings are clean and clear from any food remainders in order to ensure a flawless function 28 Hot air comes out of the ai...

Page 6: ...e basket 4 Place the ingredients into the basket Do not exceed the MAX level indicated inside the basket Slide the basket into the appliance Make sure they are placed correctly and closed completely O...

Page 7: ...them with a little vegetable oil 6 Place a baking tin or an oven dish in the appliance if you want to bake a cake or quiche or other fragile ingredients 7 Do not prepare extremely greasy ingredients s...

Page 8: ...non abrasive sponge Dry well before use 5 Clean the heating element inside of the housing You can see it after pull out the basket with a cleaning brush to remove any food residues Note The basket an...

Page 9: ...ons and repairs by third parties or the fitting of non original parts are not covered by this guarantee Always keep your receipt without the receipt you can t claim any form of warranty Damage caused...

Page 10: ...e nicht in bereinstimmung mit den Anforderungen dieser Bedienungsanleitung erfolgt verursacht wurden 1 Dieses Ger t kann von Kindern ab 8 Jahren und Personen mit eingeschr nkten k rperlichen sensorisc...

Page 11: ...en und offenen Flammen fern 11 Tauchen Sie das Ger t oder den Netzstecker nicht in Wasser oder andere Fl ssigkeiten Es besteht Lebensgefahr aufgrund von Stromschlag 12 Um den Stecker aus der Steckdose...

Page 12: ...seite Seiten und ber dem Ger t 25 Beim Frittieren mit Hei luft entweicht hei er Dampf durch die Luftaustritts ffnungen Halten Sie Ihre H nde und Ihr Gesicht in einem sicheren Abstand zum Dampf und zu...

Page 13: ...eratur der zug nglichen Oberfl chen kann sehr hoch sein wenn das Ger t in Betrieb ist 30 Wenn Sie Produkte mit Antihaftbeschichtung benutzen stellen Sie bitte sicher dass sich keine V gel im gleichen...

Page 14: ...korb GEBRAUCH 1 Stellen Sie das Ger t auf eine trockene feste und hitzebest ndige Fl che 2 Das Ger t wird w hrend des Gebrauchs hei stellen Sie es daher nicht in die unmittelbare N he anderer Objekte...

Page 15: ...4 Minuten lang vor 3 Manche Speisen m ssen nach der H lfte der Garzeit gesch ttelt werden Um die Speisen zu sch tteln oder umzudrehen ziehen Sie den Frittierkorb am Griff aus dem Ger t und sch tteln...

Page 16: ...erwenden Gefrorene H hnchennuggets 150 750 6 10 200 sch tteln ofenfertige verwenden Gefrorene Fischst bchen 150 600 6 10 200 ofenfertige verwenden Gefrorene panierte K se Snacks 150 600 8 10 180 ofenf...

Page 17: ...ein knusprigeres Resultat Aus dem Ger t steigt wei er Rauch Sie bereiten fettige Zutaten zu Beim Frittieren fettiger Zutaten tropft l in die Schale Die Schale kann sich erhitzen und das l verursacht w...

Page 18: ...ir nicht haftbar Sch den an den Zubeh rteilen bedeutet nicht dass das gesamte Ger t kostenlos ausgetauscht wird In diesem Fall kontaktieren Sie unseren Kundendienst Zerbrochenes Glas oder Kunststoffte...

Page 19: ...s enfants partir de 8 ans et plus et par des personnes ayant des capacit s physiques sensorielles ou mentales r duites ou un manque d exp rience et de connaissances condition qu elles aient re u une s...

Page 20: ...brancher la fiche de la prise saisissez la fiche et tirez la hors de la prise Ne tirez pas sur le cordon d alimentation 13 Ne touchez pas l appareil s il tombe dans de l eau D branchez la fiche de la...

Page 21: ...tes attention ne pas vous br ler avec l air et la vapeur br lants lorsque vous retirez le panier de l appareil 26 Si l appareil d gage de la fum e noire d branchez le imm diatement Attendez que la fum...

Page 22: ...avec les supports silicon s couverts Ils aident stabiliser la grille dans le panier pendant la cuisson UTILISATION 1 Posez l appareil sur une surface s che stable et thermor sistante 2 L appareil cha...

Page 23: ...eil est froid ou vous pouvez aussi laisser l appareil pr chauffer pendant 4 minutes environ sans ingr dient l int rieur 3 Certains ingr dients n cessitent d tre secou s mi cuisson Pour secouer ou reto...

Page 24: ...de poulet 150 750 10 15 180 Rouleaux de printemps pour le four 150 600 8 10 200 Agiter Utiliser des Nuggets de poulet surgel s pour le four 150 750 6 10 200 Agiter Utiliser des B tonnets de poisson su...

Page 25: ...type d aliment qui doit tre cuit dans une friteuse traditionnelle Utilisez des snacks pour four ou brossez un peu d huile sur les aliments pour obtenir un r sultat plus croustillant L appareil met de...

Page 26: ...ilit en cas de d g ts mat riels ou de dommages corporels caus s par une utilisation inappropri e ou si les instructions de s curit n ont pas t convenablement observ es Si les accessoires sont endommag...

Page 27: ...enza o conoscenza solo se supervisionati o istruiti sull uso sicuro dell apparecchio e se comprendono i rischi correlati 2 I bambini non devono giocare con l apparecchio 3 Le operazioni di pulizia e m...

Page 28: ...legare l apparecchio dalla presa di corrente con le mani bagnate 15 Non tentare mai di aprire l involucro dell apparecchio o di riparare l apparecchio per evitare il rischio di scossa elettrica 16 Non...

Page 29: ...tendere che l emissione di fumo si arresti prima di rimuovere il cestello dall apparecchio 27 Prima di ogni utilizzo assicurarsi che l elemento riscaldante e l area circostante siano puliti e privi di...

Page 30: ...supporti stabilizzano la griglia nel cestello durante la cottura FUNZIONAMENTO 1 Posizionare l apparecchio su una superficie stabile asciutta e resistente al calore 2 Poich l apparecchio diventa molto...

Page 31: ...rli usando una forchetta o un paio di pinze Quindi reinserire il cestello nell apparecchio 4 possibile usare la friggitrice anche per riscaldare gli alimenti Per riscaldare gli alimenti impostare la t...

Page 32: ...10 200 Solo precotti Snack al formaggio impanato surgelato 150 600 8 10 180 Solo precotti Verdure ripiene 150 600 10 160 Torta 450 20 25 160 Usare una tortiera Quiche 600 20 22 180 Usare una tortiera...

Page 33: ...i di cottura coleranno nel cestello Tali succhi producono del fumo bianco e il cestello potrebbe scaldarsi un fenomeno normale che non ha conseguenze sui risultati di cottura o sul funzionamento dell...

Page 34: ...danni o lesioni personali causati da un uso improprio o in caso di mancata aderenza al manuale di istruzioni Eventuali danni agli accessori non implicano la sostituzione gratuita dell intero apparecch...

Reviews: