background image

3

INSTALLER MENU 

To prevent changes that may affect system performance, this thermostat has an INSTALLER 

MENU and a USER MENU. The INSTALLER MENU provides access to every option, while the 

USER MENU provides access to items that will not affect system performance. To access the 

INSTALLER MENU press the Menu button for 8 seconds. The display will show item 

05

 in the 

table below. Use Next and Back to navigate through menu items. Press   or   to change a 

menu setting. 

Installer Menu #

(Hold Menu  8 Seconds) 

Description

Default Setting 

(flashing icons)

Settings 

(Press   or  )

05

Outdoor Equipment: selects air 

conditioner (AC) or heat pump (HP) 

equipment as well as the number of 

stage

AC2

AC0

AC1

AC2

HP1

HP2

10

Indoor Equipment: selects whether 

the equipment is a gas furnace, elec-

tric furnace or fan only

EL2

FAN

GA1

GA2

EL1

EL2

15

Dedicated Emergency: W/E only 

operates in Emergency Aux mode. W

2


becomes 

1st stage Aux. Heat

OFF

On

OFF

20

O,B or 

3

 Wire Zone Valve Selection

O

O

B

3

30    

Heat Cycle Rate: how often  

the heat will turn on

MEd

SLO – slow

MEd – medium

FAS – fast

32 

Aux Cycle Rate: how often the 

auxiliary heat will turn on

MEd

SLO – slow

MEd – medium

FAS – fast

35 

Cool Cycle Rate: how often  

the cooling will turn on

MEd

SLO – slow

MEd – medium

FAS – fast

50     

Compressor Lockout: 

protects the compressor  

from short cycling

OFF

On – 

5

 minute delay 

OFF – no delay 

65

Max Heat Limit: maximum set point 

for heat mode

99

47 to 99

66

Minimum Cool Limit: minimum set 

point for cool mode 

45

45 

to 

97

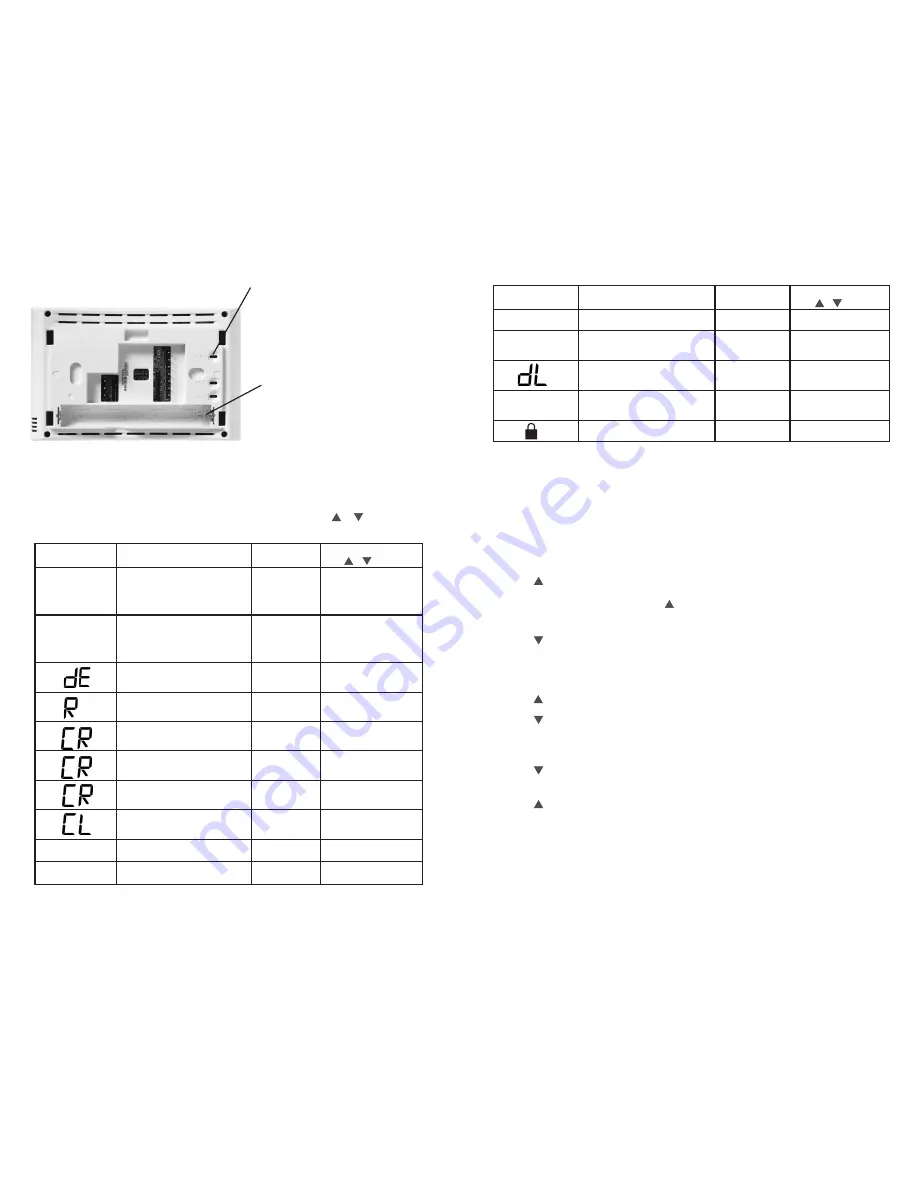
RC/RH Jumper Wire 


This thermostat electrically connects 

the RC and RH terminals so a jumper 

wire is not required. If the application 

provides a separate wire for RC and 

RH, clip the RC/RH jumper. This will 

isolate both terminals so they can be 

independently used. 

Battery Location

Premium AA alkaline batteries are 

required when C-wire is not available. 

When C-wire is available, the batteries 

provide a back-up source of power 

(this will maintain the clock in the 

event of a power outage).

4

TEST EQUIPMENT

Turn on power to the system. 
Fan Operation 

If your system does not have a G terminal connection, skip to Heating System

1.)

  Press the fan button to select the On position. The blower should begin to operate. 

2.)

  Press the fan button to select the Auto position. The blower should stop immediately. 

Heating System

1.)

  Press the System button to select the Heat position. Heat Pumps only - if the auxiliary 

heating system has a standing pilot, be sure to light it.  

2.)

 Press   to adjust thermostat setting to 

1° 

above room temperature. The heating system 

should begin to operate and the thermostat will indicate Heat On

3.)  For heat pumps with auxiliary- 

Press   to adjust thermostat setting to 

3° above room 

temperature. The auxiliary heat should begin to operate and the thermostat will indicate 

Heat On Aux.

4.) 

Press 


to adjust thermostat setting 

1° 

below room temperature. The heating system 

should stop operating and the Heat On icon will disappear.

Auxiliary System ( only for heat pumps with auxiliary) 

1.)

  Press the system button to select the Aux position. This bypasses the heat pump and 

runs auxiliary only heat.

2.)

 Press   to adjust thermostat setting to 

1° 

above room temperature. The auxiliary heating 

system should begin to operate and the thermostat will indicate Heat On Aux

3.) 

Press 


to adjust thermostat setting 

1° 

below room temperature. The auxiliary heating 

system should stop operating and the Heat On Aux icon will disappear.

Cooling System

1.)

   Press the system button to select the Cool position. 

2.) 

Press   to adjust thermostat setting 

1° 

below room temperature. The blower should 

come on immediately on high speed, followed by cold air circulation. The thermostat will 

indicate Cool On. There can be up to a 

5

 minute delay. (see INSTALLER MENU, item

 50) 

3.) 

Press   to adjust thermostat setting to 

1° 

above room temperature. The cooling system 

should stop operating and the Cool On icon will disappear.

Installer’s Menu #

(Hold Menu 8 Seconds) 

Description

Default Setting 

(flashing icons)

Settings 

(Press   or )

79

Fahrenheit or Celsius

°F

°F – Fahrenheit

°C – Celsius

81


Temperature Display Adjustment: 

adjust the displayed “Room 

Temperature”

0

-5 to +5

83

Continuous Display Light: keep 

the backlight always on – “C” wire 

required

OFF

On  – always on

OFF – momentarily

88

Auto Changeover: thermostat 

automatically switches between 

heat and cool.

OFF

On  – enable auto

OFF – disable auto

99   

Keypad Lock: prevent unwanted 

changes to the thermostat

OFF

On  – disable buttons

OFF – all buttons are active 

INSTALLER MENU (C0ntinued)


Note: If Starting Soon is shown on the display, the compressor lockout feature is operating. There will 

be up to a 

minute delay before the compressor turns on (see INSTALLER MENU, item 

50

).

Summary of Contents for 1F85U-42NP

Page 1: ...s Configurable as O or B ReversingValve or 3 wire zone heat power close Y 1st Stage Compressor G Fan Relay W E 1st Stage Heat conventional 1st Stage Auxiliary Heat heat pump Can operate as Emergency Heat only See Installer Menu 15 C Common wire for 24V optional with batteries L Heat Pump Malfunction Diagnostic terminal input signal requires common Y2 2nd Stage compressor W2 2nd Stage Heat Conventi...

Page 2: ... Auto position The blower should stop immediately Heating System 1 Press the System button to select the Heat position Heat Pumps only if the auxiliary heating system has a standing pilot be sure to light it 2 Press to adjust thermostat setting to 1 above room temperature The heating system should begin to operate and the thermostat will indicate Heat On 3 For heat pumps with auxiliary Press to ad...

Page 3: ...U To customize thermostat settings press the Menu button from the home screen Use the or buttons to highlight Settings and press Next Use Next and Back to navigate through menu items Press or to change the setting User s Menu Press Menu button and release Description Default Setting flashing icons Settings Press or 01 Fahrenheit or Celsius F F Fahrenheit C Celsius 02 Temperature Display Adjustment...

Page 4: ...setting the thermostat If the condition persists contact your HVAC service person Thermostat Display Thermometer Disagree Thermostat display requires adjustment Display can be adjusted 5 See User Menu item 05 Furnace Air Conditioner CyclesToo Fast or Slow narrow or wide temperature swing The location of the thermostat and or the size of the Heating System may be influencing the cycle rate Digital ...

Page 5: ...iveau du thermostat La mise de niveau du thermostat n est qu à des fins esthétiques et n affectera pas son fonctionnement MISE EN GARDE Pour prévenir les dommages au compresseur ou à d autres biens N utilisez PAS le système de climatisation lorsque la température extérieure est inférieure à 10 C 50 F Ne laissez pas le compresseur fonctionner à moins que les chaufferettes d huile du compresseur ne ...

Page 6: ...ment 88 Permutation automatique le système alterne automatiquement entre le chauffage et la climatisation OFF On activée OFF désactivée 99 Verrouillage clavier empêche des changements non désirés au thermostat OFF On désactivation des boutons OFF tous les boutons sont actifs MENU DE L INSTALLATEUR suite Remarque Si Starting Soon Démarrage bientôt s affiche la fonction de verrouillage du compresseu...

Page 7: ...rrouillage du clavier Afin d empêcher les changements indésirables les boutons peuvent être désactivés Pour activer cette fonction gardez et le bouton Menu enfoncés jusqu à ce que l icône s affiche cette option peut aussi être activée dans le menu Pour la désactiver gardez et le bouton Menu enfoncés durant 3 secondes 5 APERÇU DU THERMOSTAT Avant d utiliser le thermostat vous devriez être familier ...

Page 8: ... fils du système sont bien serrés en place 3 Diagnostic Réglez le sélecteur système à Heat chauffage et haussez le point de consigne au dessus de la température ambiante Le thermostat devrait émettre un léger déclic dans les cinq minutes et Heat On devrait apparaître à l affichage Ce bruit indique que le thermostat fonctionne correctement Si le thermostat n émet pas de déclic effectuez l opération...

Page 9: ... o B o como calefacción de zona de 3 cables alimentación cerrada Y Compresor de 1ra etapa convencional o bomba de calor G Relé del ventilador W E Calefacción de 1ra etapa convencional Calefacción auxiliar de 1ra etapa bomba de calor Puede funcionar como calefacción de emergencia solamente ver Menú de instalación N 15 C Cable neutro para 24 V opcional con pilas L Terminal de falla diagnóstico de la...

Page 10: ...n Solo para bombas de calor si el sistema de calefacción auxiliar tiene un piloto asegúrese de encenderlo 2 Presione para ajustar la configuración del termostato en 1 por encima de la temperatura ambiente El sistema de calefacción deberá comenzar a funcionar y el termostato indicará Heat On calefacción encendida 3 Para bomba de calor con calefacción auxiliar Presione para ajustar la configuración ...

Page 11: ...r la opción Menú del usuario N Presione el botón Menu y suéltelo Descripción Configuración predeterminada iconos intermitentes Opciones Presione o 01 Tipo de programación se establece como de 7 días 5 1 1 días o no programable 5 7 7 días 5 5 1 1 días 0 no programable 02 Define los períodos por día 4 2 partir regresar 4 despertar partir regresar dormir 03 Comienzo temprano comienza a calentar o enf...

Page 12: ...blanco o no responde al presionar los botones el termostato se debe reiniciar retirando las pilas durante 2 minutos Este reinicio no cambiará la configuración del menú ni el programa Si la condición persiste luego de volver a colocar las pilas reemplace el termostato Para reestablecer convenientemente solo la programación y la configuración del usuario a los valores predeterminados de fábrica pres...

Reviews: