3
1.
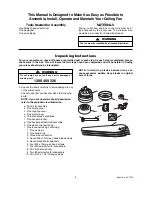
Unpack the items carefully to avoid damage to any
of the components.
Check to see that you have received the following
parts:
NOTE: If you are uncertain of part description,
refer to the exploded view illustration.
a. Fan motor assembly
b. One ceiling cover
c. One coupling cover
d. One motor cover
e. Three fan blade assemblies
f. One hanger bracket
g. One hanger ball/downrod assembly
h. One wall control parts bag
i. One loose parts bag, containing:
1. One clevis pin
2. One hairpin clip
3. Three wire connectors
4. Seven M6 x 12mm pan head blade screws
5. Seven blade M6 lockwashers
6. Four M5 x 10mm pan head screws
7. Four M5 external tooth lockwashers
8. Two 8-32 knurled nuts
9. Two #8 external tooth lockwashers
10. Two 8-32 x 1-1/4” threaded studs
Model No.: ACF765
Tools Needed for Assembly
One Phillips head screwdriver
One stepladder
One wire stripper
The fan must be installed by a licensed electrician.
WARNING
This Manual Is Designed to Make it as Easy as Possible to
Assemble, Install, Operate and Maintain Your Ceiling Fan
Unpacking Instructions
For your convenience, check-off boxes are provided next to each step. As each step is completed, place a
check mark in the box. This will insure that all steps have been completed and will be helpful in finding
your place should you be interrupted.
Do not install or use fan if any part is damaged or
missing, call:
1300 469 326
WARNING
!
NOTE: Intermixing blades between fans can
cause excessive wobble. Keep blades in original
sets of three.
f
c
b
a
h
e
g
i
d
MATERIALS
Wiring, outlet box and box connectors must be of
type required by the local code. The minimum wire
would be a 3-conductor (2-wire with ground):

