Chapter 3 Startup 31
ACTURA Flex 48330
Power System User Manual
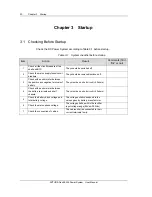
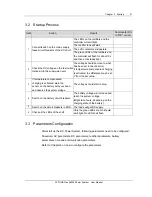
3.2 Startup Process
Item
Action
Result
Comments (Fill
in “OK” or not)
The LEDs on the rectifiers and the
controller will emit light.
The rectifier fans will start.
The LVD contactors will operate.
1
Connect/switch on the mains supply
fuses/circuit breakers of the DC shelf.
The green LEDs of the rectifiers and
the controller will flash for about 10 s.
and then emit steady light.
2
Check the DC voltage on the test outlet
marked U in the supervision unit.
The voltage should be close to what
has been set in the controller.
If temperature compensated charging
is activated, the difference may be
±
3
V from the set value.
3
If temperature compensated
charging is activated, warn the
sensor on the battery with your hand
and observe the system voltage.
The voltage should start to drop.
4
Switch on the battery circuit breakers.
The battery voltage will increase and
reach the system voltage.
(Might take hours, depending on the
charging state of the battery.)
5
Switch on the circuit breakers in MFU.
The loads will get DC supply.
6
Check all the LEDs of the shelf.
Only the green LEDs are On should
emit light. No LED shall flash.
3.3 Parameters Configuration
After start up the DC Power System, following parameters need to be configured:
Password, AC parameters, DC parameters, rectifier parameters, battery
parameters, time and communication parameters.
Refer to Chapter 5 on how to configure the parameters.
Summary of Contents for ACTURA Flex 48330
Page 10: ......

