17
emersonfans.com
Please contact 1-800-654-3545 for further assistance
E.T.L. Model No.: CF985
9. Optional Installation of No-Light Cover Plate
9.1
If NO light fitter is to be used,
Installation of the No-Light Cover Plate:
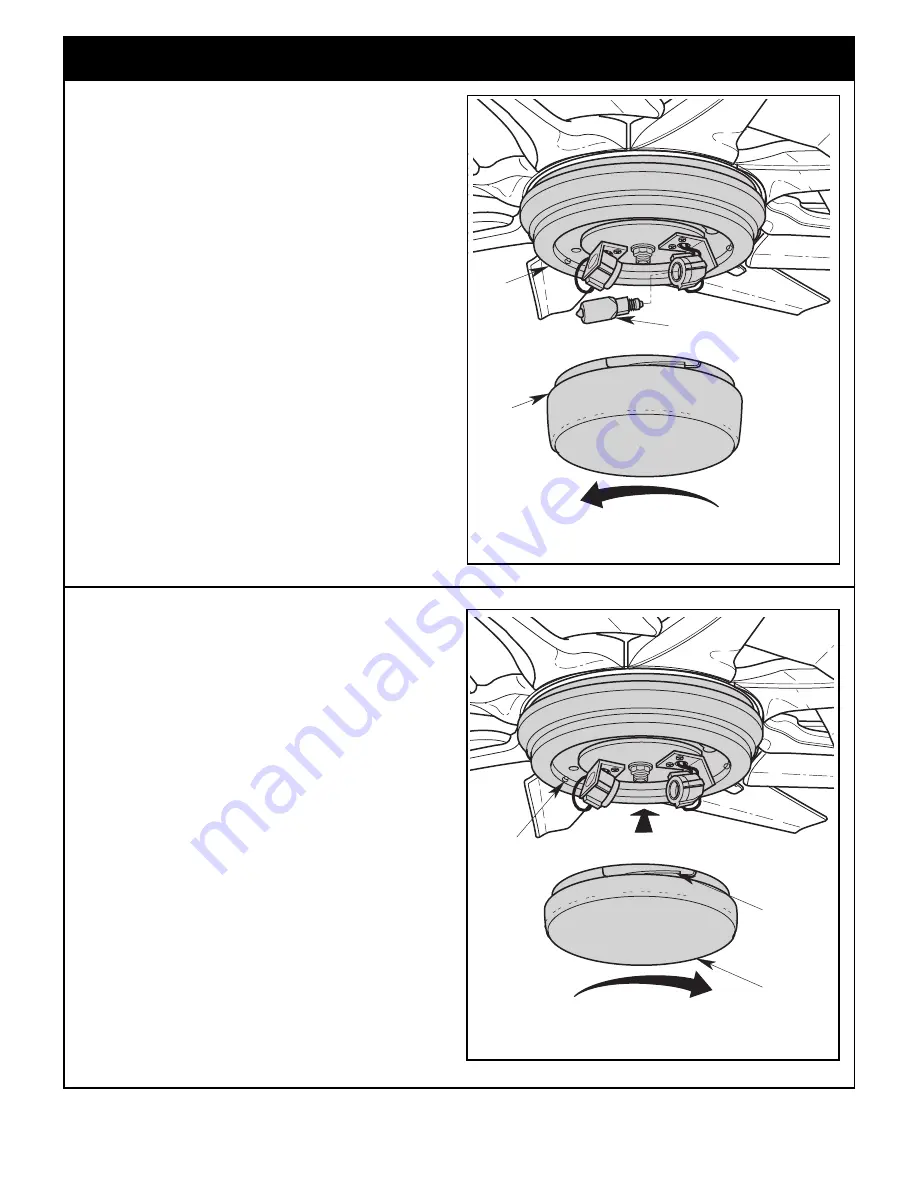
Remove the glass bowl from the light fitter by turning the
bowl counter-clockwise. Store glass bowl in a secure place
for future use (Figure 30).
Remove the two 50-watt (maximum) mini-candelabra base
halogen bulbs from the light fitter sockets
(Figure 30).
CAUTION: To avoid risk of burns or other injury,
assure power is off before attempting to install or
replace the 50-watt (max.) mini-candelabra base
halogen bulbs. Halogen bulbs are very hot and can
cause burns. Allow the bulbs to cool sufficiently
before handling.
CAUTION: Do not touch 50-watt (max.) mini-
candelabra base halogen bulbs with bare hands.
Fingerprints may result in shorter bulb life. Remove
fingerprints with alcohol.
REMOVE 50-WATT (max.) MINI-
CANDELABRA BASE HALOGEN
BULBS (2)
ROTATE GLASS BOWL COUNTER-CLOCKWISE
TO REMOVE FROM LIGHT FITTER
GLASS
BOWL
LIGHT
FITTER
Figure 30
9.2
Place the no-light cover plate into the light fitter, aligning
the three flat areas on the top flange of the no-light cover
plate with the three raised studs in the light fitter. Then turn
the no-light cover plate clockwise until it stops and is
secure (Figure 31).
Proceed to Section 10 to install the wall control.
NO-LIGHT
COVER
PLATE
ROTATE NO-LIGHT COVER PLATE CLOCKWISE TO
ENGAGE ON THE LIGHT FITTER RAISED STUDS
LIFT NO-LIGHT COVER PLATE
UP INTO LIGHT FITTER
FLAT AREA
OF NO-LIGHT
COVER
PLATE (3)
LIGHT FITTER
RAISED STUDS (3)
Figure 31


