background image

36

Digest/Intro-Scan Function
(for Audio CDs)

When playing a normal audio CD the DIGEST button
performs the same function as an INTRO SCAN button on
a CD player. This feature is useful when you are trying to
locate a specific song but you cannot remember the title
or track number.

Load your CD in the tray and as soon as playback begins
press the DIGEST button. The word "SCAN" will appear on
your TV screen. The player will back up to the beginning
of Track 1 and will play the first 6 seconds of each track
on the disc. When you hear the desired song, press the
PLAY button to cancel the SCAN function and begin
normal playback from that point.

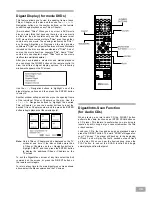
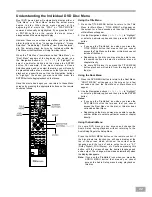
Digest Display (for movie DVDs)

This feature allows you to view the opening frame of each
Title or Chapter on the disc and then use the 

/

 Ù 

/

 Ú

Navigation buttons, or the number buttons, on the remote
control to begin playback on any Title or Chapter.

(A word about "Titles". When you buy or rent a DVD movie
disc you may think that because there is only one movie
on the disc, the disc contains only one title. However most
DVD movie discs contain multiple "Titles" even though they
contain only one movie. The opening credits may be Title 1,
any Coming Attractions or Previews on the disc are also
considered "Titles", any Special Features or Bonus Materials
included on the disc are also considered as "Titles". And of
course, the movie itself is a separate "Title". Some "Titles"
contain only one chapter. Longer "Titles" such as the movie
itself contain multiple chapters.)

After you have loaded a movie disc and started playback
you can press the DIGEST button on the remote control to
view the different digest display options. The following
window will appear on the TV screen:

Use the 

Ù 

/

  Ú

 Navigation buttons to 'highlight' one of the

digest display options and then press the ENTER button
to select it.

Another window will open and show you the opening frame
of the individual Titles or Chapters on the disc. Use the

/

  Ù 

/

  Ú

 Navigation buttons to 'highlight' the desired

Title or Chapter, or use the number buttons to input the
desired Title or Chapter number and the press the ENTER
button to begin playback at the selected point.

Note: Only 6 Titles or Chapters can be displayed on the TV

screen at one time. If the disc contains more than
6 Titles or Chapters use the 

>

 Navigation button to

'highlight' NEXT, and then press the ENTER button
to display the additional Titles or Chapters on the
TV screen.

To exit the Digest Menu screen at any time select the Exit
command on the screen, or press the DIGEST button on
the remote control again

To return at any time to the main digest menu screen shown
above, select the Menu command on the TV screen.

Summary of Contents for AV50

Page 1: ...44 COMPACT AUDIO VIDEO SYSTEM DVD CD CD RW MP3 PLAYER withAM FM DIGITAL TUNING RECEIVER OWNER S MANUAL AV50 Visit our web site at www emersonradio com ...

Page 2: ...mfort of your own living room The only thing you need to add is your own TV We have designed this system to be easy to set up and even easier to use But please review this manual before you operate your system have it handy while you are setting the system up and keep it available for future reference or in the unlikely event that you encounter any unexpected problems We have tried to keep this ma...

Page 3: ...ot be blocked or covered The openings should never be blocked by placing the product on a bed sofa rug or other similar surface This product should never be placed near or over a radiator or heat source This product should not be placed in a built in installation such as a bookcase or rack unless proper ventilation is provided or the manufacturer s instructions have been adhered to 10 POWER SOURCE...

Page 4: ...hock or other hazards 20 SAFETY CHECK Upon completion of any service or repairs to this product ask the service technician to perform safety checks to determine that the product is in proper operating condition 21 WALL OR CEILING MOUNTING The product should be mounted to a wall or ceiling only as recommended by the manufacturer 22 DAMAGE REQUIRING SERVICE Unplug the product from the wall outlet an...

Page 5: ...t does cause harmful interference to radio or television reception which can be determined by turning the equipment off and on the user is encouraged to try to correct the interference by one or more of the following measures Reorient or relocate the receiving antenna Increase the separation between the equipment and receiver Connect the equipment into an outlet on a circuit different from that to...

Page 6: ...erstanding DVD Disc Menus 22 Repeat Playback 23 A B Repeat Playback 23 Random Playback 23 Program Play Audio CDs Only 24 Selecting a Start Point by Chapter or Time Code 25 Selecting a CD Track Using Number Buttons 25 Checking Disc Information Using Display Button 26 Setting and Adjustments Using the SETUP Menu and Navigation Buttons 27 SETUP Menu Listing 28 TV Display Setting 29 TV Type Setting Mu...

Page 7: ...SE Button 3 PAUSE Button 14 MEMORY Button 4 STOP Button 15 ROTARY JOG VOLUME KNOB 5 TV AUX Button 16 STANDBY Button 6 DVD CD Button 17 STANDBY LED 7 VIDEO VCR Button 18 MONO ST FM Button 8 TUNER BAND Button 19 PLAY Button 9 DISC TRAY 20 DISPLAY WINDOW 10 PRESET STATION UP Ù DOWN Ú Button 21 REMOTE SENSOR 11 TUNING UP Ù DOWN Ú Button ...

Page 8: ...Main Unit Back Panel 1 Speaker Main Output 7 S VIDEO Output 2 RESET Button 8 COAXIALDIGITALAUDIO Output 3 Power Cable 9 AUDIO DVD Output 4 AM LOOPAntenna Terminal 10 TV AUX Input 5 FM Antenna Terminal 11 VIDEO AUDIO Input 6 VIDEO Output ...

Page 9: ... Indicator 4 DOLBY SURROUND PRO LOGIC Indicator 15 STATUS BAR Indicator 5 DTS Indicator 16 TRACK Indicator 6 DSP MODE Indicator 17 CHAPTER Indicator 7 DOLBY 3 STEREO Indicator 18 TITLE Indicator 8 2 CHANNEL STEREO Indicator 19 AM BAND Indicator 9 REPEAT 1 A B Indicator 20 FM BAND Indicator 10 FM STEREO Indicator 21 LEFT RIGHT CHANNEL Indicator 11 PRESET STATION Indicator ...

Page 10: ... PROGRAM Button 18 TREBLE Button 19 SLOW R Button 20 BASS Button 21 SPEAKER CHANGE LEVEL Buttons 22 PRESET STATION UP Ù DOWN Ú Button 23 MUTE Button 24 TUNING UP Ù DOWN Ú Button 25 VOLUME UP Ù DOWN Ú Button 26 SLOW F Button 27 PAUSE Button 28 STOP Button 29 SKIP FORWARD Button 30 PLAY Button 31 SEARCH FORWARD Button 32 ENTER Button 33 NAVIGATION ARROWS Ù Ú 34 SETUP Button 35 REPEAT Button 36 REPEA...

Page 11: ...hen the unit is suddenly moved from a cold environment to a warm one If moisture forms inside this unit it may not operate properly In this case turn on the power and wait about one hour for the moisture to evaporate On Adjusting Volume Do not turn up the volume while listening to a portion with very low level inputs or no audio signals If you do the speakers may be damaged when a peak level porti...

Page 12: ... Regarding This Manual The types of functions and operations that can be used for a particular disc vary depending on the features of that disc In some cases these functions and operations may differ from the descriptions given in this Operations Manual In this event follow the instructions given on the screen This Operations Manual only covers basic disc operations For some operations the icon ma...

Page 13: ...yer operation indicates that such manufacturer imposed restrictions apply Note 3 The audio on a DVD disc recorded in MPEG version 2 0 format may not play properly on some discs only the image will appear in this case Discs that Cannot be Played You cannot play CD G CD EXTRA CD ROM and DVD ROM discs You cannot play illegally produced discs You cannot play scratched discs You cannot play discs that ...

Page 14: ...mperature inside the car After playing store the disc in its case Do not write on the label side with a ball point pen or other writing utensils Be careful not to drop or bend the disc Disc cleaning precautions Before playing clean the disc with a cleaning cloth Wipe the disc from the center out Do not use solvents such as benzine thinner commercially available cleaners or anti static spray intend...

Page 15: ...the remote sensor to direct sunlight or lighting apparatuses Doing so many cause a malfunction If you do not use the remote for an extended period of time remove the batteries to avoid possible damage from battery leakage and corrosion Use only the size and type of batteries specified Be sure to follow the correct polarity when installing the batteries as indicated in the battery compartment Rever...

Page 16: ... speaker to the Main Speaker R terminals Tips for connecting antenna and speakers wires Push and hold Speaker terminal tab down to insert wire Release tab to lock wire in terminal Make sure the insulation is completely removed from the ends of the antenna and speaker wires at all connection points If you have poor FM reception remove the supplied FM wire antenna and have a qualified technician con...

Page 17: ...t the Left Right audio output jacks of your TV set to the Left Right audio input jacks TV AUX INPUT or VIDEO AUDIO INPUT of this system VCR Connection Audio Connection Cables Not Included To listen to the sound from your stereo VCR through the speakers of this system connect the Left Right audio output jacks of your stereo VCR to the Left Right audio input jacks VIDEO AUDIO INPUT of this system Ex...

Page 18: ...ereo and FM mono mode 21 PLAY Press to begin playback 22 PAUSE Press to pause playback 23 REMOTE SENSOR Receives the commands from the Remote Handset CONTROLS AND THEIR FUNCTIONS Main Unit Front Panel 1 POWER Press this button once to switch on the unit A red LED indicator comes on Press it again to switch off the power 2 SKIP FORWARD Skip to next chapter 3 SKIP REVERSE Skip to previous chapter 4 ...

Page 19: ...e memorized Press the MEMORY button on the front panel and while the PRESET and channel 01 indicators are flashing press the PRESET TUNING Ù or Ú buttons to select preset channel memory number 02 or any other preset number from 02 to 30 When the indicators stop flashing the station is memorized 6 Repeat step 5 until you have stored up to 30 stations in the tuner memory Recalling Preset Stations 1 ...

Page 20: ... indicator goes off and the main display comes on Note The main power switch on this system must be On 3 If necessary press the DVD CD function button on the front panel of this system or the FUNCTION button on the remote control to select the DVD function The DVD logo screen should appear on your TV 4 Press the OPEN CLOSE button on the front panel of this system or on the remote control to open t...

Page 21: ...l Playback Note On some DVD movie discs the Slow Motion option may not be available If you press the SLOW F or SLOW R button during playback of a disc which does not have this feature the Prohibited Icon u may appear on the TV screen Frame By Frame Advance Step Function During DVD playback you can press the PAUSE button repeatedly to advance the disc step by step one frame at a time Press the PLAY...

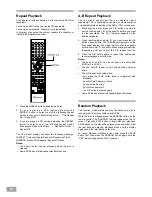
Page 22: ...on The word Filelist will appear on the TV screen Then press the Ù Ú Navigation buttons to select the desired File Track for playback and press the ENTER button to begin playback 5 For Repeat Playback of an MP3 CD press the REPEAT button until Repeat One appears on the TV screen The selected track will be repeated continuously To repeat all the tracks in a Folder continue pressing the REPEAT butto...

Page 23: ...lect a particular option and then press the ENTER button Notes If you see the Prohibited icon when you press the TITLE MENU button that means that you cannot access the Title Menu on this disc or this disc does not include a Title Menu Depending on the disc you may also be able to use the number buttons to select a particular scene or chapter directly On some DVD discs if you press the TITLE MENU ...

Page 24: ...you want to play repeatedly The A indicator appears on the front panel display 2 When reaching the end point B you want press the A B button a second time The A B indicator appears on the front panel display The player starts to play the specific portion from point A and will continue playing this portion repeatedly until you cancel the A B repeat function 3 Press the A B button again to cancel th...

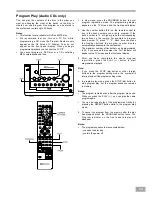
Page 25: ... program track number 15 press 1 5 Each time you press the Number buttons the program number display automatically advances to the next number The maximum number of tracks that can be programmed is 20 If you exceed that number the Full indicator will appear on the TV screen and the front panel display 3 After you have completed the above program registration press the PLAY button to start programm...

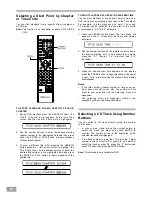
Page 26: ...art of the movie you would key in 0 1 1 5 2 0 as follows 1 Press the SEARCH button twice The Time Menu will appear on the TV screen and the front panel display as follows 2 Use the number buttons on the remote control to key in the desired starting time In this example you would press the 0 1 hours 1 5 minutes and 2 0 seconds 3 When the desired start time appears on the display press the ENTER but...

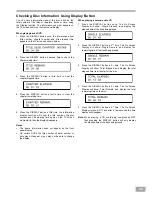
Page 27: ...isappears Notes The above information does not appear on the front panel display On certain DVDs the title number chapter number or time may not appear or you may not be able to change the display When playing a normal audio CD 1 Press the DISPLAY button once The On Screen Display will show Single Elapsed and display the elapsed time of the track being played 2 Press the DISPLAY button a 2nd time ...

Page 28: ...L SETUP Page Press the Ù Ú buttons to highlight one of the four pages which appear on the Main Page And then press the ENTER button to select the highlighted page The selected page will appear on the TV screen Notes The Preferences Page cannot be selected while a disc is playing If a disc is playing press the SETUP button again to exit the SETUP Menu page and press STOP button twice to stop playba...

Page 29: ... they appear on the menu pages The factory default setting for each item is highlighted Before you decide to change any of the factory default settings please review the specific explanation of each setting on the following pages to be sure you understand how the change will effect the operation of your system ...

Page 30: ...L If WIDE is selected and a normal TV is connected 16 9 content will appear distorted during playback objects look thin TV Type Setting Multi NTSC PAL If you live in North America your TV broadcast system is NTSC your TV set is either a NTSC TV or a multi system TV and the DVD movies you buy or rent will be labeled NTSC system The initial Default TV Type setting of this system is NTSC This setting...

Page 31: ...eset the initial Default On Screen Display OSD Language to English This means that all of the on screen menus and icons will appear in English If English is your preferred language no adjustment is necessary and you can skip to the next section If you wish to change the On Screen Display OSD Language to something else your choices are French German Spanish Follow the 3 step below to select a diffe...

Page 32: ...effect if the movie you are watching does not include captions Screen Saver Setting SCR Saver Path General Page SCR Saver Turns the screen saver option on or off If you turn the screen saver on the screen saver image appears when you leave the system in pause or stop mode for more than 1 minute The screen saver is useful to prevent your display from becoming damaged ON Turns the screen saver on OF...

Page 33: ...is will not change the default setting If you see the Prohibited icon when you press the AUDIO MENU button this means that no other audio language is available on the disc you are watching Selecting the Language for Subtitles Path Preferences Subtitle Default Setting English To change the subtitle language use the Navigation buttons to highlight the desired language and then press the ENTER button...

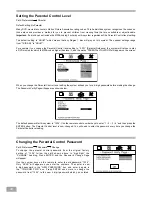
Page 34: ...screen When you change the Parental Control Level setting the system will ask you for a 4 digit password before making the change The Password Verify Page will appear as shown below The default password for this system is 1234 Use the remote control number keys to enter 1 2 3 4 and then press the ENTER button The Parental Control level is now changed You will need to enter the password every time ...

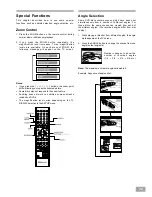
Page 35: ...ond to the zoom feature Zooming does not work on subtitles or menu screens included on DVDs The magnification level varies depending on the TV DISPLAY selection in the SETUP menu Angle Selection Some DVD discs contain scenes which have been shot simultaneously from a number of different angles For these discs the same scenes can viewed from each of the different angles The recorded angles differ f...

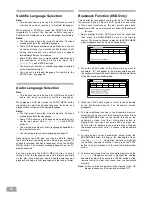
Page 36: ...e pressing the AUDIO MENU button to scroll through all of the languages and audio formats available on the disc Stop when you see the desired selection and playback will begin in that language and that audio format Bookmark Function DVD Only This special function allows you to enter up to 12 individual bookmarks within a Title on a DVD movie disc and return to those exact locations on the disc qui...

Page 37: ... considered Titles any Special Features or Bonus Materials included on the disc are also considered as Titles And of course the movie itself is a separate Title Some Titles contain only one chapter Longer Titles such as the movie itself contain multiple chapters After you have loaded a movie disc and started playback you can press the DIGEST button on the remote control to view the different diges...

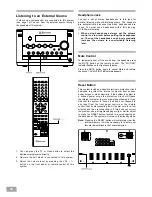
Page 38: ... use some functions contained in the system i e listen to the radio how to listen to an external source how to select a listening mode etc Listening to the Radio To listen to preset radio stations Preset radio stations into the systems memory first see Presetting Radio Stations on page 18 1 Press the TUNER BAND button on the main unit repeatedly until FM or AM appears on the front panel display Th...

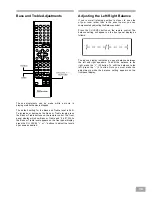
Page 39: ...s to adjust the levels up or down as desired Adjusting the Left Right Balance If your normal listening position is closer to one side of your room rather than in the exact center you can compensate by adjusting the Balance control Press the CH LEVEL button on the remote control The balance setting will appear on the front panel display as follows The above display indicates an equal balance betwee...

Page 40: ...shut off the sound from the speakers press the MUTE button on the remote control The MUTING indicator flashes on the front panel display Press the MUTE button again to cancel Mute and restore the sound The MUTING indicator disappears Reset Button This system includes a special electronic protection circuit designed to protect the internal computer from sudden power surges or static electricity If ...

Page 41: ... use this troubleshooting guide to help you remedy the problem Should any problem persist consult your nearest service center by calling 1 800 695 0098 No power Is the power cord firmly plugged into the power outlet One of the safety mechanisms may be operating In this event unplug the player from the power outlet briefly and then plug it in again No picture Check that the system is connected secu...

Page 42: ...n you play a DVD Multilingual sound is not recorded on the DVD Changing the language for the sound is prohibited on the DVD The language for the subtitles cannot be changed when you play a DVD Multilingual subtitles are not recorded on the DVD Changing the language for the subtitles is prohibited on the DVD The subtitles cannot be turned off when you play a DVD Depending on the DVD you may not be ...

Page 43: ...on which the serial number has been defaced modified or removed Damage to equipment not properly connected to the product Cost incurred in shipping your unit to and from an authorized Depot Repair Facility Ordinary adjustments which you can perform as outlined in the owner s manual Signal reception problems caused by external antenna or cable systems Products purchased used serviced or damaged out...

Page 44: ...43 EMERSON PART NO 16 2940 403 02 Printed in China ...

Reviews: