background image


  DEUTSCH 

 ENGLISH 


Rack PDUs Mounting Options 

Index b 

Seite / Page 31


(ECR no. 15302) 


Knürr DI-STRIP

®

 HighPower 

Knürr DI-STRIP

®

 HighPower


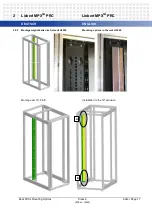
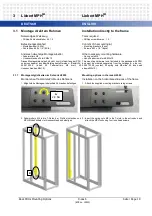
4.1 

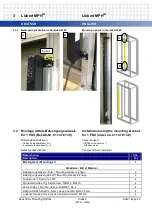
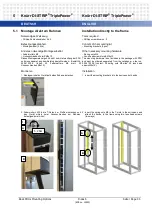
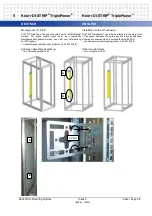
Montage direkt am Rahmen  


Installation directly to the frame 


Notwendiges Werkzeug 

– Torx-Schraubendreher TX25 
– Schlitzschraubendreher 10x1,6 
 

Tools required 

– Torx screw driver TX25 
– Slotted screw driver 10x1,6 


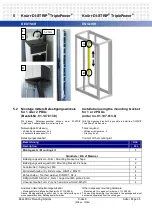
Befestigungssatz 

Mounting kit 


Bezeichnung 

Stk. 

Description 

Pcs 

Werkzeugloser Montagesatz / Toolless mounting kit 

Stückli ste / Bill of Material 

Einhängewinkel / Mounting  bracket 

Trans port winkel (L-Form) / Transport bracket (L-shape) 

Befestigungs winkel / Fixing bracket 

Torx-Schraube / Torx screw, DIN7985, M5x10,  TX25 

18 

Federmutter breit / Spring nut broad, M5  

11 

Kontaktscheibe / Contact washer, 5,1 

18 

Käfigmutter / Cage nut, M6 

Befestigungsknopf mit Schlitz / Fastening button with slot, DIN921, M6x12 

Scheibe / Washer, 2,5mm 

Erdungsleitung / Earth wire 

AMP-Stecker / Earth tag 

Flachscheibe / Flat washer, M5, 12,5x5,3x1,5  


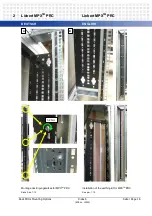
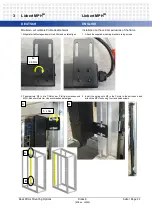
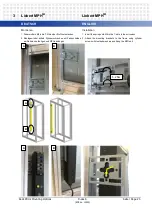
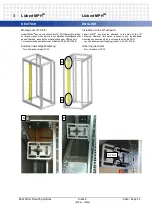
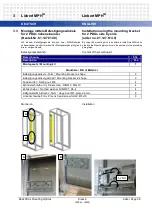
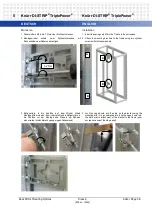
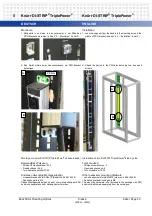
Montieren 


Installation


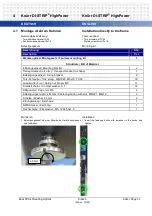
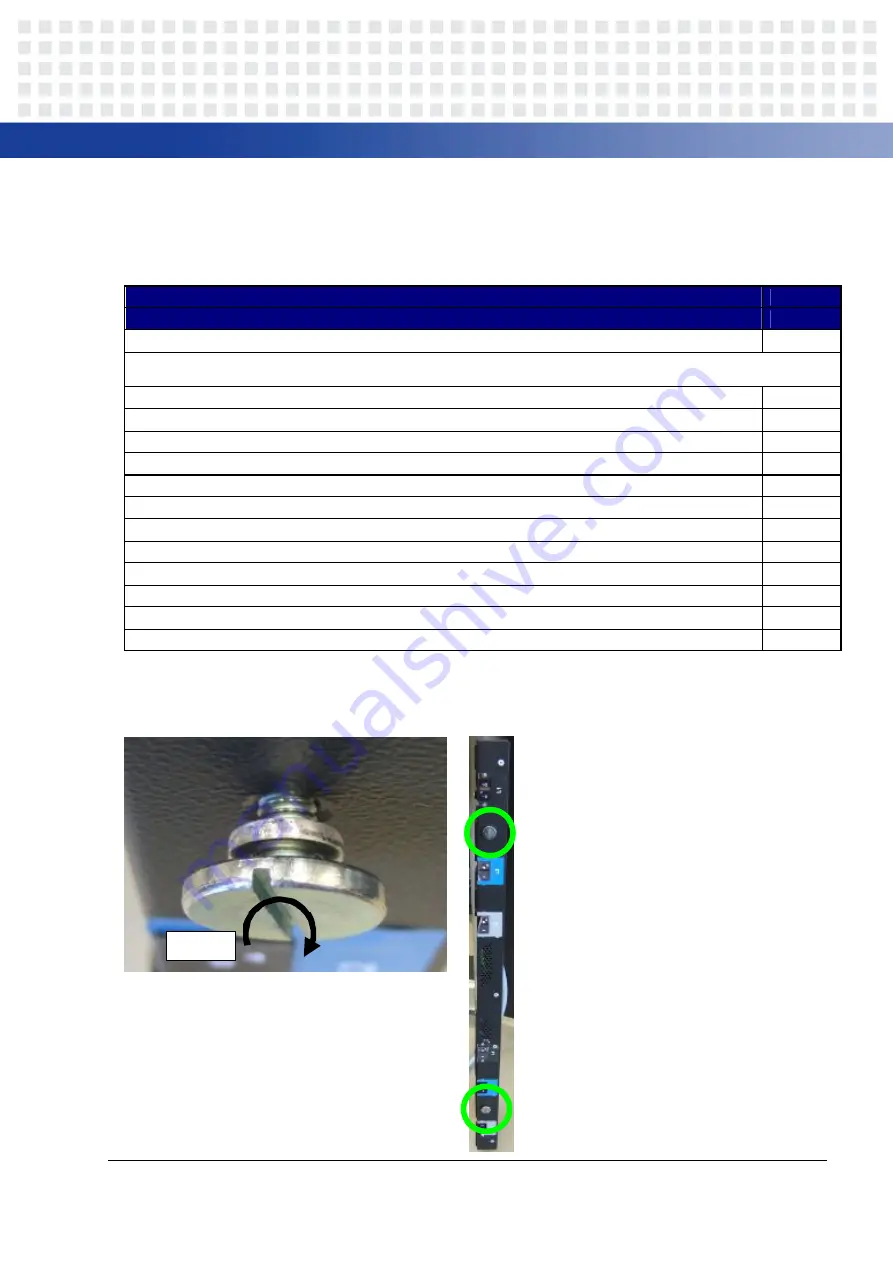
1. Befestigungsknopf  mit  einer  Scheibe  ins  Gerät  einschrauben 

und festziehen.  


1.  Insert  the fastening  button w ith  a w asher  in  the  device  and 

tighten.


2,8 Nm 

Summary of Contents for Avocent PM 3000

Page 1: ...DEUTSCH ENGLISH Rack PDUs Mounting Options Index b Seite Page 1 ECR no 15302 Inhalt Content Emerson Network Power Rack PDUs Montagemöglichkeiten Mounting Options Racks Integrated Cabinets ...

Page 2: ...ür 1 PDU 45 6 3 Montage mittels Befestigungswinkels für 2 PDUs nebeneinander 49 6 4 Montage mittels PDU Brackets 51 1 Bitte beachten Sie 4 1 1 General information 4 1 2 Safe operation 4 1 3 Delivery 4 2 Liebert MPX TM PRC 5 2 1 Installation using the supplied mounting kit 5 2 1 1 Mounting options in the rack H2000 7 2 1 2 Mounting options in the rack H2200 9 2 1 3 Installation of the earthing kit ...

Page 3: ...ttels Befestigungswinkels für 1 PDU 59 7 3 Montage mittels Befestigungswinkels für 2 PDUs nebeneinander 62 7 4 Montage mittels PDU Brackets 62 7 Avocent PM 3000 55 7 1 Installation using the supplied mounting brackets 55 7 2 Installation using the mounting bracket for 1 PDU 59 7 3 Installation using the mounting bracket for 2 PDUs side by side 62 7 4 Installation using the PDU bracket 62 ...

Page 4: ...ge or if components are added or modified w ithout authorisation To meet the conditions of use all the information and instructions in this manual must be adhered to Liability Knürr can not accept responsibility for the completeness and correctness of the information In particular w e accept no liability for damages w hich result from incorrect use or operation of the products 1 2 Sicheres Arbeite...

Page 5: ... Cylinder screw DIN912 M6x10 6 Zahnscheibe Toothed washer DIN6797 A6 4 6 Erdungsset Earthing kit 1 Stückliste Bill of Material Leitung Wire 1 Zylinderschraube Cylinder screw DIN912 M6x12 2 Zahnscheibe Toothed washer DIN6797 A6 4 2 Federmutter Spring nut M6 2 Scheibe Washer DIN125 A6 4 2 Montieren Installation 1 Zwei Federmuttern in die T Nut an der Rückseite der MPXTM PRC einstecken eine in der Nä...

Page 6: ...ecken wo die MPXTM PRC montiert sein w ird Jeder Befestigungs winkel w ird mittels zw ei Federmuttern und zwei Zylinder schrauben mit Zahnscheiben befestigt 3 Attach the mounting brackets to the DCM frame Insert the spring nuts in the T slot of the aluminum extrusion where the MPXTM PRC w ill be mounted Each bracket requires two spring nuts and two cylinder screwswith toothed washers 2 8 Nm Transp...

Page 7: ...ann sollte Datenbus auf der linken Seite sein Wenn das MPX PEM unten an der Stromschiene befestigt ist d h die Kabeleinführung führt nach unten dann sollte Datenbus auf der rechten Seite sein Dadurch ist die Trennung von Strom und Datenleitungen einfach möglich If the MPX PEM Pow er Entry Module is attached to the top of the power rail chassis i e the cable entry leads upwards then the data bus sh...

Page 8: ...UTSCH ENGLISH Rack PDUs Mounting Options Index b Seite Page 8 ECR no 15302 2 Liebert MPXTM PRC Liebert MPXTM PRC Montage von zwei MPXTM PRC nebeneinander Installation of two MPXTM PRC side by side A B B A ...

Page 9: ...chkeiten im Schrank H2200 Mounting options in the rack H2200 Beim Schrank H2200 kann die Stromschiene zurückversetzt auf den Seitenteil montiert w erden Dadurch bleibt mehr Platz für Kabelmanagement In the rack H2200 the pow er rail chassis can be installed sunken on the side panel This leaves more space for cable management A B A B ...

Page 10: ...DEUTSCH ENGLISH Rack PDUs Mounting Options Index b Seite Page 10 ECR no 15302 2 Liebert MPXTM PRC Liebert MPXTM PRC 5 2 Nm A B A B ...

Page 11: ...hes Montagezubehör gekauft werden das nicht zum Lieferumfang der PDU gehört Linsenschrauben selbstfurchend Bestell Nr 05 041 334 9 The pow er rail chassis can also be attached to the side of the 19 extrusion How ever this option requires to buy an additional mounting accessories which is not supplied w ith the PDU Lens head screwsself tapping order no 05 041 334 9 Anderes notwendige Werkzeug Torx ...

Page 12: ...by side How ever this option requires to buy an additional mounting kit order no 01 147 814 9 Mounting procedure is the same as at the beginning of this chapter paragraph Installation Befestigungssatzinhalt Content of the mounting kit Bezeichnung Stk Description Pcs Montagesatz Mounting kit 1 Stückliste Bill of Material Befestigungswinkel L Form Mounting bracket L shape 2 Befestigungswinkel gekröp...

Page 13: ...DEUTSCH ENGLISH Rack PDUs Mounting Options Index b Seite Page 13 ECR no 15302 2 Liebert MPXTM PRC Liebert MPXTM PRC 2 1 3 Montage des Erdungssatzes Installation of the earthing kit A B ...

Page 14: ... Schrank H2200 Für Montage des PDU Brackets siehe separate Montageanleitung PDU bracket belongs to the rack accessories and can be ordered as an option order no 01 147 816 8 for rack H2000 or 01 147 817 8 for rack H2200 For installation of the PDU bracket see the separate assembly instructions Notwendiges Werkzeug Schlitzschraubendreher 10x1 6 Torx Schraubendreher TX30 Tools required Slotted screw...

Page 15: ...Installation to the 19 extrusion Anderes notwendige Werkzeug Torx Schraubendreher TX25 Gabelschlüssel Nr 8 Other required tools Torx screwdriver TX25 Open end wrench no 8 Anderes notwendige Montagezubehör Torx Schrauben M5x10 Sperrzahnmuttern M5 Other necessary mounting hardware Torx screws M5x10 Serrated toothed locking nuts M5 A B A B ...

Page 16: ...DEUTSCH ENGLISH Rack PDUs Mounting Options Index b Seite Page 16 ECR no 15302 2 Liebert MPXTM PRC Liebert MPXTM PRC A B 5 2 Nm ...

Page 17: ... Mounting Options Index b Seite Page 17 ECR no 15302 2 Liebert MPXTM PRC Liebert MPXTM PRC 2 2 2 Montagemöglichkeiten im Schrank H2200 Mounting options in the rack H2200 Montage am 19 Profil Installation to the 19 extrusion A B ...

Page 18: ...PDUs Mounting Options Index b Seite Page 18 ECR no 15302 2 Liebert MPXTM PRC Liebert MPXTM PRC Montage des Ergungssatzes für MPXTM PRC Installation of the earthing kit for MPXTM PRC Siehe Abs 1 1 3 See par 1 1 3 A B 5 2 Nm ...

Page 19: ...muttern M5 breit 50 Linsenschrauben M5x10 Other necessary mounting hardware Spring nuts M5 Lens head screwsformZ M5x10 This mounting hardw are is not included in the package w ith PDU and must be ordered separately from the catalogue order no 05 041 335 9 content 50 spring nuts M5 wide 50 lens head screws M5x10 3 1 1 Montagemöglichkeiten im Schrank H2000 Mounting options in the rack H2000 Montiere...

Page 20: ...CH ENGLISH Rack PDUs Mounting Options Index b Seite Page 20 ECR no 15302 3 Liebert MPHTM Liebert MPHTM Montage von zwei Liebert MPHTM nebeneinander Installation of two Liebert MPHTM side by side 5 2 Nm A B A ...

Page 21: ...trusions of the frame 1 Mitgelieferte Montagew inkel mittels Schrauben befestigen 1 Attach the supplied mounting brackets using screws 2 Federmuttern M5 in die T Nuten der Profile einstecken und MPH Einheit mittels vier Linsenschrauben befestigen 2 Insert the spring nuts M5 in the T slots in the extrusions and attach the MPH unit using four lens head screws 4x 2 8 Nm A B A B 5 2 Nm ...

Page 22: ...er Nr 1 Innensechskantschlüssel Gr 5 Tools required Phillips screwdriver no 1 Allen key size 5 Befestigungssatzinhalt Content of the mounting kit Bezeichnung Stk Description Pcs Montagesatz Mounting kit 1 Stückliste Bill of Material Befestigungswinkel L Form Mounting bracket L shape 2 Befestigungswinkel gekröpft Mounting bracket Z shape 2 Federmutter Spring nut M6 4 Zylinderschraube Cylinder screw...

Page 23: ...dermuttern M6 in die T Nuten der Profile einstecken 2 Montagew inkel mittels Zylinderschrauben mit Zahnscheiben am Rahmen befestigen und MPH einhängen 1 Insert the spring nuts M6 in the T slots in the extrusions 2 Attach the mounting brackets to the frame using cylinder screwswith toothedwashers and hang the MPH unit 5 2 Nm A B A B A B ...

Page 24: ...es Montagezubehör gekauft werden das nicht zum Lieferumfang der PDU gehört Linsenschrauben selbstfurchend Bestell Nr 05 041 334 9 Liebert MPHTM can also be attached to the side of the 19 extrusion How ever this option requires to buy an additional mounting accessories which is not supplied w ith the PDU Lens head screwsself tapping order no 05 041 334 9 Anderes notwendige Werkzeug Torx Schraubendr...

Page 25: ...DEUTSCH ENGLISH Rack PDUs Mounting Options Index b Seite Page 25 ECR no 15302 3 Liebert MPHTM Liebert MPHTM A B ...

Page 26: ...s mounting kit it is possible to install two MPH units side by side Mounting procedure is the same as in the preceding paragraph Befestigungssatzinhalt Content of the mounting kit Bezeichnung Stk Description Pcs Montagesatz Mounting kit 1 Stückliste Bill of Material Befestigungswinkel L Form Mounting bracket L shape 2 Befestigungswinkel gekröpft Mounting bracket Z shape 2 Federmutter Spring nut M6...

Page 27: ...bzw 01 147 817 8 für Schrank H2200 Für Montage des PDU Brackets siehe separate Montageanleitung PDU bracket belongs to the rack accessories and can be ordered as an option order no 01 147 816 8 for rack H2000 or 01 147 817 8 for rack H2200 For installation of the PDU bracket see the separate assembly instructions Notwendiges Werkzeug Phillips Schraubendreher Nr 1 Torx Schraubendreher TX30 Tools re...

Page 28: ...allation to the 19 extrusion Anderes notwendige Werkzeug Torx Schraubendreher TX25 Gabelschlüssel Nr 8 Other required tools Torx screwdriver TX25 Open end wrench no 8 Anderes notwendige Montagezubehör Torx Schrauben M5x10 Sperrzahnmuttern M5 Other necessary mounting hardware Torx screws M5x10 Serrated toothed locking nuts M5 A B A B ...

Page 29: ...DEUTSCH ENGLISH Rack PDUs Mounting Options Index b Seite Page 29 ECR no 15302 3 Liebert MPHTM Liebert MPHTM A B 5 2 Nm ...

Page 30: ...DEUTSCH ENGLISH Rack PDUs Mounting Options Index b Seite Page 30 ECR no 15302 3 Liebert MPHTM Liebert MPHTM A B ...

Page 31: ...e Bill of Material Einhängewinkel Mounting bracket 2 Transportwinkel L Form Transport bracket L shape 1 Befestigungswinkel Fixing bracket 2 Torx Schraube Torx screw DIN7985 M5x10 TX25 18 Federmutter breit Spring nut broad M5 11 Kontaktscheibe Contact washer 5 1 18 Käfigmutter Cage nut M6 4 Befestigungsknopf mit Schlitz Fastening button with slot DIN921 M6x12 2 Scheibe Washer 2 5mm 2 Erdungsleitung...

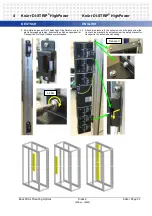
Page 32: ...terungen am Profil befestigen Das Gerät von vorn in die Halterungen einrasten Eventuell den Sicherungswinkel für Transport an Profil und Gehäuse verschrauben 2 Attach two brackets to the extrusion Lock the device from the front into the brackets Eventually screw the safety bracket for transport to the extrusion and housing Transport 2 8 Nm ...

Page 33: ...816 8 für Schrank H2000 bzw 01 147 817 8 für Schrank H2200 Für Montage des PDU Brackets siehe separate Montageanleitung PDU bracket belongs to the rack accessories and can be ordered as an option order no 01 147 816 8 for rack H2000 or 01 147 817 8 for rack H2200 For installation of the PDU bracket see the separate assembly instructions Notwendiges Werkzeug Schlitzschraubendreher 10x1 6 Torx Schra...

Page 34: ...en Bestell Nr 05 041 335 9 Inhalt 50 Federmuttern M5 breit 50 Linsenschrauben M5x10 Other necessary mounting hardware Spring nuts M5 Lens head screwsformZ M5x10 This mounting hardw are is not included in the package w ith PDU and must be ordered separately from the catalogue order no 05 041 335 9 content 50 spring nuts M5 wide 50 lens head screws M5x10 Montieren Installation 1 Montagew inkel ins G...

Page 35: ...lt Content of the mounting kit Bezeichnung Stk Description Pcs Montagesatz Mounting kit 1 Stückliste Bill of Material Befestigungswinkel L Form Mounting bracket L shape 2 Befestigungswinkel gekröpft Mounting bracket Z shape 2 Federmutter Spring nut M6 4 Zylinderschraube Cylinder screw DIN912 M6x10 4 Zahnscheibe Toothed washer DIN6797 A6 4 4 Käfigmutter M5 Blech 2 5mm Caged nut M5 plate 2 5mm 4 Lin...

Page 36: ...e extrusions 2 Attach the mounting brackets to the frame using two cylinder screwswith toothedwashers 3 Käfigmuttern in die Schlitze auf dem Winkel mittels Montagehilfe einrasten Es w ird empfohlen die Käfigmuttern in die Schlitze vor der Montage des Winkels am Rahmen einzurasten schlechterer Zugang wegen Seitenwand 3 Lock the caged nuts into the slots on the bracket using the mounting aid It is r...

Page 37: ...rr DI STRIP TriplePower Knürr DI STRIP TriplePower 4 Die Geräte mittels Linsenschrauben am Winkel befestigen 4 Attach the devices to the bracket using lens head screws Andere Montagemöglichkeiten Platzeinsparung im Schrank Other mounting options space savings in the rack 2 8 Nm B A B ...

Page 38: ...ein zusätzliches Montagezubehör gekauft werden das nicht zum Lieferumfang der PDU gehört Linsenschrauben selbstfurchend Bestell Nr 05 041 334 9 DI STRIP TriplePow er can also be attached to the side of the 19 extrusion However this option requires to buy an additional mounting accessories which is not supplied w ith the PDU Lens head screwsself tapping order no 05 041 334 9 Anderes notwendige Werk...

Page 39: ... see the separate assembly instructions Notwendiges Werkzeug Phillips Schraubendreher Nr 2 Torx Schraubendreher TX30 Tools required Phillips screwdriver no 2 Torx screwdriver TX30 Anderes notwendige Montagezubehör Käfigmuttern M5 Blech 2 5mm Bestell Nr 05 041 518 7 Linsenschrauben FormZ M5x10 Bestell Nr 05 041 330 9 Montagehilfe für Käfigmutter Bestell Nr 01 130 985 9 Dieses Montagematerial gehört...

Page 40: ...wei DI STRIP TriplePower nebeneinander Installation of two DI STRIP TriplePower side by side Notwendiges Werkzeug Phillips Schraubendreher Nr 2 Gabelschlüssel Nr 8 Torx Schraubendreher TX30 Tools required Phillips screwdriver no 2 Open end wrench no 8 Torx screwdriver TX30 Anderes notwendige Montagezubehör Linsenschrauben FormZ M5x10 Bestell Nr 05 041 330 9 Sperrzahnmuttern M5 Dieses Montagemateri...

Page 41: ...DEUTSCH ENGLISH Rack PDUs Mounting Options Index b Seite Page 41 ECR no 15302 5 Knürr DI STRIP TriplePower Knürr DI STRIP TriplePower Montieren Installation 5 2 Nm B A A B ...

Page 42: ...9 Profil Installation to the 19 extrusion Anderes notwendige Werkzeug Torx Schraubendreher TX25 Gabelschlüssel Nr 8 Other required tools Torx screwdriver TX25 Open end wrench no 8 Anderes notwendige Montagezubehör Torx Schrauben M5x10 Sperrzahnmuttern M5 Other necessary mounting hardware Torx screws M5x10 Serrated toothed locking nuts M5 A B A B ...

Page 43: ...DEUTSCH ENGLISH Rack PDUs Mounting Options Index b Seite Page 43 ECR no 15302 5 Knürr DI STRIP TriplePower Knürr DI STRIP TriplePower A B 2 8 Nm 5 2 Nm ...

Page 44: ...m Katalog bestellt werden Bestell Nr 05 041 335 9 Inhalt 50 Federmuttern M5 breit 50 Linsenschrauben M5x10 Other necessary mounting hardware Spring nuts M5 Lens head screwsformZ M5x10 This mounting hardw are is not included in the package w ith PDU and must be ordered separately from the catalogue order no 05 041 335 9 content 50 spring nuts M5 wide 50 lens head screws M5x10 Montieren Installation...

Page 45: ...gungssatzinhalt Content of the mounting kit Bezeichnung Stk Description Pcs Montagesatz Mounting kit 1 Stückliste Bill of Material Befestigungswinkel L Form Mounting bracket L shape 2 Befestigungswinkel gekröpft Mounting bracket Z shape 2 Federmutter Spring nut M6 4 Zylinderschraube Cylinder screw DIN912 M6x10 4 Zahnscheibe Toothed washer DIN6797 A6 4 4 Käfigmutter M5 Blech 2 5mm Caged nut M5 plat...

Page 46: ...nkel mittels zw ei Zylinderschrauben mit Zahnscheiben am Rahmen befestigen 1 Insert the spring nuts M6 in the T slots in the extrusions 2 Attach the mounting brackets to the frame using two cylinder screwswith toothedwashers 3 Käfigmuttern in die Schlitze auf dem Winkel mittels Montagehilfe einrasten Es w ird empfohlen die Käfigmuttern in die Schlitze vor der Montage des Winkels am Rahmen einzuras...

Page 47: ... seitlich am 19 Profil befestigt werden Für diese Option muss aber ein zusätzliches Montagezubehör gekauft werden das nicht zum Lieferumfang der PDU gehört Linsenschrauben selbstfurchend Bestell Nr 05 041 334 9 DI STRIP BladePow er PizzaPow er can also be attached to the side of the 19 extrusion However this option requires to buy an additional mounting accessories which is not supplied w ith the ...

Page 48: ...DEUTSCH ENGLISH Rack PDUs Mounting Options Index b Seite Page 48 ECR no 15302 6 Knürr DI STRIP BladePower Knürr DI STRIP BladePower PizzaPower PizzaPower 5 2 Nm A B A B ...

Page 49: ...by side order no 01 147 814 9 Mit diesem Befestigungsw inkel können zwei DI STRIP BladePow er PizzaPow er nebeneinander montiert werden Der Montagevorgang ist gleichw ie im vorigen Absatz With this mounting bracket it is possible to install tw o DI STRIP BladePow er PizzaPow er side by side Mounting procedure is the same as in the preceding paragraph Notwendiges Werkzeug Phillips Schraubendreher N...

Page 50: ...4 Zylinderschraube Cylinder screw DIN912 M6x10 4 Zahnscheibe Toothed washer DIN6797 A6 4 4 Käfigmutter M5 Blech 2 5mm Caged nut M5 plate 2 5mm 8 Linsenschraube FormZ Lens head screw formZ M5x10 8 Anderes notwendige Montagezubehör Montagehilfe für Käfigmutter Bestell Nr 01 130 985 9 Dieses Montagematerial gehört nicht zum Lieferumfang der PDU und muss separat aus dem Katalog bestellt werden Other n...

Page 51: ... PDU bracket see the separate assembly instructions Notwendiges Werkzeug Phillips Schraubendreher Nr 2 Torx Schraubendreher TX30 Tools required Phillips screwdriver no 2 Torx screwdriver TX30 Anderes notwendige Montagezubehör Käfigmuttern M5 Blech 2 5mm Bestell Nr 05 041 518 7 Linsenschrauben FormZ M5x10 Bestell Nr 05 041 330 9 Montagehilfe für Käfigmutter Bestell Nr 01 130 985 9 Dieses Montagemat...

Page 52: ...1 Käfigmutter von hinten in den Lochraster in der Mitte des PDU Brackets einrasten s Abs 6 2 Montieren Punkt 3 1 Lock the cage nut from the back into the mounting holes in the middle of PDU bracket see par 6 2 Installation point 3 2 Das Gerät mittels zwei Linsenschrauben am PDU Bracket befestigen 2 Attach the device to the PDU bracket using tw o lens head screws A B A B 2 8 Nm ...

Page 53: ...ntage am 19 Profil Installation to the 19 extrusion Anderes notwendige Werkzeug Torx Schraubendreher TX25 Gabelschlüssel Nr 8 Other required tools Torx screwdriver TX25 Open end wrench no 8 Anderes notwendige Montagezubehör Torx Schrauben M5x10 Sperrzahnmuttern M5 Other necessary mounting hardware Torx screws M5x10 Serrated toothed locking nuts M5 A B A B ...

Page 54: ...DEUTSCH ENGLISH Rack PDUs Mounting Options Index b Seite Page 54 ECR no 15302 6 Knürr DI STRIP BladePower Knürr DI STRIP BladePower PizzaPower PizzaPower 5 2 Nm 2 8 Nm A B ...

Page 55: ...DU und muss separat aus dem Katalog bestellt werden Bestell Nr 05 041 335 9 Inhalt 50 Federmuttern M5 breit 50 Linsenschrauben M5x10 Other necessary mounting hardware Spring nuts M5 Lens head screwsformZ M5x10 This mounting hardw are is not included in the package w ith PDU and must be ordered separately from the catalogue order no 05 041 335 9 content 50 spring nuts M5 wide 50 lens head screws M5...

Page 56: ...et für Schrankreihen PM PDU can also be installed sunken on the side panel This leaves more space for cable management This type of installation requires the side panel to be removed first not suitable for rack suites 1 Federmuttern M5 in die T Nuten der Profile einstecken und Montagew inkel mittels zw ei Linsenschrauben am Rahmen befestigen 1 Insert the spring nuts M5 in the T slots in the extrus...

Page 57: ... Für diese Option muss aber ein zusätzliches Montagezubehör gekauft werden das nicht zum Lieferumfang der PDU gehört Linsenschrauben selbstfurchend Bestell Nr 05 041 334 9 Torx Schrauben M5x10 Sperrzahnmuttern M5 PM PDU can also be attached to the side of the 19 extrusion How ever this option requires to buy an additional mounting accessories which is not supplied w ith the PDU Lens head screwssel...

Page 58: ...DEUTSCH ENGLISH Rack PDUs Mounting Options Index b Seite Page 58 ECR no 15302 7 Avocent PM 3000 Avocent PM 3000 A B A B 5 2 Nm 2 8 Nm ...

Page 59: ...iste Bill of Material Befestigungswinkel L Form Mounting bracket L shape 2 Befestigungswinkel gekröpft Mounting bracket Z shape 2 Federmutter Spring nut M6 4 Zylinderschraube Cylinder screw DIN912 M6x10 4 Zahnscheibe Toothed washer DIN6797 A6 4 4 Käfigmutter M5 Blech 2 5mm Caged nut M5 plate 2 5mm 4 Linsenschraube FormZ Lens head screw formZ M5x10 4 Montieren Installation 1 Federmuttern M6 in die ...

Page 60: ...tzliches Montagezubehör gekauft werden das nicht zum Lieferumfang der PDU gehört Linsenschrauben selbstfurchend Bestell Nr 05 041 334 9 Liebert MPHTM can also be attached to the side of the 19 extrusion How ever this option requires to buy an additional mounting accessories which is not supplied w ith the PDU Lens head screwsself tapping order no 05 041 334 9 Anderes notwendige Werkzeug Torx Schra...

Page 61: ...DEUTSCH ENGLISH Rack PDUs Mounting Options Index b Seite Page 61 ECR no 15302 7 Avocent PM 3000 Avocent PM 3000 A B A B 5 2 Nm ...

Page 62: ...rocedure is the same as w ith Liebert MPHTM Chapter 3 paragraph 3 3 7 4 Montage mittels PDU Brackets Installation using the PDU bracket PDU Bracket gehört zum Schrankzubehör und ist optional bestellbar Bestell Nr 01 147 816 8 für Schrank H2000 bzw 01 147 817 8 für Schrank H2200 Für Montage des PDU Brackets siehe separate Montageanleitung PDU bracket belongs to the rack accessories and can be order...

Page 63: ...stallation to the 19 extrusion Anderes notwendige Werkzeug Torx Schraubendreher TX25 Gabelschlüssel Nr 8 Other required tools Torx screwdriver TX25 Open end wrench no 8 Anderes notwendige Montagezubehör Torx Schrauben M5x10 Sperrzahnmuttern M5 Other necessary mounting hardware Torx screws M5x10 Serrated toothed locking nuts M5 A A B B ...

Page 64: ...DEUTSCH ENGLISH Rack PDUs Mounting Options Index b Seite Page 64 ECR no 15302 7 Avocent PM 3000 Avocent PM 3000 A B 5 2 Nm ...

Page 65: ...DEUTSCH ENGLISH Rack PDUs Mounting Options Index b Seite Page 65 ECR no 15302 7 Avocent PM 3000 Avocent PM 3000 A B ...

Page 66: ...er EMEA Via Leonardo Da Vinci 16 18 Zona Industriale Tognana 35028 Piove di Sacco PD Italy Tel 39 049 9719 111 Fax 39 049 5841 257 marketing emea emersonnetworkpower com United States 1050 Dearborn Drive P O Box 29186 Columbus OH 43229 Tel 1 614 8880246 Asia 7 F Dah Sing Financial Centre 108 Gloucester Road Wanchai Hong Kong Tel 852 2572220 Fax 852 28029250 Business Critical Continuity Emerson Net...

Reviews: