background image

DOWNLOADING AND TRANSFERRING FILES  (CONT.)

9

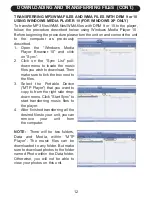
TRANSFERRING FILES 

You can download digital music files from the Internet or use encoding

software to convert music that you have on an audio CD into MP3 or

WMA format. Once these files are stored on your computer you can

easily copy them to your player.

For Windows XP, if you have Windows Media Player 10, you can

transfer music files (MP3, WMA, WMA files with DRM 9 or 10)

to the

player through the

"Sync" function of

Windows Media Player

10. Connect this unit to

the USB port on your

computer using the

USB cable. “MTP

Player” will appear in your "My Computer" folder which indicates the

player is connected. Then, follow the procedure on page 12 to transfer

music files to the player.

For Windows ME, 2000, Vista or Windows XP (without Windows

Media Player 10)

, transfer music files as follows:

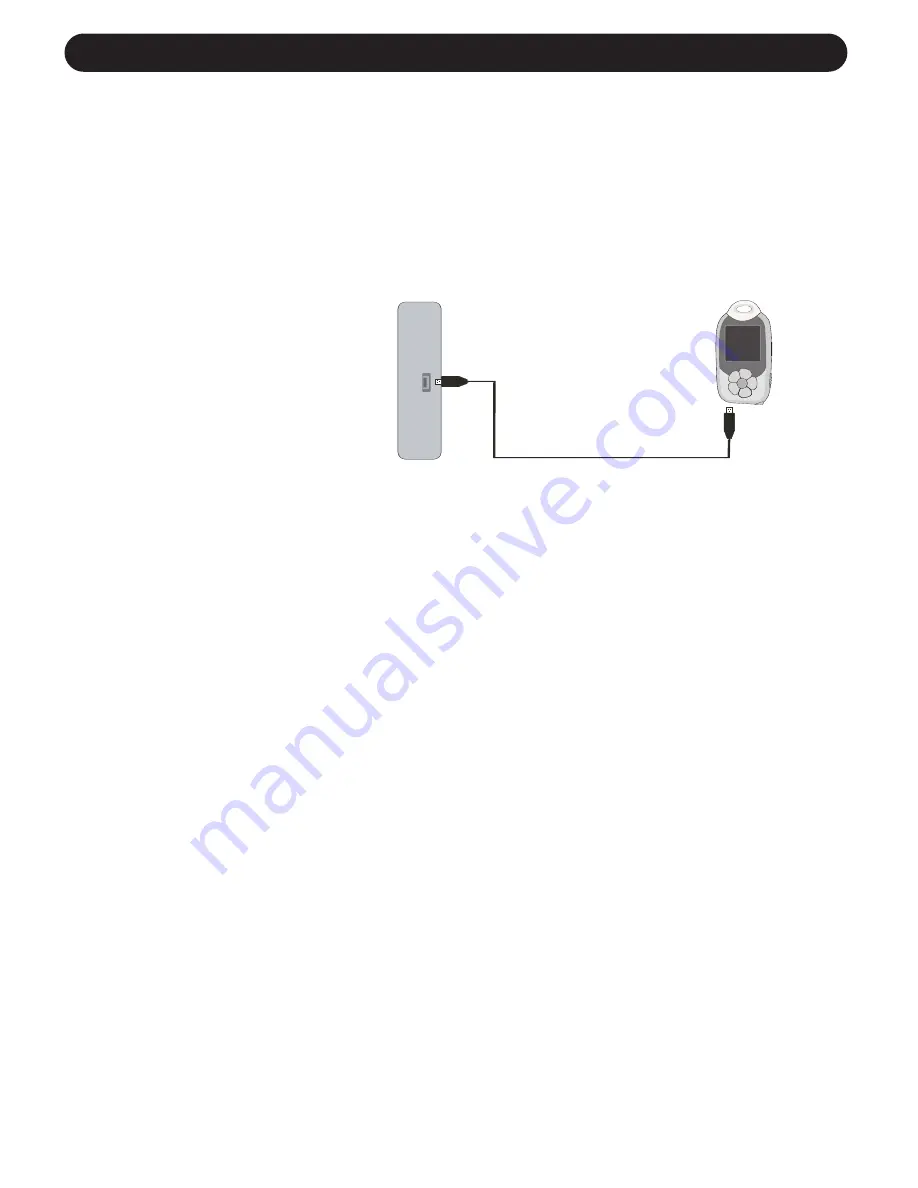
1. Connect your player to the USB port on your computer using the USB

cable as shown above.

2. A "Removable Disk" window will automatically pop-up on your

computer screen.

3. To add more files and songs to your player, simply drag and drop

MP3 or WMA files/folders from anywhere on your computer into the

"Removable Disk" window.

IMPORTANT:

A WMA file with DRM 9 or 10 will not play back if you

directly drag and drop it into the "Removable Disk" window. You must use

Windows Media Player 10 to transfer copy-protected files as described

on page 12.

Computer

USB cable

USB jack

Summary of Contents for Barbie Petal BAR900

Page 1: ...ed trademarks and trade dress are owned by and used under license from Mattel Inc 2007 Mattel Inc All Rights Reserved Petal MP3 Player with Photo Viewer OWNER S MANUAL TM See page 30 for your hidden GEMSTONE FUN button surprise ...

Page 2: ... to service this product yourself as opening or removing covers may expose you to dangerous voltage or other hazards 9 This unit should not be exposed to dripping or splashing water and no object filled with liquids such as vases should be placed near the unit Never push objects of any kind into this unit through any openings 10 Use replacement parts as specified by the manufacturer 11 Upon comple...

Page 3: ... generate or use radio frequency energy Changes or modifications to this equipment may cause harmful interference unless the modifications are expressly approved in the instruction manual The user could lose the authority to operate this equipment if an unauthorized change or modification is made SAFETY INSTRUCTIONS COPYRIGHT Distributing copies of MP3 WMA with DRM or WAV tracks without permission...

Page 4: ...do this now will help to prevent hearing damage or loss in the future After all we want you listening for a lifetime We Want You Listening For A Lifetime Used wisely your new sound equipment will provide a lifetime of fun and enjoyment Since hearing damage from loud noise is often undetectable until it is too late this manufacturer and the Electronic Industries Association s Consumer Electronics G...

Page 5: ...at 1 800 898 9020 Retain this manual for future reference WARNING Choking Hazard Small Parts and Packaging Materials Not for children under 5 years All materials for fastening or packing purposes are not part of the unit and should be discarded for children s safety Please keep all information for future reference This is not a toy 0 5 NOTES Please avoid using this unit in places of high temperatu...

Page 6: ...files Listening To Music 3 Connecting the earbuds 3 1 Connect the earbud to the earbud jack 4 Turn on the player 4 1 Press the button to turn on the player 4 2 In the main menu use the Skip buttons to choose Music and press the button to select 4 3 Use the Skip buttons to choose the desired music and press the button to play 4 4 Use the player controls to adjust playback and volume level 4 5 Press...

Page 7: ...splay 3 Lanyard Hole 4 RESET Access Bottom of Unit 5 Hold Switch 6 Skip Search o Button 7 Headphones Jack 8 Play Pause p Power Button 9 Skip Search n Button 10 GEMSTONE FUN Record Button 11 Volume Button 12 USB Jack Side of Unit Under Cover 13 Volume Button 14 MIC Microphone ...

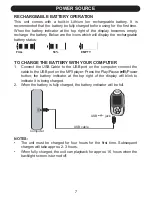
Page 8: ...WITH YOUR COMPUTER 1 Connect the USB Cable to the USB port on the computer connect the cable to the USB port on the MP3 player Press the Play Pause p Power button the battery indicator at the top right of the display will blink to indicate it is being charged 2 When the battery is fully charged the battery indicator will be full NOTES The unit must be charged for four hours for the first time Subs...

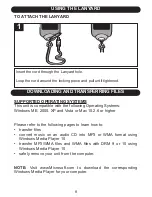
Page 9: ...nvert music on an audio CD into MP3 or WMA format using Windows Media Player 10 transfer MP3 WMA files and WMA files with DRM 9 or 10 using Windows Media Player 10 safely remove your unit from the computer NOTE Visit www Microsoft com to download the corresponding Windows Media Player for your computer USING THE LANYARD Insert the cord through the Lanyard hole Loop the cord around the locking piec...

Page 10: ...er folder which indicates the player is connected Then follow the procedure on page 12 to transfer music files to the player For Windows ME 2000 Vista or Windows XP without Windows Media Player 10 transfer music files as follows 1 Connect your player to the USB port on your computer using the USB cable as shown above 2 A Removable Disk window will automatically pop up on your computer screen 3 To ...

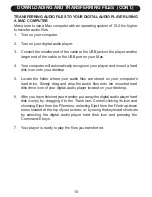
Page 11: ...disk icon onto your desktop 5 Locate the folder where your audio files are stored on your computer s hard drive Simply drag and drop the audio files onto the mounted hard disk drive icon of your digital audio player located on your desktop 6 After you have finished your transfer put away the digital audio player hard disk icon s by dragging it to the Trash icon Control clicking its icon and choosi...

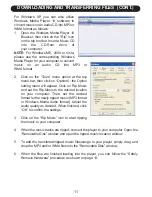
Page 12: ...etting menu will appear Click on Rip Music and set the Rip Music to the desired location on your computer Then set the desired format for the newly ripped music MP3 format or Windows Media Audio format Adjust the audio quality as desired When finished click OK to confirm the settings 3 Click on the Rip Music icon to start ripping the music to your computer 4 When the music tracks are ripped connec...

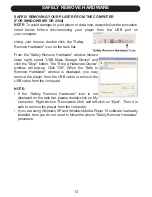
Page 13: ...c 2 Click on the Sync List pull down menu to locate the music files you wish to download Then make sure to tick the box next to the files 3 Select the Portable Device MTP Player that you want to copy to from the right side drop down menu Click Start Sync to start transferring music files to the player 4 After finished transferring all the desired files to your unit you can remove your unit from th...

Page 14: ...rage Device and click the Stop button The Stop a Hardware Device window will pop up Click OK When the Safe to Remove Hardware window is displayed you may remove the player from the USB cable or remove the USB cable from the computer NOTE If the Safely Remove Hardware icon is not displayed on the task bar please double click on My Computer Right click on Removable Disk and left click on Eject Then ...

Page 15: ...he display and the unit will turn off 1 1 1 TURNING THE POWER ON OFF HOLD SWITCH With the unit on slide the HOLD switch to the Lock position right a small Lock icon will appear in the display and no buttons will function This is useful when you do not want the track changed by accidentally pressing a button Slide the HOLD switch to the Unlock position left to cancel the Lock function 1 1 1 NOTE Yo...

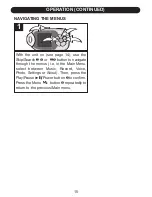
Page 16: ...or o 2 button to navigate through the menus i e in the Main Menu select between Music Record Voice Photo Settings or About Then press the Play Pause p Power button 3 to confirm Press the Menu button 4 repeatedly to return to the previous Main menu 1 2 3 4 1 NAVIGATING THE MENUS ...

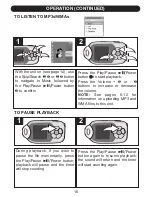
Page 17: ...3 buttons to increase or decrease the volume NOTE See pages 9 12 for information on uploading MP3 and WMA files to this unit 1 2 3 2 TO LISTEN TO MP3s WMAs During playback if you wish to pause the file momentarily press the Play Pause p Power button playback will pause and the timer will stop counting 1 1 1 Press the Play Pause p Power button again to resume playback the sound will return and the ...

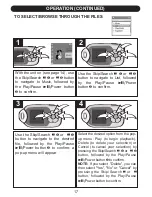
Page 18: ...to the desired file followed by the Play Pause p Power button 3 to confirm a pop up menu will appear 1 2 3 3 Select the desired option from the pop up menu Play to begin playback Delete to delete your selection or Cancel to cancel your selection by pressing the Skip Search n 1 or o 2 button followed by the Play Pause p Power button 3 to confirm NOTE If you select Delete you can then select Yes No ...

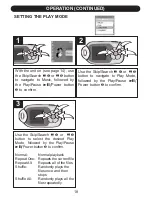
Page 19: ... Play Mode followed by the Play Pause p Power button 3 to confirm 1 2 3 2 Use the Skip Search n 1 or o 2 button to select the desired Play Mode followed by the Play Pause p Power button 3 to confirm Normal Normal playback Repeat One Repeats the current file Repeat All Repeats all of the files Shuffle Randomly plays the files once and then stops Shuffle All Randomly plays all the files repeatedly 1...

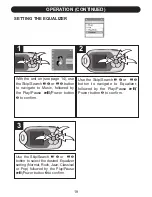
Page 20: ...utton 3 to confirm 1 2 3 1 Use the Skip Search n 1 or o 2 button to navigate to Equalizer followed by the Play Pause p Power button 3 to confirm 1 2 3 2 Use the Skip Search n 1 or o 2 button to select the desired Equalizer setting Normal Rock Jazz Classical or Pop followed by the Play Pause p Power button 3 to confirm 1 2 3 3 SETTING THE EQUALIZER ...

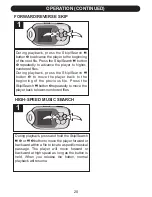
Page 21: ... back to the beginning of the previous file Press the Skip Search o button 2 repeatedly to move the player back to lower numbered files 1 2 1 FORWARD REVERSE SKIP HIGH SPEED MUSIC SEARCH During playback press and hold the Skip Search n 1 or o 2 button to move the player forward or backward within a file to locate a specific musical passage The player will move forward or backward at high speed as ...

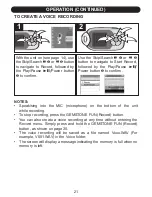
Page 22: ...O CREATE A VOICE RECORDING NOTES Speak sing into the MIC microphone on the bottom of the unit while recording To stop recording press the GEMSTONE FUN Record button You can also create a voice recording at any time without entering the Record menu Simply press and hold the GEMSTONE FUN Record button as shown on page 30 The voice recording will be saved as a file named Vxxx WAV For example V001 WAV...

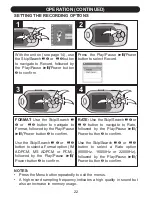
Page 23: ...o 2 button to select a Format option IM ADPCM MS ADPCM or PCM followed by the Play Pause p Power button 3 to confirm 1 2 3 3 RATE Use the Skip Search n 1 or o 2 button to navigate to Rate followed by the Play Pause p Power button 3 to confirm Use the Skip Search n 1 or o 2 button to select a Rate option 8000Hz 16000Hz or 22050Hz followed by the Play Pause p Power button 3 to confirm 1 2 3 4 SETTIN...

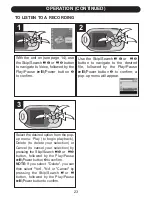
Page 24: ...utton 3 to confirm a pop up menu will appear 1 2 3 2 Select the desired option from the pop up menu Play to begin playback Delete to delete your selection or Cancel to cancel your selection by pressing the Skip Search n 1 or o 2 button followed by the Play Pause p Power button 3 to confirm NOTE If you select Delete you can then select Yes No or Cancel by pressing the Skip Search n or o button foll...

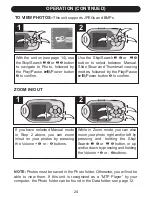
Page 25: ...rts JPEGs and BMPs If you have selected Manual mode in Step 2 above you can zoom in out on your photos by pressing the Volume 1 or 2 buttons 1 2 1 While in Zoom mode you can also move your photo right and or left by pressing and holding the Skip Search n 1 or o 2 button or up and or down by pressing and holding the Volume 3 or 4 buttons 1 2 3 4 2 ZOOM IN OUT NOTE Photos must be saved in the Photo ...

Page 26: ...ause p Power button 3 to confirm 1 2 3 1 Press the Play Pause p Power button to select Brightness 1 1 2 Use the Skip Search n 1 or o 2 button to select a brightness level between Low Mid and High followed by the Play Pause p Power button 3 to confirm 1 2 3 3 SETTING THE BRIGHTNESS NOTE Press the Menu button repeatedly to exit the menus ...

Page 27: ... Search n 1 or o 2 button to select SCREEN SAVER followed by the Play Pause p Power button 3 to confirm 1 2 3 2 Use the Skip Search n 1 or o 2 button to select the desired screen saver activation time select OFF to keep the screen light always on followed by the Play Pause p Power button 3 to confirm 1 2 3 3 SETTING THE SCREEN SAVER NOTE Press the Menu button repeatedly to exit the menus ...

Page 28: ...ngs followed by the Play Pause p Power button 3 to confirm 1 2 3 2 Use the Skip Search n 1 or o 2 button to select the desired Power Savings time the unit will stay on before turning off due to inactivity followed by the Play Pause p Power button 3 to confirm 1 2 3 3 SETTING THE POWER SAVINGS NOTES Select OFF to disable this feature and not have the unit enter the Power Savings mode Press the Menu...

Page 29: ...p Search n 1 or o 2 button to select Photo Slide Time followed by the Play Pause p Power button 3 to confirm 1 2 3 2 Use the Skip Search n 1 or o 2 button to select the desired Photo Slide time will stay on the display when in Slide Show mode followed by the Play Pause p Power button 3 to confirm 1 2 3 3 SETTING THE PHOTO SLIDE TIME NOTE Press the Menu button repeatedly to exit the menus ...

Page 30: ...ss it stops working and you are instructed to do so by technical support personnel To format this unit connect it to your computer as previously described and use the Windows format tool IMPORTANT Do not select NTFS from the File System menu If you do the MP3 Player will not work and will need to be formatted again Please back up the files on this unit before formatting UPDATING THE FIRMWARE WARNI...

Page 31: ...st speak or sing into the MIC microphone on the bottom of your MP3 player NOTE Please see pages 21 23 for more information about voice recordings You can record yourself singing or speaking into your MP3 player Step 1 Step 2 Step 1 Step 2 BarbieTM has another surprise for you Included on your Petal MP3 PlayerTM are these four songs Hope Has Wings B A R B I E Where d You Get That Style It Up NOTE T...

Page 32: ...oad files to the unit as player described on pages 9 12 The computer is not The player is Make sure player is recognizing the not securely connected securely connected player Computer is not Supported OS Windows ME compatible 2000 XP Vista or Mac 9 2X WMA files with DRM Incorrect downloading See page 12 to download can t playback methods WMA files with DRM No buttons work The Hold feature is Deact...

Page 33: ... cover shipping and handling costs and enclose a copy of your proof of purchase Send your unit to Emerson Radio Corp 5101 Statesman Drive Irving TX 75063 This warranty does not cover damage from negligence misuse abuse accident failure to follow operating instructions commercial use rental repairs by an unauthorized facility or products purchased used serviced or damaged outside of the United Stat...

Page 34: ... power line voltage or liquid spillage g Any product received without appropriate model serial number and CSA cUL cULus cETL cETLus markings h Any products used for rental or commercial purposes i Any installation setup and or programming charges Should this EMERSON product fail to operate during the warranty period warranty service may be obtained upon delivery of the EMERSON product together wit...

Page 35: ...BAR900 080307 01 Printed in China ...

Reviews: