background image

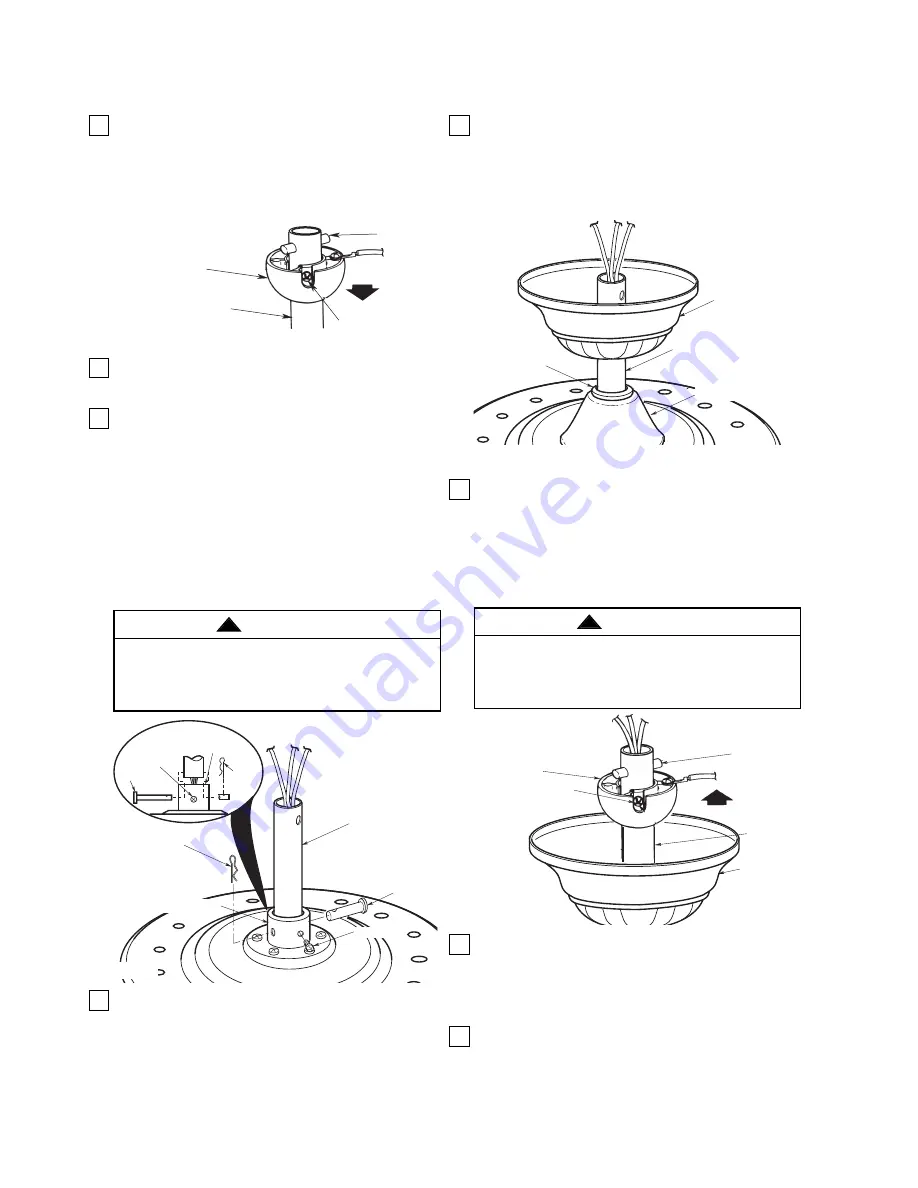
1.

Remove the hanger ball by loosening the setscrew
in the hanger ball until the ball falls freely down the
downrod (Figure 1). Remove the pin from the
downrod, then remove the hanger ball. Retain the
pin and hanger ball for reinstallation in step 5.

2.

Separate, untwist and unkink the three 80” motor
leads. Route the motor lead wires through the
downrod.

3.

Remove the setscrew (Figure 2) from the motor
coupling. Align the clevis pin holes in the downrod
with the holes in the motor coupling. Install the cle-
vis pin and secure with the hairpin clip (Figure 2).
The clevis pin must go through the holes in the
motor coupling and the holes in the downrod. Be
sure to push the straight leg of the hairpin clip
through the hole near the end of the clevis pin until
the curved portion of the hairpin clip snaps around
the clevis pin. The hairpin clip must be properly
installed to prevent the clevis pin from working
loose. Pull on the downrod to make sure the clevis
pin is properly installed.

4.

Reinstall the setscrew in the motor coupling. While
pulling up on the hanger ball, securely tighten the
setscrew.

NOTE: The setscrew must be properly installed as
described above, or fan wobble could result.

5.

Make sure the grommet is properly installed in the
coupling cover, then slide the coupling cover on the
downrod until it rests on the motor housing. Place
the ceiling cover over the downrod. Be sure that
the ceiling cover and the coupling cover are both
oriented correctly (Figure 3).

6.

Reinstall the hanger ball (Figure 4) on the downrod
as follows. Route the three 80” motor leads through
the hanger ball. Position the pin through the two
holes in the downrod and align the hanger ball so
the pin is captured in the groove in the top of the
hanger ball. Pull the hanger ball up tight against the
pin and securely tighten the setscrew in the hanger
ball. A loose setscrew could create fan wobble.

7.

The fan comes with blue, black and white leads
that are 80-inches long. Before installing the fan,
measure up approximately 6 to 9-inches above top
of hanger ball/downrod assembly. Cut off excess
leads and strip back insulation 1/2-inch from end of
leads.

8.

Mount blade flanges to fan blades using three
M5 x 6 washer head screws and three blade
washers (Figure 5).

4

How to Put Your Ceiling Fan Together

HANGER BALL

DOWNROD

CLEVIS PIN

SETSCREW

Figure 1

SETSCREW

PIN

CEILING COVER

DOWNROD

HANGER
BALL

Figure 4

CEILING
COVER

GROMMET

DOWNROD

COUPLING COVER

Figure 3

DOWNROD

MOTOR
COUPLING

HAIRPIN
CLIP

SETSCREW

CLEVIS PIN

HAIRPIN
CLIP

CLEVIS
PIN

SETSCREW

MOTOR COUPLING

Figure 2

It is critical that the clevis pin in the motor coupling
is properly installed and the setscrews securely
tightened. Failure to verify that the pin and setscrews
are properly installed could result in the fan falling.

WARNING

!

It is critical that the pin in the hanger ball is properly
installed and the setscrew securely tightened.
Failure to verify that the pin and setscrew are proper-
ly installed could result in the fan falling.

WARNING

!

U.L. Model No.: CF935

Summary of Contents for CF935ORB02

Page 1: ...AVE THESE INSTRUCTIONS Ceiling Fan Owner s Manual Model Number CF935ORB02 Oil Rubbed Bronze Net Weight 21 1 Lbs 1 800 654 3545 www emersonfans com Questions problems missing parts Before returning to the store call Emerson Electric Customer Service 8 a m 6 p m EST Monday Friday ZURICH ...

Page 2: ...he fan must be mounted with the fan blades at least 7 feet from the floor to prevent accidental contact with the fan blades 6 Follow the recommended instructions for the proper method of wiring your ceiling fan If you do not know enough about electrical wiring have your fan installed by a licensed electrician WARNING To reduce the risk of electrical shock this fan must be installed with an isolati...

Page 3: ...is completed place a check mark in the box This will insure that all steps have been completed and will be helpful in finding your place should you be interrupted NOTE Place the parts from the loose parts bags in a small container to keep them from being lost If any parts are missing contact your local retail er or catalog outlet for replacement before pro ceeding 2 Remove the fan assembly from th...

Page 4: ...er and the coupling cover are both oriented correctly Figure 3 6 Reinstall the hanger ball Figure 4 on the downrod as follows Route the three 80 motor leads through the hanger ball Position the pin through the two holes in the downrod and align the hanger ball so the pin is captured in the groove in the top of the hanger ball Pull the hanger ball up tight against the pin and securely tighten the s...

Page 5: ...e keyed and color coded and must be mated correctly color to color before they can be engaged Make sure the con nector latch closes properly 13 Remove the three switch housing mounting screws Figure 7 from the switch housing plate Position the switch housing assembly on the switch housing plate and align the holes in the switch housing assembly with the holes in the plate Secure the switch housing...

Page 6: ...n to outlet box marked Acceptable for Fan Support of 22 7kg 50 lbs or less and use screws supplied with outlet box Most outlet boxes commonly used for support of light fixtures are not acceptable for fan support and may need to be replaced Consult a qualified electrician if in doubt WARNING The outlet box and joist must be securely mounted and capable of supporting at least 50 lbs Use only a U L o...

Page 7: ...this product by Emerson Electric Co could result in personal injury or property damage WARNING NOTE CEILING COVER OMITTED FOR CLARITY GROUND WIRE LISTED WIRE CONNECTOR 3 GREEN WIRE GROUND FROM HANGER BRACKET GREEN WIRE GROUND FROM HANGER BALL WHITE SUPPLY NEUTRAL WHITE FAN WIRE BLACK SUPPLY HOT BLACK AND BLUE FAN WIRES Figure 12 Check to see that all connections are tight including ground and that...

Page 8: ... water when cleaning your ceiling fan It could damage the motor or the blades and create the possibility of an electrical shock WARNING Energy Efficient Use of Ceiling Fans Ceiling fan performance and energy savings rely heavily on the proper installation and use of the ceil ing fan Here are a few tips to ensure quality and product performance Choosing the Appropriate Mounting Location Ceiling fan...

Page 9: ...setscrew securely excessively securely 2 Setscrew in the hanger ball downrod assembly is 2 Tighten the setscrew in the hanger ball downrod assembly loose 3 Screws securing fan blade flanges to motor are loose 3 Check to be sure screws which attach the fan blade flanges to the motor are tight 4 Fan blade flanges not seated properly 4 Check to be sure the fan blade flanges seat firmly and uniformly ...

Page 10: ...10 4 9 8 5 7 11 12 13 19 17 16 18 1 2 3 10 6 20 15 14 Repair Parts U L Model No CF935 ...

Page 11: ... Blade Washer 16 6 Ceiling Canopy 763732 ORB 9 Coupling Cover 762463 16 12 Wiring Harness 762993 1 14 Switch Housing 763087 ORB 16 Flange set of 5 763088 ORB 17 Blade set of 5 761859 29 Owner s Manual BP7310 2 Before discarding packaging material be certain all parts have been removed HOW TO ORDER REPAIR PARTS WHEN ORDERING REPAIR PARTS ALWAYS GIVE THE FOLLOWING INFORMATION PART NUMBER NAME OF ITE...

Page 12: ... limited warranty You can return your Emerson Ceiling Fan to your place of purchase or you can call Emerson Customer Service at 1 800 237 6511 to obtain a return authorization and service identification tag In order for us to confirm that your Emerson Ceiling Fan is still under warranty please retain your receipt or other proof of purchase and have that information readily available when returning...

Reviews: