20
D6.3.4/0715-0716/E
4.7
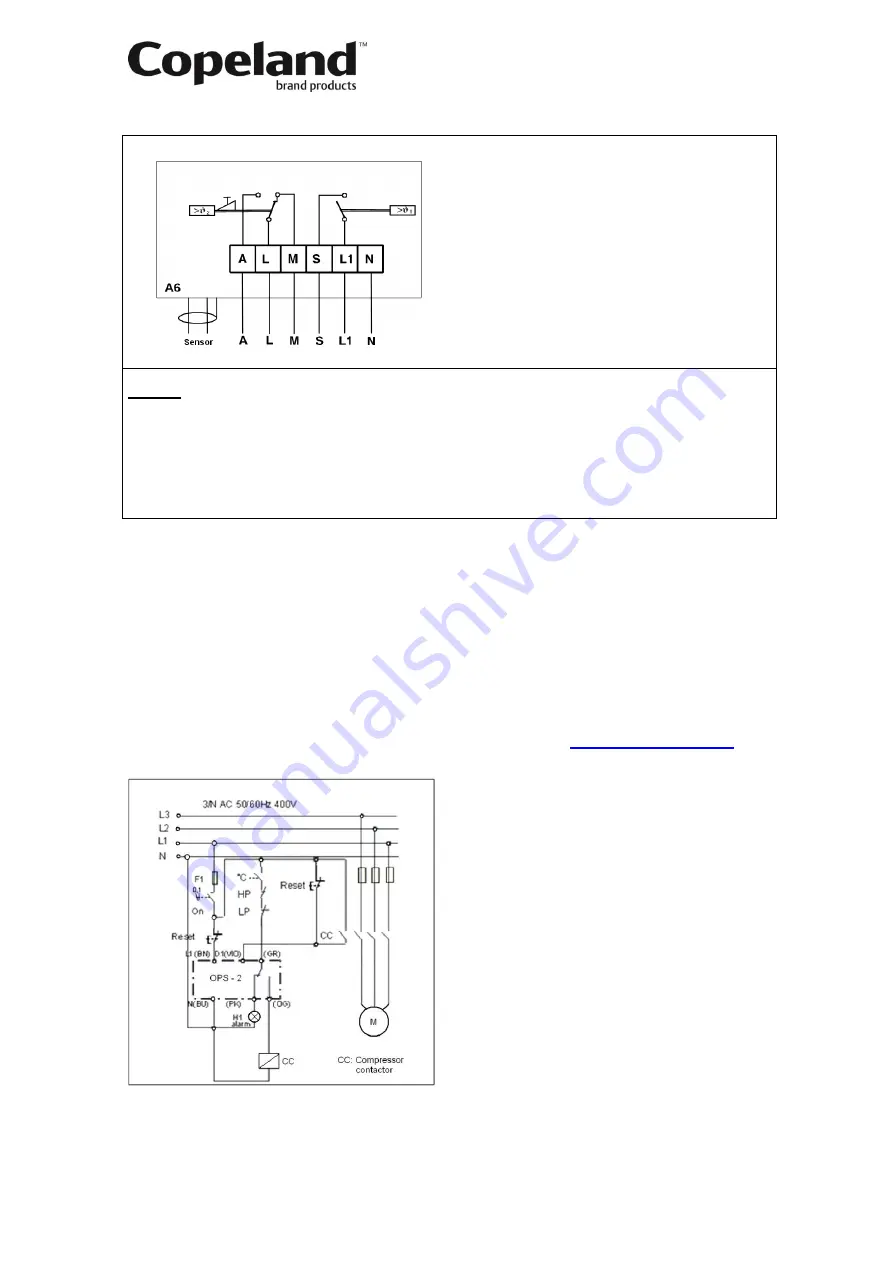
Demand Cooling
Legend
A
......... Alarm connection
θ
1
........ Temperature control device for
L
......... Control voltage connection
energising the injection valve
M
......... Control circuit
θ
2
........ Temperature control device for
S
......... Injection valve connection
switching off the compressor
L1
....... Voltage connection
A6
........ Demand Cooling module
N
......... Neutral connection
Figure 18
4.8
Oil pressure control
4.8.1 Oil pressure switch (OPS2)
Where there is a 5-wire cable connection between the electrical control panel and the
compressor terminal box to the OPS module, the same wires can be applied to the OPS2 which
will give the functions of an OPS1 module.
To obtain use of all of the features of the OPS2 a 7-wire cable between the electrical control
cabinet and the compressor terminal box should be used. Wiring diagrams for both the OPS1
and OPS2 are shown in Technical Information D7.8.3
“DWM Copeland™ Semi-hermetic
Compressor Oil Pressure Differential Switch OPS2” available at
. The
wiring diagram relates to an option using a 7-wire cable.
Wiring:
Brown (BN) = Power supply input
Violet (VIO) = Running signal from the
compressor
Grey (GR) = Input changeover contact from the
daisy chain
Orange (OG) = Output changeover contact
linked to the compressor contactor
Pink (PK) = Output changeover contact linked to
the alarm
Blue (BU) = Power supply output
Figure 19
NOTE:
Where a 5- or 7-wire cable is stated a 4- or 6-wire cable is required. In some
countries only a 5- or 7-wire cable is available. See more information about OPS2 in
Technical Information
D7.8.3 “DWM Copeland™ Semi-hermetic Compressor Oil Pressure
Differential S
witch OPS2”.


