background image

14


U.L. Model No.: CF411

6. How to Wire Your Ceiling Fan 

(Continued)

F

O

R

 L

IG

H

T

T

O

 M

O

T

O

R

 L

AC

 IN

 L

T

O

 M

O

T

O

R

 N

AC IN

 N

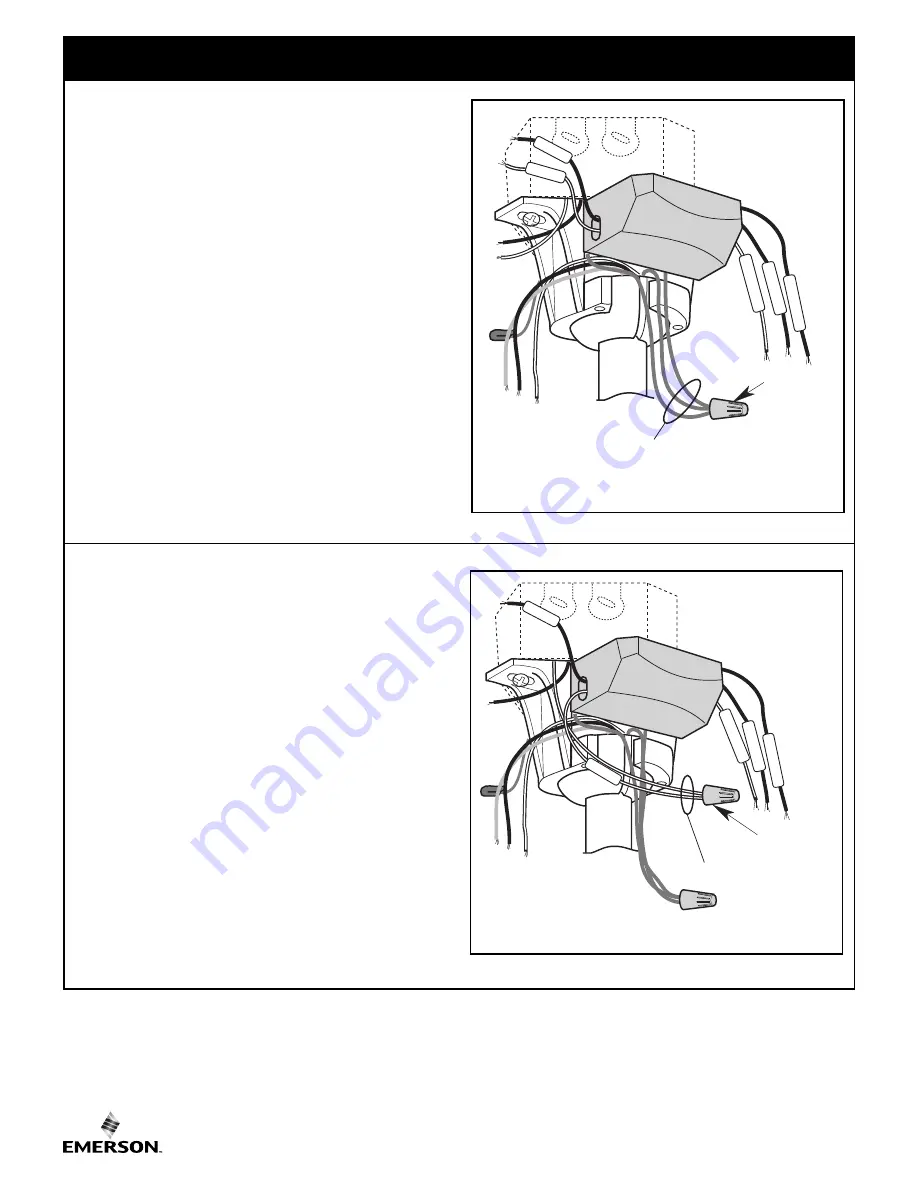
HANGER BALL, HANGER BRACKET, & SUPPLY GREEN 

GOUND WIRES

WIRE 

CONNECTOR

Figure 19

6.3

NOTE: Make all wiring connections using the wire

connectors supplied in the hardware kit and remote

control kit. Make sure that all connections are tight,

including ground, and that no bare wire is visible at

the wire connectors, except for the supply circuit

ground wire.

Connect the Green Ground Wire from the Hanger Ball and

the Green Ground Wire from the Hanger Bracket to the

Ground Conductor of Supply (this may be a bare wire or

wire with green colored insulation). Securely connect

Wires with Wire Connectors (supplied in hardware bag)

(Figure 19).

F

O

R

 L

IG

H

T

T

O

 M

O

T

O

R

 L

AC

 IN

 L

AC

 IN

 N

T

O

 M

O

T

O

R

 N

WIRE 

CONNECTOR

SUPPLY AND RECEIVER 

WHITE WIRES

Figure 20

6.4

Securely connect the Receiver White Wire (AC IN N) to

the Supply White Wire (neutral) using the Wire Connector

(supplied in hardware bag) (Figure 20).

Summary of Contents for Cronley CF411BS00

Page 1: ...ion 170216 U L Model No CF411 CRONLEY 54 Ceiling Fan Owner s Manual CF411BS00 Brushed Steel CF411ORB00 Oil Rubbed Bronze Questions problems missing parts Before returning to the store call Emerson Electric Customer Service 8 a m 6 p m Eastern Monday Friday 1 800 654 3545 www emersonfans com Net Weight 23 6 Lbs Model Numbers ...

Page 2: ...ling fan If you do not know enough about electrical wiring have your fan installed by a licensed electrician NOTE This fan is suitable for use with solid state speed controls NOTE All set screws must be checked and re tightened where necessary before installation 1 Read your owner s manual carefully and keep it for future reference 2 Be careful of the fan and blades when cleaning painting or worki...

Page 3: ... up The upper foam pad serves as a holder for the fan during the first stages of assembly NOTE The loose parts are individually packaged for ease of installation Place the parts from the hardware bags in a small container to keep them from being lost If any parts are missing contact your local retailer or catalog outlet for replacement before proceeding F A E D C G K I J H M L B PACKAGE CONTENTS 7...

Page 4: ... and capable of withstanding a load of at least 50 pounds To reduce the risk of fire electric shock or personal injury mount fan to outlet box marked Acceptable for Fan Support of 22 7kg 50 lbs or less and use screws supplied with outlet box Most outlet boxes commonly used for support of light fixtures are not acceptable for fan support and may need to be replaced Consult a qualified electrician i...

Page 5: ...ws in the Motor Coupler for installation of the Downrod Figure 3 Seat the Downrod in the Motor Coupler Figure 3 Rotate and align the Downrod holes with all the holes in the Motor Coupler Figure 3 PHILLIPS HEAD SET SCREW LOOSENED HANGER BALL 4 5 DOWNROD PIN GREEN GROUND WIRE Figure 1 3 1 Remove the Hanger Ball by loosening the Phillips Head Set Screw in the Hanger Ball until the Ball falls freely d...

Page 6: ...es in the Downrod and align the Hanger Ball so the Pin is captured in the groove in the top of the Hanger Ball Pull the Hanger Ball up tight against the Pin and securely tighten the Set Screw in the Hanger Ball A loose Set Screw could create fan wobble 3 4 Align the Clevis Pin holes in the Downrod with the holes in the Motor Coupler Install the Clevis Pin and secure with the Hairpin Clip Figure 4 ...

Page 7: ...2 inch from end of Wires PARTIALLY ASSEMBLED FAN SOLID STYROFOAM FACING OUT 6 8 GAP Figure 8 3 8 Turn Fan Motor Assembly upside down in preparation for mounting fan blades Position the top and bottom halves of the Styrofoam packaging on end with solid styrofoam facing outward Set side by side on the floor with a six to eight inch gap between the halves Figure 8 Carefully place the partially assemb...

Page 8: ...oosen the other two 8 32 x 10 mm Pan Head Screws to assemble the Lower Housing to the Fan Motor Assembly Figure 10 To reduce the risk of personal injury do not bend the fan blades when installing the blades balancing the fan blades or cleaning the fan Do not insert foreign objects in between rotating fan blades WARNING LOWER HOUSING REINSTALL ONE 8 32 x 10 mm PAN HEAD SCREW RETIGHTEN TWO 8 32 x 10...

Page 9: ...er Housing for the installation of the Light Kit Assembly Figure 13 LIGHT KIT ASSEMBLY LIGHT KIT ASSEMBLY WHITE WIRE LIGHT KIT ASSEMBLY BLACK WIRE FAN MOTOR ASSEMBLY WHITE WIRE FAN MOTOR ASSEMBLY BLUE WIRE WIRE CONNECTORS Figure 12 3 12 Remove and retain the Wire Connectors from the White and Blue Wires of the Fan Motor Assembly Connect the Fan Motor Assembly White Wire to the Light Kit Assembly W...

Page 10: ...ce in a residential installation This equipment generates uses and can radiate radio frequency energy and if not installed and used in accordance with the instructions may cause harmful interference to radio communications However there is no guarantee that interference will not occur in a particular installation If this equipment does cause harmful interference to radio or television reception wh...

Page 11: ...Hanger Bracket to the Outlet Box using the two screws supplied with the Outlet Box Figure 16 Hanger bracket must seat firmly against outlet box If the outlet box is recessed remove wall board until bracket contacts box If bracket and or outlet box are not securely attached the fan could wobble or fall WARNING TWO SCREWS SUPPLIED WITH OUTLET BOX HANGER BRACKET ANTI ROTATION TAB OUTLET BOX Figure 16...

Page 12: ...ARNING OUTLET BOX HANGER BRACKET HANGER BALL DOWNROD ASSEMBLY NOTE CEILING COVER SUPPLY WIRES AND FAN WIRES OMITTED FOR CLARITY HANGER BRACKET HANGER BALL HANGER BALL GROOVE ANTI ROTATION TAB Figure 17 5 2 Carefully lift the Fan and seat the Hanger Ball Downrod Assembly on the Hanger Bracket that was just attached to the Outlet Box Figure 17 Be sure the Groove in the Ball is engaged with the Anti ...

Page 13: ...ight kit or receiver Disconnect electrical power to the branch circuit at the Circuit Breaker or Fuse Box before attempting to wire the Ceiling Fan 6 How to Wire Your Ceiling Fan To avoid possible electrical shock be sure electricity is turned off at the main fuse box before wiring NOTE If you are not sure if the outlet box is grounded contact a licensed electrician for advice as it must be ground...

Page 14: ...le at the wire connectors except for the supply circuit ground wire Connect the Green Ground Wire from the Hanger Ball and the Green Ground Wire from the Hanger Bracket to the Ground Conductor of Supply this may be a bare wire or wire with green colored insulation Securely connect Wires with Wire Connectors supplied in hardware bag Figure 19 F O R L IG H T T O M O T O R L AC IN L AC IN N T O M O T...

Page 15: ...re Connector supplied in hardware bag Figure 21 F O R L IG H T T O M O T O R L T O M O T O R N AC IN N AC IN L WIRE CONNECTOR SUPPLY AND RECEIVER BLACK WIRES Figure 21 TO M O TO R L T O M O T O R N AC IN N AC IN L F O R L I G H T FAN AND RECEIVER WHITE WIRES WIRE CONNECTOR Figure 22 6 6 Securely connect the Receiver White Wire TO MOTOR N to the Fan Motor White Wire using the Wire Connector supplie...

Page 16: ...operly connect the receiver wires will damage the device and render it non operable T O M O T O R N AC IN N AC IN L F O R L I G H T TO M O T O R L SUPPLYAND RECEIVER BLACK WIRES WIRE CONNECTOR Figure 23 T O M O T O R N AC IN N AC IN L T O M O T O R L F O R L I G H T WIRE CONNECTOR SUPPLY AND RECEIVER BLUE WIRES Figure 24 Check to see that all connections are tight including ground and that no bare...

Page 17: ...tion the Black and Blue Wires on the other side of the Outlet Box Figure 25 STANDARD ON OFF WALL SWITCH OR OPTIONAL SW406 WALL CONTROL BLACK BLACK WHITE RED BLACK WHITE HANGER BALL GREEN WIRE GROUND FROM HANGER BALLAND HANGER BRACKET TWO CONDUCTOR CABLE WITH GROUND BLACK HOT WHITE GROUND TO 120 VOLT SUPPLY WHITE BLUE WHITE BLUE Figure 26 6 10 Wiring Schematic for reference Figure 26 Check to see t...

Page 18: ...NUT BOWL CAP HEX JAMNUT THREADED NIPPLE Figure 28 7 3 Position the Glass Shade onto the Threaded Nipple of the Light Kit Assembly Figure 29 Reinstall the Gasket Hex Jamnut Bowl Cap and Finial Nut onto the Threaded Nipple Figure 29 Gently tighten the Finial Nut to secure the Glass Shade to the Light Kit Assembly NOTE Periodically check that the glass shade is seated correctly on the light kit assem...

Page 19: ...n hardware bag Figure 31 Tighten the Knurled Knobs securely until the Ceiling Cover fits snugly against the ceiling and the hole in the Ceiling Cover is clear of the Downrod KNURLED KNOBS 2 LOCKWASHERS 2 THREADED STUDS 2 CEILING COVER Figure 31 To avoid possible fire or shock make sure that the electrical wires are completely inside the outlet box and not pinched between the ceiling cover and the ...

Page 20: ...ntrol of lights Set switch to ON to allow for dimming of the lights Set switch to I for no dimming of the lights such as for fluorescent bulbs NOTE If your fan and light go on and off without using your control you may be getting interference from other remote units such as garage door openers car alarms or security systems To remedy this situations simply change the combination code in your remot...

Page 21: ...et 8 5 Your Emerson Ceiling Fan consists of Hand held Remote Control Transmitter and a Receiver which is mounted under the Fan Ceiling Cover The Remote Control is designed to separately control your ceiling fan speed and light intensity Figure 35 There are four push buttons to set the fan speed and turn the fan off 8 Remote Control Procedures Continued Fan installation must be completed including ...

Page 22: ...th bracket into the Wall Bracket and tighten to secure to wall Figure 38 Slide the Wall Bracket Cover back down over the screws TO INSTALL BRACKET TO WALL INSTALL THE TWO SCREWS SLIDE THE COVER DOWN WALL BRACKET SCREWS 2 COVER Figure 38 8 6 The Light Push Button turns the light on and off and controls the light intensity Figure 36 To vary the intensity of the light hold the Light Button down until...

Page 23: ...y those parts supplied with this product and or any accessories designated specifically for use with this product by Emerson Electric Co Substitution of parts or accessories not designated for use with this product by Emerson Electric Co could result in personal injury or property damage WARNING See your local Emerson dealer www emersonfans com or the Emerson Ceiling Fan catalog for these accessor...

Page 24: ...24 U L Model No CF411 12 Repair Parts 11 HARDWARE BAG 23 24 10 8 9 7 6 5 4 3 1 2 5 13 6 7 14 9 15 8 22 21 10 16 11 20 11 17 18 19 14 ...

Page 25: ...5 Downrod 1 Hardware Bag Containing 764190 1 764190 4 Wire Connectors 3 5 Threaded Studs 8 32 x 1 1 4 2 6 Lockwashers 8 External Tooth 2 7 Knurled Knobs 8 32 2 8 Clevis Pin 1 9 Hairpin Clip 1 10 Screws Washer Head 10 24 x 15 mm 16 11 Screw Pan Head 8 32 x 10 mm 1 12 Blade Balance Kit 1 13 Ceiling Cover 1 764167 BS 764167 ORB 14 Coupler Cover 1 764100 BS 764100 ORB 15 Harness Wiring 1 764191 764191...

Page 26: ...ating noisy 2 Loose screws in motor housing 2 Check to make sure all screws in motor housing are snug not over tight 3 Wire connectors inside switch housing 3 Check to make sure wire connectors in switch rattling housing are not rattling against each other or against the interior wall of the switch housing 4 Screws holding blades to flywheel 4 Tighten screws securely are loose 3 Fan wobbles 1 Set ...

Page 27: ...erson Ceiling Fan to obtain your remedy under this limited warranty You can return your Emerson Ceiling Fan to your place of purchase or you can call Emerson Customer Service at 1 800 237 6511 to obtain a return authorization and service identification tag In order for us to confirm that your Emerson Ceiling Fan is still under warranty please retain your receipt or other proof of purchase and have...

Page 28: ...EmErSON ElEctrIc cO 8100 W Florissant St louis mO 63136 Part No F40BP75200000 Form No BP7520 Revision 170216 U L Model No CF411 Printed in China 02 17 SERIAL NUMBER DATE CODE The serial number of this fan can be found on the nameplate on top of the fan housing The date code can be found on the carton and on top of the fan housing stamped in ink on a white label You should record this data above an...

Reviews: