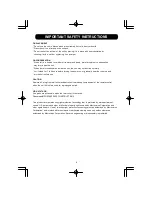
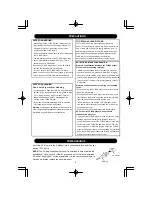
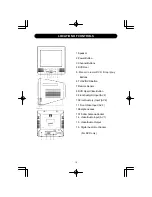
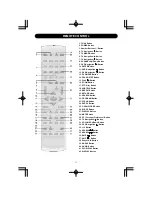
background image

13" COLOR TV WITH

DVD PLAYER

6

Summary of Contents for Dora the Explorer DTE351

Page 1: ...13 COLOR TV WITH DVD PLAYER 6 ...

Page 2: ... Option 18 Setting the Channels into Memory 19 Adding and Deleting Channels 20 Basic TV Operation 21 Mute 22 Sleep 22 TV AV Button 22 DVD TV Button 22 Closed Captions 23 On Screen Control Adjustments Picture 24 Personal Preference 24 Blue Background 24 Setting Parental Control 25 Movie Rating Set Up 26 TV Parental Rating Set Up 27 Changing the No Rating Option 28 Changing the External Source Optio...

Page 3: ...re operating this unit to become familiar with its features and obtain the performance that will bring you continued enjoyment for many years In the event you require technical assistance please call the Emerson Service Department at 1 800 898 9020 For future reference record the serial number in the space provided Serial Number ...

Page 4: ...c over or bac k no us er serviceable parts inside Refer servicing to qualified service personnel The exclamation point within an equilateral triangle is intended to alert the user to presence of important operating and main tenance servicing instructions in the literature accompanying the appliance TO PREVENT FIRE OR SHOCK HAZARD DO NOT EXPOSE THIS APPLIANCE TO RAIN OR MOISTURE THIS APPLIANCE SHAL...

Page 5: ... for replace ment of the obsolete outlet 10 Protect the power cord from being walked on or pinched particularly at plugs conve nience receptacles and the point where they exit from the apparatus 11 Only use attachments accessories specified by the manufacturer 12 Use only with a cart stand tripod bracket or table specified by the manufacturer or sold with the apparatus When a cart is used use caut...

Page 6: ...act your electrician to replace your obsolete outlet Do not defeat the safety purpose of the grounding type plug 19 Outdoor Antenna Grounding If an outside antenna or cable system is connected to the product be sure the antenna or cable system is grounded so as to provide some protection against voltage surges and built up static charges Article 810 of the National Electrical Code ANSI NFPA 70 pro...

Page 7: ...its a distinct change in performance this indicates a need for service 25 Replacement Parts When replacement parts are required be sure the service technician has used replacement parts specified by the manufacturer or have the same characteristics as the original part Unauthorized substitutions may result in fire electric shock or other hazards 26 Safety Check Upon completion of any service or re...

Page 8: ... stand off insulators spaced from 4 6 feet 1 22 1 83m apart c Mount antenna discharge unit as close as possible to where lead in enters house d Use jumper wire not smaller than No 6AWG 13 3mm2 copper or the equivalent when a separate antenna grounding electrode is used FIGURE A EXAMPLE OF ANTENNA GROUNDING ACCORDING TO NATIONAL ELECTRICAL CODE INSTRUCTIONS IMPORTANT SAFETY INSTRUCTIONS ...

Page 9: ...se CAUTION Remove AC plug from wall outlet and batteries from battery compartment of the remote control when the unit will not be used for a prolonged period HIGH VOLTAGE Live parts are accessible when the rear cover is removed Pleaseread IMPORTANT SAFETYINSTRUCTIONS IMPORTANT SAFETY INSTRUCTIONS This product incorporates copyright protection technology that is protected by method claims of certai...

Page 10: ...re condensation occurs during the following cases When you bring the TV DVD player directly from a cold place to a warm place When you use the TV DVD player in a room where you just turned on the heater or a place where the cold wind from the air conditioner directly hits the unit In summer when you use the TV DVD player in a hot and humid place just after you moved the unit from an air conditione...

Page 11: ... DVD Stop play Bottons 6 TV AV DVD Button 7 Remote Sensor 8 DVD Open Close Button 9 Front Audio R Input AV 2 10 Front Audio L Input AV 2 11 Front Video Input AV 2 12 Earphone Jack 13 75 ohm Antenna Socket 14 Video Audio Input AV 1 15 Video Audio Output 16 Digital Audio Out Socket For DVD only ...

Page 12: ...on 16 ZOOM Button 17 STOP Button 18 SUBTITLE Button 19 REPEAT Button 20 SETUP Button 21 SEARCH Button 22 PROGRAM Button 23 CLEAR Button 24 DVD TV Button 25 OPEN CLOSE Button 26 SLEEP Button 27 DISPLAY Button 28 MUTE Button 29 PP Personal Preference Button 30 TV Navigation Button 31 VOLUME Up Down Button 32 DVD Navigation Button 33 10 Button 34 SEARCH Button 35 SEARCH Button 36 SKIP Button 37 SKIP ...

Page 13: ...e or injury from possible battery leakage 5 Do not try to recharge batteries not intended to be recharged they can overheat and rupture Follow battery manufacturer s directions NOTES When there is an obstacle between the DVD and the transmitter the transmitter may not operate When direct sunlight an incandescent lamp fluorescent lamp or any other strong light shines on the REMOTE SENSOR of the DVD...

Page 14: ... well as this manual When connecting the unit make sure the power is off and both units are unplugged before making any connections NOTES Connecting the unit to an external video source will allow you to see the external unit s video through this unit s TV screen When connecting the external unit refer to the owner s manual of the external unit as well as this manual When connecting the external u...

Page 15: ...rough this unit and allow for fast and easy disconnect When connecting the external unit refer to the owner s manual of the external unit as well as this manual When connecting the external unit make sure the power is off and both units are unplugged before making any connections Press the TV AV button to select AV2 EARPHONE JACK For private listening plug an earphone into the Earphone jack The sp...

Page 16: ...xperiment to find optimal position 1 Front Left Speaker 2 Television 3 Center Speaker can be located on top or below the television 4 Sub woofer can be located anywhere in the room 5 Front Right Speaker 6 Viewing Listening Position the best listening position is obtained by positioning the chair sofa etc in the middle of all the speakers 7 Rear Left Speaker 8 Rear Right Speaker 9 AV Amplifier w Do...

Page 17: ...se the converter descrambler or satellite box to select channels CABLE CATV SATELLITE CONNECTIONS If you subscribe to a satellite service or a cable TV service in which basic channels are unscrambled and premium channels require the use of a converter descrambler box you may wish to use a signal splitter and an A B switch box available from the cable company or an electronic supply store Follow th...

Page 18: ... the UHF twin lead wire to a combiner NOT SUPPLIED Connect the VHF twin lead to a 300 75 ohm matching transformer NOT SUPPLIED Attach the transformer to the combiner Attach the combiner to the antenna jack Connect the 75 ohm cable from the VHF antenna and the UHF antenna twin lead wire to a combiner NOT SUPPLIED Attach the combiner to the antenna jack NOTE If your VHF antenna has a twinlead wire u...

Page 19: ... change the on screen menus SETTING THEAIR CATV MENU OPTION Press the Menu buttons twice Access the Menu screen as described in step 1 above Press the TV Navigation and buttons to select RECEPTION Press the TV Navigation button to set AIR or CATV Press the TV MENU button twice to exit the menu TV CATV MODE SELECTION When shipped from the factory the TV CATV menu option is set to the CATV Cable Tel...

Page 20: ...ve up to 113 Cable TV channels FAQs How many channels will I actually receive The actual number of channels that can be received depends on how many channels your cable company or local area provides Contact your company to determine the number of channels in your area Do channels need to be set into memory before using the TV Navigation and buttons Yes the channels must be programmed into memory ...

Page 21: ... TV Navigation and buttons to select a channel Press the TV Navigation and buttons to select SKIP OFF will appear if the channel is not skipped ON will appear if the channel is being skipped When a channel is selected press the TV Navigation and buttons to skip ON will appear or not to skip OFF will appear Repeat steps 3 to 5 to add or delete more channels Press the TV MENU button twice or wait 10...

Page 22: ... buttons 0 9 Use these buttons to select a channel The channel number will appear at the top right corner of the screen For Channels 1 through 9 press 1 9 as desired For Channels 10 through 99 press the button once then the two digits in order For Channels 100 through 125 CATV only press the button twice then the three digits in order FAQs AIR CATV option must be set to CATV when using cable see p...

Page 23: ...LEEP OFF will appear on the screen Each additional press will increase the Sleep time by 5 minutes up to 120 minutes To confirm remaining sleep time press the SLEEP button the remaining time will briefly appear on the screen To cancel the sleep time press the SLEEP button repeatedly until SLEEP OFF appears on the screen TV AV BUTTON Press to select between TV AV1 jacks on the rear of the unit or A...

Page 24: ...dialogue Words in italics or underlined describe titles words in foreign languages or words requiring emphasis Words that are sung usually appear enclosed by musical notes For television programs broadcasting with Closed Captions look in your TV Guide for the Closed Captions symbo CC NOTES When selecting Closed Captions the captioning will be delayed approximately 10 seconds Misspellings or unusua...

Page 25: ...ENCE PP There are four preset picture modes to choose from PERSONAL SOFT STANDARD or VIVID The SOFT STANDARD and VIVID options are preset The PER SONAL setting is preset by the user as described above Press the PP button to select between the three modes If the BLUE BACKGROUND option is set to ON when a station is selected with no broadcast signal a blue screen will appear Press the Menu buttons t...

Page 26: ... CHIP Press the TV Navigation button to confirm Using the Number buttons 0 9 enter the TV password 1111 is the preset password if you have not changed it This TV password can be changed to consist of different numbers after the original password is entered see page 29 Press the TV Navigation and buttons to scroll to select PARENTAL LOCK and then press the TV Navigation button to turn it on or off ...

Page 27: ... blocked MOVIE RATING SET UP Enter the PARENTAL CONTROL menu as described on page 25 Press the TV Navigation and button to select MOVIE RATING and then the TV Navigation button to select it Press the TV Navigation and buttons to select a rating to turn On or Off When a desired rating appears press the TV Navigation button to block that rating and the ones above it NONE Movie rating is not set G Al...

Page 28: ... the TV Navigation button to select it Press the TV Navigation and buttons to select a rating When a desired rating appears press the TV Navigation button to turn selected rating On or Off Then press the TV Navigation button to scroll down and then press the TV Navigation button to turn the individual settings On or Off these represent the descriptions as shown above All programs with a higher rat...

Page 29: ...TROL CONTINUED Press the TV Navigation and buttons to block or unblock external programs Press the TV Navigation and buttons to block or unblock a program that does not have a rating CHANGING THE NO RATING OPTION Enter the PARENTAL CONTROL menu as described on page 25 Press the TV Navigation and button to select NO RATING and then the TV Navigation button to select it 1 2 3 1 2 3 1 1 2 2 1 2 1 2 1...

Page 30: ...n button to confirm Using the Number buttons 0 9 enter the password 1111 is the preset TV password if you have not changed it Using the Number buttons 0 9 enter the desired new password then the confirm screen will appear Enter the password again to confirm IMPORTANT Make sure you write down the new password elsewhere and retain it for future use SETTING PARENTALCONTROL CONTINUED 2 2 1 1 1 2 3 4 1...

Page 31: ...t will play the first track directly 4 Press the STOP Button if you want to stop the Disc playback You can resume playback by pressing the PLAY button and it will start at the location where you have pressed stopped Resume Play 5 Press the STOP Button twice to have the Disc really stopped Pause Step This function is applicable for DVD and CD audio For DVD the picture will become static For CD audi...

Page 32: ...th different effects Pressing the AUDIO Button will change the Audio channel Scan This function is applicable for DVD and CD audio but with different effects The FAST FORWARD key and FAST BACKWARD key are used to achieve fast play function For DVD there are 5 different levels of speed 2x 4x 8x 16x 32x Every successive key press will increment the speed of quick play For CD audio the FORWARD BACKWA...

Page 33: ...e end point 1 Press the REPEAT AB Button to mark the starting point Playback will continue 2 Press the REPEAT AB Button to mark the end point The marked part will be repeated automatically Note Press the REPEAT AB Button during repetition will disable the Repeat mode Subtitle This function is only applicable for DVD disc It can change the subtitle language shown on the screen Note Number of subtit...

Page 34: ...01 04 CH 01 12 0 02 18 DISPLAY OFF Resume Play This function is applicable for DVD and CD audio During the disc playback when the STOP Button is pressed once the player will enter the Resume Play mode At this time if the PLAY Button is pressed the player will resume playback at the location where the STOP Button is pressed If the STOP button is pressed i e STOP Button is pressed twice the player w...

Page 35: ...light cursor to the START option by using the Navigation Arrows Press ENTER on the remote controller to confirm To Remove the program move the highlight cursor to desire Program By use the Navigation arrows then press the clear button to Remove the selected program PROGRAM 01 02 03 04 05 Exit Next 06 07 08 09 10 PROGRAM 01 02 03 04 05 Exit Start Next 06 07 08 09 10 05 03 08 PROGRAM 06 07 08 09 10 ...

Page 36: ...ip the next picture Press the PREVIOUS Button on the remote controller will repeat the current picture 3 Enter the Chapter number of the Title selected in the last step 4 Repeat step 2 3 to input the sequence 5 After assigning the playback sequence move the highlight cursor to the START option by using the Navigation Arrows Press ENTER on the remote controller to confirm To cancel the program Move...

Page 37: ... Press MUTE button again Possible local interference Check for source of reception disturbance Antenna CATV connector is not connected Check CATV connection or VHF UHF antenna Poor or no sound Volume is set to minimum Increase volume TV station stopped broadcasting Tune to a new channel Sleep Timer is set Set Sleep Timer to Off TV shuts off Home breaker has blown Check breaker TV signal is weak Ch...

Page 38: ...sc DVD does not function properly Some features and functions are not available on all discs The equipment is not connected properly No picture and or sound The TV DVD button has not been pressed to select the DVD mode The search feature is not working Some disc have sections that do not allow searching this is normal Subtitles are not working Subtitles appear only when the disc contains them Angl...

Page 39: ...r objects Changing the direction or position of the antenna may improve the reception SNOW If your receiver is located in the fringe area of a television station where the signal is weak your picture may be marred by the appearance of small dots When the signal is extremely weak it may be necessary to install an external antenna to improve the picture RADIO FREQUENCY INTERFERENCE This interference...

Page 40: ... Jacks GENERAL SECTION AC Power Input AC 120V 60Hz AC Power Consumption 74W Speakers 21 4 8 Ohm x 2 Audio Output 1 8W 1 8W Design and specifications are subject to change without notice This DVD Player is designed and manufactured according to the Region Management Information that is recorded on a DVD disc If the Region number described on the DVD disc does not correspond to the Region number of ...

Page 41: ...ge to equipment not properly connected to the product Cost incurred in shipping your unit to and from an authorized Depot Repair Facility Ordinary adjustments which you can perform as outlined in the owner s manual Signal reception problems caused by external antenna or cable systems Products purchased used serviced or damaged outside of the United States What other limitations apply to your warra...

Page 42: ...41 EMERSON PART NO DTE351 06272006 01 Printed in China R ...

Reviews: