www.easyheat.com
TyPICAL MeMBRANe ROOF
Ice dams may occur on flat roofs typically at the edge of the
flashing and at drains. Flat roofs are normally pitched toward
drains and these paths can become obstructed by snow and ice.
To maintain a path for melt water to run off, install the heating
cable as shown below using appropriate attachment methods.
Additional heating cable may be required for downspouts.
Note:
Heating cable attachment methods are not shown in the
diagram below. For attachment we recommend using our ZH-C
roof clip. Properly securing this clip to different roofing materials
may require differing methods; consult a roofing professional for
more information. If the situation warrants it may also be
possible to use strips of the roofing membrane to secure the
heating cable by adhering the cable under the strip to the main
roofing membrane (see figure below).
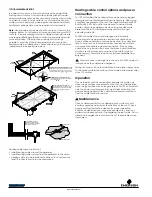
Heating cable layout on flat roof:
• Install heating cable around the perimeter.
• Install heating cable running from the perimeter to the drain.
• Heating cable is to be installed into drain so that it extends at
least 12 inches (30cm) into a heated space.
Heating cable control options and power
connection
For 120 Volt cables, the heating cable can be simply plugged
into a ground fault protected electrical receptacle, when icing
conditions are present on the roof. The (optional) EasyHeat RS-2
Roof Sentry (120 Volt) control can be used to automatically
ensure cables are energized only when icing conditions are
present on the roof, minimizing energy consumption and
extending cable life.
For 240 Volt cables, the cable is designed to be directly
connected into an appropriate electrical connection box.
Since it will be necessary to remove power from the cable from
time to time, such as in summer, always connect the cable to
an appropriate double-pole electrical switch. If the heating
cable is the only load on the circuit, the branch circuit breaker
may be used to disconnect power from the cable (switch is
not necessary). Several automatic controls are available from
EasyHeat.
Always connect a pilot light into the circuit of 240V cables to
indicate when the cables are energized.
Testing the system. Once the installation is complete, apply power
to the heating cable; the surface of the cable will feel warm after
about 15 minutes.
Operation
If no automatic controls are installed, energize the cable only
when icing conditions are present on the roof, and de-energize
when icing conditions are no longer present. For 120 Volt models
only, the power cord plug contains a pilot light indicating that
power is being applied to the cable. Ensure power is removed
from the cable/control in summer.
Maintenance
Check cable annually for any damage, such as nicks or cuts
possibly caused by animals or other activity on the roof. Check
any ground fault protection devices for proper operation.
Remove all debris (leaves, twigs, pine needles, etc.) from roof,
gutters and downspouts prior to energizing the roof cable. Do not
attempt to energize the roof cable if any of these problems are
discovered.
Heating cable should be positioned around the
perimeter and in the valleys of a flat roof. The
heating cable must extend into the drain or
scupper to allow the melt water to exit the roof.
Heating cable is to be installed into drain
so that it extends at least 12 inches (30 cm)
into a heated space.
Drain
Slope
Junction Box
Cable
End Seal
Heating cable should be positioned
around the perimeter of a flat roof. The
heating cable must extend into the drain
or scupper to allow the melt water to
exit the roof.
Drip Loop
Cable
End Seal
Junction Box
Scupper
Heating cable provides a
continuous heated path to
allow melt water to run off the
roof before it refreezes.
Adhesive
Roof Membrane
Heating Cable
Membrane
Strip


