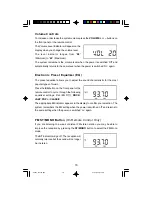
background image

16

Volume Controls

To increase or decrease the system volume press the 

VOLUME


+

 or 

 buttons on

the front panel or the remote control.

The Volume Level Indicator will appear on the

display when you change the volume level.

The level indicator ranges from “

00

(Minimum) to “

40

” (Maximum).

The system remembers the volume level when the power is switched ‘Off’ and

automatically returns to the same level when the power is switched ‘On’ again.

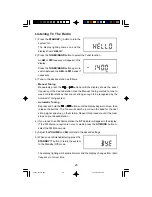
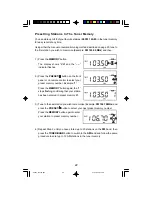
Electronic Preset Equalizer (EQ)

The preset equalizer allows you to adjust the sound characteristic for the most

popular types of music.

Press the 

EQ

 button on the front panel or the

remote control to cycle through the following

equalizer settings: Flat (EQ ‘Off’), 

ROCK

,

JAZZ

POP

 or 

CLASSIC

.

The appropriate EQ indicator appears in the display to confirm your selection. The

system remembers the EQ setting when the power is switched ‘off’ and returns to

the same setting when the power is switched ‘on’ again.
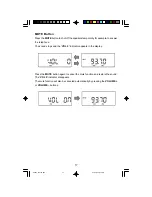
FM ST/MONO Button

 (On Remote Control Only)

If you are listening to a weak or distant FM stereo station you may be able to

improve the reception by pressing the 

ST/MONO

 button to select the FM Mono

mode.

The 

ST

 indicator will go off. The reception will

normally improve but the sound will no longer

be in stereo.

ES920_102104.p65

21/10/2004, 12:06

16

Summary of Contents for ES920

Page 1: ...OWNER S MANUAL ES920 Visit our web site at www emersonradio com HOME AUDIO SYSTEM with CD R RW PLAYER and DIGITAL AM FM TUNER ES920_102104 p65 21 10 2004 10 56 42 ...

Page 2: ...qualified service personnel Servicing is required when the apparatus has been damaged in any way such as power supply cord or plug is damaged liquid has been spilled or objects have fallen into the apparatus the apparatus has been exposed to rain or moisture does not operate normally or has been dropped 14 This appliance shall not be exposed to dripping or splashing water and no object filled with...

Page 3: ...son inspectors and found to be in perfect working order before it left our factory However there is always the chance that some problem may occur because of rough handling during shipment to the retail store or to the final consumer If after reading this manual you experience any problems with the operation of this product please refer to the instructions for obtaining service at the end of this m...

Page 4: ...C Rules These limits are designed to provide reasonable protection against harmful interference in a residential installation This equipment generates uses and can radiate radio frequency energy and if not installed and used in accordance with the instructions may cause harmful interference to radio communications However there is no guarantee that interference will not occur in a particular insta...

Page 5: ...service Using the original carton and packing material is the only way to properly protect the unit from shipping damage Remove any descriptive stickers or labels from the front panel of the main unit Do not remove any labels or stickers that may be affixed to the back panel of the main unit or the speakers Unwind the AC power cord on the back of the main unit and extend it to its full length Unwi...

Page 6: ...new 3 volt lithium battery The battery number is CR2025 or equivalent To replace the battery slide the battery holder out of the remote control as shown in the following illustration Remove the original battery from the holder and install a new CR2025 battery with the side facing up as shown in the illustration Then slide the battery holder back into the remote control Dispose of the original batt...

Page 7: ...the Black terminals If the wires are connected incorrectly the sound will be muddy or distorted To make the connections push the Red levers upward and the Black levers downward to open the terminals Insert the bare ends of the speaker wires into the terminal openings and then push the red and black levers back to their original positions to close the terminal openings and lock the wires in place R...

Page 8: ...nect the subwoofers AC power cord to your AC outlet set the subwoofer power switch On and adjust the subwoofers level control to the desired setting When you operate this system the low frequencies will be sent to the external powered subwoofer for a more powerful bass sound Note the remote controller of this system cannot control the external Subwoofer You must remember to switch the external Sub...

Page 9: ...isc audio jukebox device such as an iPod Connect the audio output jack s or headphone jack of the external audio equipment to the AUX R L jacks on the back panel of this system CONNECTION CABLES ARE NOT INCLUDED You may leave your external device permanently connected to this system if you wish It is not necessary to disconnect the external device in order to listen to the Tuner or CD player in th...

Page 10: ...rol to a low level before you connect the headphones Then connect the headphones put them on and very gradually increase the volume to a comfortable listening level Remember that CDs may contain both very soft and very loud passages Adjust the volume to a comfortable level using a louder passage so that you always know what the maximum level will be Placement Of The System The system should be pla...

Page 11: ...o your outlet This defeats the safety feature and could expose you to electric shock Protect Your Furniture This model is equipped with non skid rubber feet to prevent the product from moving when you operate the controls These feet are made from non migrating rubber material specially formulated to avoid leaving any marks or stains on your furniture However certain types of oil based furniture po...

Page 12: ... Panel 2 3 24 1 CD AUX BAND TUNER MEMORY PRESET PLAY PAUSE TUNING UP STOP RANDOM VOLUME TUNING DN MODE TIMER SNOOZE SLEEP VOLUME STANDBY MUTE EQ OPEN CLOSE 22 21 4 5 6 7 20 19 18 17 16 15 14 13 12 11 9 8 10 23 ES920_102104 p65 21 10 2004 12 06 11 ...

Page 13: ...n 8 TUNING UP Skip Button 9 STOP Button 10 PLAY PAUSE Button 11 TUNER BAND Button 12 CD Button 13 CD Door OPEN CLOSE Button 14 AUX Button 15 PRESET Repeat Button 16 MEMORY Button 17 RANDOM Button 18 MODE Button 19 TIMER Button 20 SLEEP Button 21 EQ Button 22 MUTE Button 23 STANDBY Button 24 Remote Sensor ES920_102104 p65 21 10 2004 12 06 12 ...

Page 14: ...X SUBWOOFER FM ANT SPEAKERS Back Panel 30 29 26 25 27 28 25 FM Lead Wire ANTENNA 26 AC Power Cord 27 SUBWOOFER Out Jack 28 AUX R L Input Jacks 29 SPEAKER Terminals 30 PHONES Jack ES920_102104 p65 21 10 2004 12 06 13 ...

Page 15: ...tton 8 Play Pause Button 9 TUNER BAND Button 10 MUTE Button 11 CD Button 12 IR Infrared Transmitter 13 Standby On Off f Button 14 AUX Button 15 TIMER Button 16 SLEEP Button 17 Skip Fwd Tuning Button 18 PRESET Repeat Button 19 ST MONO Button 20 MEMORY Button 21 RANDOM Button 22 MODE Button 23 SNOOZE Button 24 Battery Compartment 24 1 2 3 4 5 6 8 9 10 11 13 14 15 17 19 20 21 22 23 18 12 7 16 ES920_1...

Page 16: ...ress the OPEN CLOSE button to close the CD door General Controls Most of the main functions of this system can be operated by the controls on the top panel of the main unit or by the buttons on the remote control handset If a specific function can only be operated by the remote handset or by the top panel controls this will be clearly indicated in the instructions When operating this system with t...

Page 17: ...ost popular types of music Press the EQ button on the front panel or the remote control to cycle through the following equalizer settings Flat EQ Off ROCK JAZZ POP or CLASSIC The appropriate EQ indicator appears in the display to confirm your selection The system remembers the EQ setting when the power is switched off and returns to the same setting when the power is switched on again FM ST MONO B...

Page 18: ...one The sound stops and the VOL 0 indicator appears in the display Press the MUTE button again to cancel the mute function and restore the sound The VOL 0 indicator disappears The mute function will also be canceled automatically by pressing the VOLUME or VOLUME buttons ES920_102104 p65 21 10 2004 12 06 17 ...

Page 19: ... automatically Set the clock as follows 1 Press the MEMORY button on front panel or on remote control once The Hour digits begin flashing 2 Repeatedly press the or buttons on front panel or remote control to adjust the display to the correct hour AM or PM 3 Press the MEMORY button again to set the hour The Minute digits begin to flash 4 Repeatedly press the or buttons on front panel or remote cont...

Page 20: ...t be adjusted If this occurs press the MEMORY button again and then press the or buttons within 6 seconds to adjust the display The display will always show the time when the system is in the Standby Power Off mode To display the time while the system is in the AUX LINE TUNER or CD Stop mode press the MODE button on the front panel or remote control once ES920_102104 p65 21 10 2004 12 06 19 ...

Page 21: ...ized by the Automatic Tuning system Automatic Tuning Depress and hold the or buttons until the display begins to move then release the buttons The Tuner will search up or down the band for the next strong signal and stop on that station Repeat this procedure until the tuner stops on your desired station 4 If you tuned to an FM Stereo station the ST indicator will appear in the display If the FM St...

Page 22: ...of this antenna until you find the position that provides the best reception AM The AM bar antenna is inside the cabinet of the main unit You may need to change the position of the main unit until you find the position that provides the best reception for your favorite AM stations R L R L AUX SUBWOOFER FM ANT SPEAKERS ES920_102104 p65 21 10 2004 12 06 21 ...

Page 23: ...e control to select your preset memory number Example 1 Press the MEMORY button again the 1 stops flashing confirming that your station has been entered in preset memory 1 3 Tune to the next station you wish to memorize Example FM 106 70 MHz and press the PRESET button to select your next preset memory number Press the MEMORY button again to enter your station in preset memory number 4 Repeat Step...

Page 24: ...reset memory numbers 10 through 19 first press the 10 button and then the desired second digit For example To select preset 10 press the 10 button once and then the 0 button To select preset 19 press the 10 button once and then the 9 button To select preset 20 press the 10 button twice and then the 0 button Changing Preset Stations 1 Tune to the new station you want to memorize 2 Press the MEMORY ...

Page 25: ...g 100 compatibility cannot be guaranteed This is not an indication of any problems with your player Normal Playback 1 Press the STANDBY button to turn the system On 2 Press the CD button to select CD function 3 Press the OPEN CLOSE button to open the CD door If you have not already done so remove the dummy CD transit protection cards and discard it You cannot play your own CD unless the card is re...

Page 26: ...your unit 6 Press the PLAY PAUSE button to begin playback 7 Adjust the VOLUME and EQ controls as desired 8 Playback will continue until all tracks on the disc have been played then the player stops and the display shows the total tracks number and playing time on the disc To stop playback at any time press the STOP button 9 If you are finished listening press the OPEN CLOSE button to open the CD d...

Page 27: ...point the elapsed time stops flashing Skip Track and High Speed Music Search During playback repeatedly press the or buttons to skip to higher or lower numbered tracks Playback will begin on the selected track During playback depress and hold the or buttons to search within a track at high speed to locate a specific musical passage Release the or buttons when you hear the desired passage Normal sp...

Page 28: ... the selected track will be repeated continuously All Tracks Repeat Load the disc in the player and begin playback Press the PRESET button twice The REP indicator appears in the display All tracks on the disc will be repeated continuously To cancel Repeat playback mode press the PRESET button until the REP indicator disappears from the display Repeat mode can also be canceled by opening the CD doo...

Page 29: ...that point INTRO Scan Playback On Remote Control Only This feature allows you to play just the first 10 seconds of each track on the disc This may be useful when you are trying to locate a specific song but you do not remember the title Load the disc as usual and wait until the display shows the total playing time and number of tracks Press the INTRO button on the remote control The INTRO indicato...

Page 30: ...ll show Track and Program Memory Pr 01 3 Then press the or buttons to select ct the first track on the disc to be programmed Example Track 07 4 Press the MEMORY button again to enter Track 07 in program memory 1 The program memory number advances to Pr 02 5 Repeat steps 3 and 4 selecting the desired Track number each time until you have entered up to 16 tracks in the CD program memory Note You may...

Page 31: ...uence again press the PLAY PAUSE button To cancel the programmed sequence from the memory press the STOP button while the player is stopped The MEMORY indicator disappears Programmed Repeat Playback You can use the Programmed and Repeat Playback functions together to continuously repeat a programmed sequence First program up to 16 tracks as described above Then press the PRESET button twice Press ...

Page 32: ... repeatedly until the ON indicator is flashing in the display 2 Press the MEMORY button on the front panel or remote control The Hour digits begin flashing 3 Press the or buttons to set the display to the desired turn on hour AM or PM 4 Press the MEMORY button on the front panel or remote control to memorize the On hour setting The Minute digits begin flashing 5 Press the or button to set the disp...

Page 33: ...f hour AM or PM 9 Press the MEMORY button on the front panel or remote control to memorize the Off hour setting The Minute digits begin flashing 10 Press the or buttons to set the display to the desired turn off minute Press MEMORY button once again to memorize the Off minute setting Only the indicator continues flashing Press the MODE button after completing step 10 above The ON OFF indicator and...

Page 34: ...dicates that the Timer On time is deactivated 3 Press the MODE button repeatedly until the indicator is flashing and the OFF indicator remains On 4 Press the TIMER button Both the and OFF indicators will flash together This indicates that the Timer Off time is deactivated Press MODE button again to return to current time or playing mode The ON OFF indicator disappears ES920_102104 p65 21 10 2004 1...

Page 35: ...ates that the Timer Off time is active Press MODE button once more to return to current time At the selected On time the system will turn on automatically to the last function selected either TUNER or CD It will play until it reaches the selected Off time and then shut off automatically Note If the system turns on to CD function it will only play until the end of the disc and then stop If you prog...

Page 36: ...CD track and time information in the CD mode You can press the MODE button repeatedly to show the following information on the display STANDBY Power Off Mode Correct Time Timer On Time Timer Off Time Correct Time AUX LINE Mode LINE Correct Time Timer On Time Timer Off Time LINE TUNER Mode Radio Frequency Correct Time Timer On Time Timer Off Time Radio Frequency CD Playback Mode CD Track Elapsed Ti...

Page 37: ... sleep timer operation Each time you press the SLEEP button you add 10 minutes to the sleep timer The maximum sleep timer operation is 90 minutes 5 After a few seconds the Sleep Time display disappears and the normal Tuner or CD display returns but the small SLEEP indicator remains in the display When the Sleep Timer counts down to 00 the power shuts off automatically Notes You can shut the unit o...

Page 38: ...f this unit refer to page 8 Press the AUX button to select the Aux function The LINE indicator appears in the display Operate the external device as you would normally When you hear the music from your external source adjust the VOLUME and EQ controls of this system as desired ES920_102104 p65 21 10 2004 12 06 37 ...

Page 39: ...he point of a pencil a toothpick a straightened paper clip or similar object to press the RESET button which is located in a small opening on the bottom of unit The system will return to the Standby Off mode Note Resetting the system computer also clears all of the system memory and returns the system to its original factory default settings All of the preset tuner memories the clock and the timer...

Page 40: ...he inside to the outside of the disc Small dust particles and light stains will have absolutely no effect on reproduction quality Clean the disc periodically with a soft lint free dry cloth Never use detergents or abrasive cleaners to clean the disc If necessary use a CD cleaning kit Never write on or affix labels to the surface of compact discs Care Of The Cabinet If the cabinet becomes dusty wip...

Page 41: ...a copy of your proof of purchase Send your unit to Emerson Radio Corp 1901 Diplomat Drive Farmers Branch TX 75234 This warranty does not cover damage from negligence misuse abuse accident failure to follow operating instructions commercial use rental repairs by an unauthorized facility or products purchased used serviced or damaged outside of the United States THIS WARRANTYGIVES YOU SPECIFIC LEGAL...

Page 42: ...EMERSON Part No 16 2974 410 01 Printed in China ES920_102104 p65 21 10 2004 12 06 41 ...

Reviews: