background image

Chapter 5  Parameter Table      21 

EV3200 Door Control Inverter    User Manual 

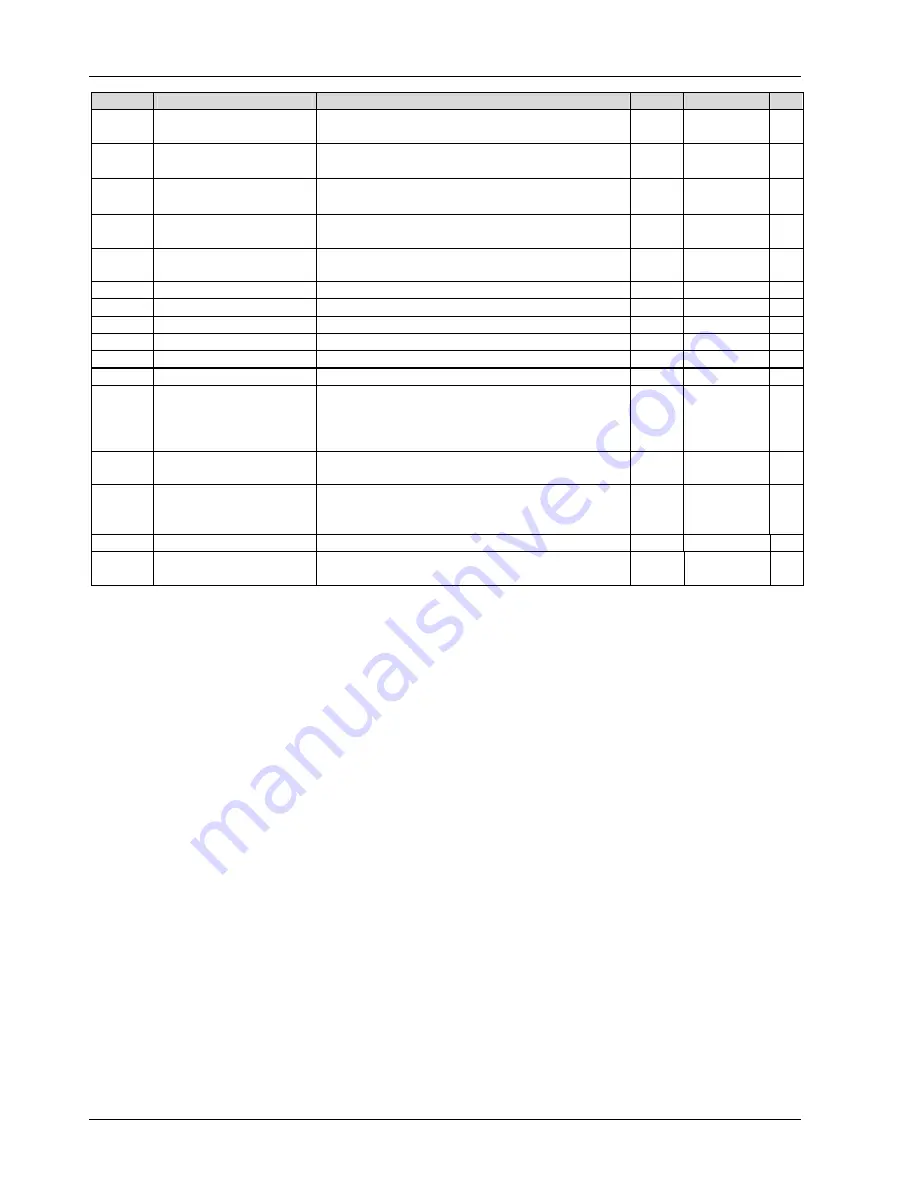
Parameter 

Name 

Setting range 

Min. unit 

Default 

Mod.

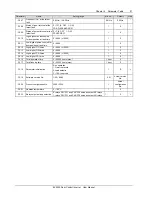
F9.07 

Frequency (Hz) at the latest 
fault 

0.00Hz ~ 128.00Hz 

0.01Hz 

0.00Hz 

F9.08 

Status of input terminal at the 
latest fault 

0 ~ 127 (0: OFF

1: ON) 

CD/OD/X5/X4/X3/X2/X1 

1 0 

F9.09 

Status of output terminal at the 
latest fault 

0 ~ 7 (0: OFF

1: ON) 

PC3/PC2/PC1 

1 0 

F9.10 

High digits of pulse counted 
for door position at fault time 

0 ~ 9999 (×10000) 

F9.11 

Low digits of pulse counted for 
door position at fault time 

0 ~ 9999 

F9.12 

High digit of OD times 

0 ~ 9999 (×10000) 

F9.13 

Low digit of OD times 

0 ~ 9999 

F9.14 

High digit of CD times 

0 ~ 9999 (×10000) 

F9.15 

Low digit of CD times 

0 ~ 9999 

F9.16 

Total operation time 

0 ~ 65535 hours (max.) 

1 hour 

F9.17 

Total running time 

0 ~ 65535 hours (max) 

1 hour 

F9.18 Parameter 

initialization 

0: no operation 
1: Clear the record 
2: Load defaults 
3 ~ 100: reserved 

0


× 

F9.19 

Software version No. 

1.00 ~ 99.99 

0.01 

Actual version 

No. 

F9.20 

Product configuration No. 

3200 ~ 3299   

Actual 

configuration 

No. 

F9.21 

Heatsink temperature 

0 ~ 100°C 

F9.22 

Relay output polarity selection 

0: relays PA1/PC1 and PA2/PC2 serve as output NC relays 
1: relays PA1/PC1 and PA2/PC2 serve as output NO relays

1 0 

× 


Summary of Contents for EV3200

Page 1: ...rvice center Copyright 2007 by Emerson Network Power Co Ltd All rights reserved The contents in this document are subject to change without notice Emerson Network Power Co Ltd Address No 1 Kefa Rd Science Industry Park Nanshan District 518057 Shenzhen China Homepage www emersonnetworkpower com cn Customer Service Hotline 86 755 86010537 400 887 6510 Complaint Hotline 86 755 86010800 E mail support...

Page 2: ...rter 2 Chapter 2 Product Specifications 3 2 1 Model Description 3 2 2 Nameplate 3 2 3 Models 3 2 4 Installation Size 4 2 5 Specifications 4 Chapter 3 Electrical Installation 6 3 1 Wiring Of Power Terminals 6 3 1 1 Introduction To Power Terminals 6 3 1 2 Connection Of Power Terminals 7 3 2 Control Terminals 8 3 3 User Relay Output Terminals 8 3 4 PG Terminals Of Synchronous Motor 9 3 5 Wiring Diagr...

Page 3: ...eration Parameters F1 23 6 2 1 OD Operation Curve For Speed Control 23 6 2 2 OD Operation Curve For Distance Control 24 6 3 CD Operation Parameters F2 25 6 3 1 CD Operation Curve For Speed Control 25 6 3 2 CD Operation Curve For Distance Control 26 6 4 Enhanced Function Parameters F3 27 6 5 Door Width Self learning Parameters F4 29 6 6 Multi function Input Terminal Parameters F5 31 6 7 Motor Param...

Page 4: ...rameter Settings 44 Chapter 8 Troubleshooting 45 Chapter 9 Maintenance 47 9 1 Daily Maintenance 47 9 2 Periodical Maintenance 48 9 3 Replacing Weary Parts 48 9 4 Storage 49 9 5 Warranty 49 Appendix 1 EMI Filter And AC Input Reactor 50 Appendix 2 Modbus Communication Protocol 51 Appendix 3 EU Declaration Of Conformity 56 ...

Page 5: ...alfunction of the inverter or its control system could lead to or allow damage loss or injury a risk analysis must be carried out and where necessary further measures taken to reduce the risk for example an over speed protection device in case of failure of the speed control or a fail safe mechanical brake in case of loss of motor braking 1 4 Motor Ensure the motor is installed in accordance with ...

Page 6: ...ed By Plug And Socket Special attention must be given if the inverter is installed in equipment which is connected to the AC supply by a plug and socket The AC supply terminals of the inverter are connected to the internal capacitors through rectifier diodes that are not intended to give safety isolation If the plug terminals can be touched when the plug is disconnected from the socket a means of ...

Page 7: ...ameplate is on the bottom of the inverter enclosure as shown in Figure 2 1 2S0002A 0 2kW 1PH AC 200 240V 3PH AC 0 240V Hz 0 5kVA 1 3A MODEL POWER INPUT 00 OUTPUT S N 2 0 2kW 1PH AC 200 240V 2 65A 50 60Hz 3PH AC 0 240V Hz 0 5kVA 1 3A 00 2 0 2kW 1PH AC 200 240V 3PH AC 0 240V Hz 0 5kVA 1 3A 00 EV3200 2 0 2kW 1PH AC 200 240V 2 65A 50 60Hz 3PH AC 0 240V 0 128Hz 0 5kVA 1 3A Drive model Motor capacity Ra...

Page 8: ...close door CD open door OD CD stop After the auto learning operation the door width information is saved and the auto learning process is over Auto tuning of motor s parameters Purpose of auto tuning function of inverter is to obtain the motor s parameters automatically and these parameters will be saved automatically after the tuning process is over Main control functions Speed adjusting range Un...

Page 9: ...ion Application environment Inside free from direct sunlight dust corrosive gas combustible gas oil mist steam water drop and so on Altitude Lower than 1000m Max altitude 3000m deration curve should be observed at 1000m 3000m derated 10 for every rise of 100m Working temperature 10 C 40 C temperature change less than 0 5 C minute Must be derated above 40 C The output current must be derated 2 for ...

Page 10: ...rcurrent protection and facilitate maintenance The control circuits are isolated from the power circuits in the drive by basic insulation single insulation only The installer must ensure that the external control circuits are insulated from human contact by at least one layer of insulation supplementary insulation rated for use at the AC supply votlage If the control circuits are to be connected t...

Page 11: ...nput circuit of the inverter 2 The cable diameter and MCCB capacity should be selected according to Table 3 3 Table 3 3 Recommended MCCB capacity and copper core insulating cable specifications Power cables mm 2 Inverter model MCCB A Input cables Output cables Earth cables EV3200 2S0002A EV3200 2S0002S 6 1 0 1 0 2 5 EV3200 2S0004A EV3200 2S0004S 10 1 0 1 0 2 5 Proper overload short circuit protect...

Page 12: ...ut terminal CD CD command input terminal Terminal command valid when shorted with COM Note If the control cables are multi core cables it is recommended that the sectional area of a single strand of the control cables be 0 5mm2 If the control cables are single core cables the cable sectional area should be greater than 1 0mm2 3 3 User Relay Output Terminals A EV3200 A amplified view PA2 PA1 PC1 PC...

Page 13: ...he inverter status data to external monitoring equipment The wiring method depends on your application L N L N Single phase power supply 50 60Hz M A B X1 CD Incremental PG signal input 1 Multi function input terminal 1 P24 U V W PE Auxiliary supply MCCB Defined as fault relay by default Normal PA3 PB3 closed Fault PA3 PC3 closed COM OD OD command input PB3 PC3 PA3 PC1 PA1 PC2 PG power supply PA2 1...

Page 14: ...With EMI filter installed EV3200 series inverters comply with the requirements in IEC 61800 3 in the fields of conducted emission and radiated emission with un shielded AC power supply cables and shielded output cable to the motor With AC input reactor installed EV3200 series inverters comply with the requirements in IEC 61800 3 in the field of harmonic emission For the technical parameters of the...

Page 15: ...gnal cables have to cross over the power cables keep them vertical to each other as shown in Figure 3 9 Power source or motor cable Motor cable Signal control cable Power cable 50cm 30cm 20cm Signal control cable Figure 3 9 Wiring requirements 4 Installation requirements of relay contactor and electro magnetic braking kit which may generate great interference should be installed outside of the inv...

Page 16: ...nning CD key In the keypad control mode pressing this key closes the door or initiates reverse REV spinning Stop Reset In the keypad control mode press this key to stop operating or to reset and exit fault alarming status Note 1 In the keypad control mode of elevator door control pressing the key opens the door pressing the key closes the door 2 Under general purpose inverter keypad mode pressing ...

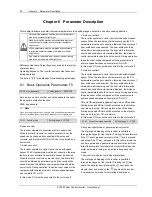
Page 17: ...ey to exit programming state 30 00 blinking Figure 4 2 shows the application chart LED display F0 F1 F1 00 F1 04 30 00 Exit after modification Abandon the modification 20 00 F1 05 F1 1 Press PRG to enter programming state and display curent parameter group 2 Press to search the desired parameter group F1 3 Press FUNC DATA to enter the corresponding function parameter F1 00 in F1 parameter group 4 ...

Page 18: ...verter change the setting of F4 02 check the connections and motor ratings set F6 07 to 1 again and press the key to start tuning 2 In synchronous motor tuning if the PG direction is reversed by cable connection the inverter will report E025 fault PG fault In this case exchange the connections of any two phase cables of the motor and restart the tuning 3 For synchronous motors you should conduct t...

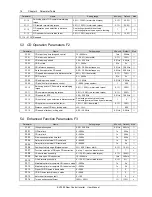
Page 19: ...erminal control mode of the inverter used for controlling elevator door 3 communication control mode of the inverter used for controlling elevator door reserved 4 Auto demo mode 5 terminal control mode of general purpose inverter 6 reserved 7 communication control mode of general purpose inverter reserved 1 0 F0 03 Running direction selection 0 same as direction preset by actual motor wiring 1 rev...

Page 20: ...ete maintainging torque 0 0 100 0 motor rated torque 0 1 50 0 F2 12 CD speed for EFS 5 00 25 00Hz 0 01Hz 10 00Hz F2 13 CD operation curve selection in distance control 0 selecting manually preset curve 1 selecting optimum curve by auto learning 1 0 F2 14 CD optimum curve correction factor 3 0 15 0 door width 0 1 10 0 F2 15 Distance control CD door locking point 000 9999 1 800 F2 16 CD speed after ...

Page 21: ...1 UVW incremental PG 5V 1 0 F4 01 Pulse number per revolution 0 4000 1 100 F4 02 PG direction 0 same as direction preset by PG wiring 1 reverse to direction preset by PG wiring 1 0 F4 03 Magnetic pole initial angle 0 0 359 9 0 1 0 F4 04 Speed during door width auto learning 2 20 00Hz 0 01Hz 5 00 F4 05 Selection of door width auto learning 0 disabled 1 enabled 1 0 F4 06 Low digits of pulse count fo...

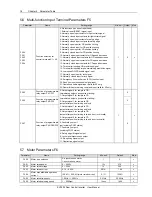
Page 22: ...input 21 Operation enable signal input valid for X5 only 22 Door width auto learning command input valid for X5 only 1 0 F5 05 Function of programmable relay output PA1 PC1 2 F5 06 Function of programmable relay output PA2 PC2 3 F5 07 Function of programmable relay output PA3 PB3 PC3 0 Output signal 0 for complete OD immediately output upon position limiting 1 Output signal 0 for complete CD immed...

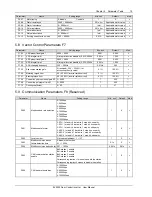
Page 23: ...nt 0 1 100 0 F7 07 Braking torque limit 0 0 200 0 inverter rated current 0 1 100 0 F7 08 Current loop s proportional gain KP 0 9999 1 500 F7 09 Current loop s integral time KI 0 9999 1 300 F7 10 Filtering coefficient 0 63 1 27 5 9 Communication Parameters F8 Reserved Parameter Name Setting range Min unit Default Mod F8 00 Modbus baud rate selection 0 1200bps 1 2400bps 2 4800bps 3 9600bps 4 19200bp...

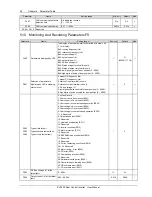
Page 24: ...tus of input terminal no unit 3 status of output terminal no unit 4 DC bus voltage V 5 low digits of pulse counted for door position 0 9999 6 high digits of pulse counted for door position 0 9999 1 0 F9 02 F9 03 F9 04 Type of latest fault Type of second lastest fault Type of third lastest fault 0 no fault record 1 Over current in Acc process E001 2 Overcurrent in Dec process E002 3 Overcurrent in ...

Page 25: ... time 0 9999 1 0 F9 12 High digit of OD times 0 9999 10000 1 0 F9 13 Low digit of OD times 0 9999 1 0 F9 14 High digit of CD times 0 9999 10000 1 0 F9 15 Low digit of CD times 0 9999 1 0 F9 16 Total operation time 0 65535 hours max 1 hour 0 F9 17 Total running time 0 65535 hours max 1 hour 0 F9 18 Parameter initialization 0 no operation 1 Clear the record 2 Load defaults 3 100 reserved 1 0 F9 19 S...

Page 26: ...The inverter operates in vector control mode without speed sensor When the inverter controls elevator door the PG parameters must be set correctly otherwise the accuracy of door width cannot be ensured The door width should be obtained via auto learning and the door width information should be saved after auto learning Besides the distance control parameters should be set correctly During operatio...

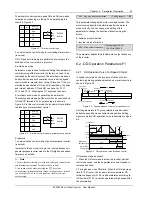
Page 27: ... mode for elevator door control 2 In keypad control mode pressing the key starts auto learning In terminal control mode for elevator door control you need to set F5 04 to 22 and input the valid level to start auto learning F0 03 Running direction selection Setting range 0 1 0 This parameter changes the motor running direction The motor running direction is determined after the motor is wired corre...

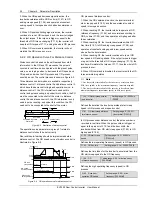
Page 28: ...F1 06 door width F1 09 Door width 0 0 Door width OD start creep distance Door width F1 01 door width 0 D1 D2 D3 Figure 6 6 OD operation curve for distance control OD process of distance control 1 When the OD command is active the inverter starts at start creep speed F1 02 and then operates at constant speed in low speed section 2 When reaching D1 the inverter starts to operate at OD reference freq...

Page 29: ...s the OD position limiting function is enabled When the torque of catching spinning motor is bigger or equal to the setting of F1 10 and in the mean time the torque maintaining prohibition function is disabled the inverter maintains at complete OD status with the maintaining torque of the product of F1 11 and motor s rated torque F1 12 OD operation curve selection in distance control Setting range...

Page 30: ...time F2 07 to CD ending creep speed F2 08 and operates at constant ending speed in low speed section when after the deceleration 4 When reaching D3 the inverter will run at the CD speed after door locking point F2 16 speeding up the CD process 5 When reaching D4 the inverter continues to run at CD speed after door locking point If the output torque is bigger or equal to the threshold for CD torque...

Page 31: ...automatically based on the door width CD optimum curve correction factor F2 14 Acc time and Dec time As the operation curve shows in Figure 6 10 when the CD distance S1 CD optimum curve correction factor F2 14 and door width S are determined adjust the CD Acc time F2 03 and CD Dec time F2 07 to regulate the Acc slope and Dec slope of the operation curve the shorter the time the steeper the slope a...

Page 32: ...l stop immediately and the delay function is invalid If F3 04 is set to 9999 the OD delay once triggered will be maintained endlessly F3 05 Delay time for external CD command Setting range 0 9999s 0s Defines the time interval from the CD command becoming invalid to the end of maintaining time of complete CD state If the maintaining time is equal to or greater than F3 05 the inverter will stop If t...

Page 33: ...wo seconds later it will reset automatically and continue to run Setting this parameter disables the automatic reset function and the inverter can only be reset by manually Note The inverter will not reset automatically when E024 E025 E028 E029 E030 E031 faults occur F3 16 Torque enhance coefficient Setting range 100 350 115 This parameter is used to enhance the switching torque in first time oper...

Page 34: ...PG must be input correctly before the auto learning 2 During auto learning there must not be any obstacles on the slide rail of the door 3 If you use the terminal to input the auto learning command you should set F4 05 to 1 in advance as well 4 If you use terminal to input the auto learning command you are required to set F4 05 to 1 in advance 5 Door width auto learning function is valid in distan...

Page 35: ...ly closed input contacts for safety edge 17 Normally open input for lock signal 6 Normally open input for OD position limiting 18 Normally closed input for lock signal 7 Normally closed input for OD position limiting 19 EFS function input 8 Normally open input for CD position limiting 20 Rush hour operation enable signal input 9 Normally closed input for CD position limiting 21 Operation enable si...

Page 36: ...tions 2 Output signal 1 for complete OD 8 Safety edge lift signal output 3 Output signal 1 for complete CD 9 Lock signal synchronous output 4 Output signal 2 for complete OD 10 Re opening signal output 5 Output signal 2 for complete CD 11 Obstruction signal output 0 Output signal 0 for complete OD In OD process when the inverter receives OD position limiting signal or when the pulse count number r...

Page 37: ...g range 100 0 200 0 150 F6 05 Motor rated frequency Setting range 1 00 128 00Hz 50 00 F6 06 Motor rated spinning speed Setting range 1 9999rpm 1400 Set the motor parameters according to the nameplate Note 1 Relevant parameters of motor F6 01 F6 06 must be input correctly before auto tuning 2 The motor power should match that of the inverter that is the setting of F069 can be only one grade higher ...

Page 38: ...frequency operation with load and then the user may set speed regulator s switching frequency in F7 04 Normally when the system runs at low frequency the transient response performance can be improved by increasing P and decreasing I Adjust speed regulator s parameters following the procedures below Set appropriate switching frequency F7 04 First tune P F7 00 and I F7 01 for high speed application...

Page 39: ...200bps 5 38400bps 6 115200bps 7 125000bps F8 01 Modbus data format Setting range 0 5 0 Defines the data format adopted in serial communication protocol 0 RTU 1 start bit 8 data bits 2 stop bits no parity 1 RTU 1 start bit 8 data bits 1 stop bit even parity 2 RTU 1 start bit 8 data bits 1 stop bit odd parity 3 ASCII 1 start bit 7 data bits 2 stop bits no parity 4 ASCII 1 start bit 7 data bits 1 sto...

Page 40: ...t is 1 if the inverter detects the terminal is on and is 0 if the inverter detects the terminal is off We define the relation of bits and terminals as follows Bit bit6 bit5 bit4 bit3 bit2 bit1 bit0 Input terminal CD OD X5 X4 X3 X2 X1 The number displayed by LED is the decimal number of the corresponding binary code Bit 7 Status of output terminal no unit Note Terminal input status is represented b...

Page 41: ...t of OD times Setting range 0 9999 10000 0 F9 13 Low digit of OD times Setting range 0 9999 0 F9 14 High digit of CD times Setting range 0 9999 10000 0 F9 15 Low digit of CD times Setting range 0 9999 0 F9 12 and F9 13 record OD times OD times F9 12 10000 F9 13 F9 14 and F9 15 record CD times CD times F9 14 10000 F9 15 F9 16 Total operation time Setting range 0 65535 hours 0 Records the inverter s...

Page 42: ...g During the tuning process the keypad displays When the tuning is over the parameters will be saved automatically Follow the procedures shown in Figure 7 1 to set the tuning parameters Motor type Start Synchronous Asynchronous Set motor type F6 00 1 Set PG pulse number F4 01 Set control mode F0 01 1 Set motor rated power F6 01 Set motor rated voltage F6 02 F6 03 F6 05 F6 06 F6 07 1 Start tunning ...

Page 43: ...ntrol 1 is shown in Figure 7 2 L N Single phase power supply 50 60Hz M X1 CD U V W PE MCCB Fault relay OD OD command input CD command input Complete OD relay output OD speed decrease NO input OD position limiting NO input light curtain or safety edge signal NO input COM EV3200 inverter PB3 PC3 PA3 PC2 PA1 PC1 PA2 X2 X3 X4 X5 CD speed CD position limiting NO input Elevator door mechanical system Co...

Page 44: ... 05 Rush hour operation OD speed 25Hz F1 07 OD Dec time 0 5s F1 08 OD ending creep speed 3Hz F1 10 Threshold for OD torque changing 50 0 F1 11 Maintaining torque at OD completion 50 0 Parameters in this table are factory settings adjust the OD parameters according to the actual OD operating conditions F2 00 CD start creep time for speed control 500ms F2 02 CD start creep speed 6Hz F2 03 CD Acc tim...

Page 45: ...ng according to Figure 7 3 and Figure 7 4 refer to 3 4 PG Terminals Of Synchronous Motor and 3 5 Wiring Diagram Of Inverter for PG wiring 2 Switch on the inverter set F9 18 to 2 to restore the factory settings 3 Carry out motor tuning according to instructions provided in 7 1 Motor Type Setup The parameters will be saved automatically after tuning 4 Set F0 01 to 1 set F4 01 and F4 02 0 forward 1 r...

Page 46: ... F1 06 OD speed decrease point in distance control 70 0 F1 07 OD Dec time 0 5s F1 08 OD ending creep speed 3Hz F1 09 OD position limit in distance control 95 0 F1 10 Threshold for OD torque changing 50 0 F1 11 Maintaining torque at OD completion 50 0 F1 12 OD operation curve selection in distance control 0 Parameters in this table are factory settings adjust the OD parameters according to the actu...

Page 47: ...ures 1 Do the wiring according to Figure 7 5 2 Switch on the inverter set F9 18 to 2 to restore the factory settings 3 Carry out motor tuning according to instructions provided in 7 1 Motor Type Setup The parameters will be saved automatically after tuning 4 Set F0 01 to 3 set F4 01 and F4 02 0 forward 1 reverse correctly After exiting the programming status press or to start the operation in keyp...

Page 48: ... F1 01 OD start creep distance for distance control 15 F1 02 OD start creep speed 7Hz F1 03 OD Acc time 0 5s F1 04 OD reference frequency 20Hz F1 05 Rush hour operation OD speed 25Hz F1 06 OD speed decrease point in distance control 70 0 F1 07 OD Dec time 0 5s F1 08 OD ending creep speed 3Hz F1 09 OD position limit in distance control 95 0 F1 10 Threshold for OD torque changing 50 0 F1 11 Maintain...

Page 49: ...short 2 Unsuitable selection of braking resistor 3 Abnormal input voltage 4 Unsuitable setting of PI parameters 1 Prolong Dec time 2 Re select the braking resistor 3 Check input voltage 4 Adjust PI parameters E006 Overvoltage in constant speed operation 1 Abnormal change of input voltage 2 Energy regenerated by negative torque load 1 Mount input reactor 2 Connect external braking resistor E007 E00...

Page 50: ...F0 02 2 in OD width auto learning 2 Set F002 to 0 in motor tuning 3 Set the OD and CD time to a bigger value and ensure the setting of F006 is bigger than the sum of all the settings of CD and OD time 4 The tuning can be conducted only in the single motor mode F4 11 0 and only one motor can be connected Besides the synchronous motor can only be used in the single motor mode F4 11 0 5 F5 00 X1 term...

Page 51: ...confirm the following items first Otherwise there is the hazard of electric shock The inverter has been switched off Use a volt meter to test the voltage between terminals P and P and the voltage should be below 36V 9 1 Daily Maintenance Daily maintenance is required when using the inverter so as to ensure the good operating environment Besides the daily operating data parameter settings parameter...

Page 52: ...r the motor must be disconnected from the inverter Otherwise the inverter might be damaged Note Dielectric test of the inverter has already been done in the factory It is not necessary for the user to do dielectric test again in order to avoid potential damage of its internal components 9 3 Replacing Weary Parts Components that are easily damaged mainly include electrolyte capacitors of filters Th...

Page 53: ...iodically For the inverter that has been stored for a long time it should be powered on without driving a motor for at least half an hour every half year 9 5 Warranty Emerson Network Power will offer warranty service if the inverter has faults in the following situations 1 There are 18 months defects liability period as of the date of manufacture for the inverter providing that the inverter is use...

Page 54: ...00 2S0002S EV3200 2S0004S Schaffner FS6512 12 07 12 3 7 51 2 0 8 0 65 Figure 1 shows the dimensions of the EMI filter Figure 1 Dimensions of EMI filter The dimensions A a B b and D of the EMI filter shown in Figure 1 differ with the filter model Refer to the following table Dimensions EMI filter model A mm a mm B mm b mm D mm Schaffner FS6512 12 07 74 48 193 173 40 The AC input reactor specificati...

Page 55: ...lustrated as follows Start at least 3 5 bits of vacancy Slave address Function code Data Check End at least 3 5 bits of vacancy Modbus data frame RTU mode Start 0 3A Slave address Function code Data Check End 0 D 0 A Modbus data frame ASCII mode Modbus adopts Big Endian representation for data frame This means that when a numerical quantity larger than a byte is transmitted the most significant by...

Page 56: ...ter or control parameters Not save them upon power off 0x41 Modify single inverter s parameter or control parameters Saving them upon power off 0x10 Modify several inverters parameter or control parameters Not save them upon power off All inverter s parameters control and status parameters are mapped to Modbus R W Register The R W properties of the parameters and their setting ranges are specified...

Page 57: ...invalid This bit works with the inverter enable bit to run the inverter for OD and CD 1 OD auto learning FWD running bit1 0 CD REV running Elevator door running direction auto learning RWD REV running in general drvie mode 1 Reserved bit2 0 1 Inverter enable bit3 0 Inverter disable Indicating the inverter state normal or faulty Function same as terminal EN 1 Reset valid bit4 0 Reset invalid Invert...

Page 58: ...er Bytes Content of inputs Check sum 0x01 0x03 0x02 0x01 0x47 0XF9 0xE6 Protocol data unit format of modifying single inverter s parameters Request format Protocol data unit Data length bytes Range Function parameter 1 0x06 Register address 2 0x0000 0xFFFF Register content 2 0x0000 0xFFFF Response format Protocol data unit Data length bytes Range Function parameter 1 0x06 Register address 2 0x0000...

Page 59: ...ame Address Function parameter Register address Register quantity Check sum 0x05 0x10 0x01 0x01 0x00 0x02 0x10 0x70 In RTU mode when changing multiple function parameters the max number is 22 In ASCII mode the max number is halved If the operation request fails error code and exception code forming the protocol data unit will be replied The error code is Parameter 0x80 For the error code refer to ...

Page 60: ...endment Directive 93 68 EEC and with the requirements of the Directive 89 336 EEC For the evaluation of the compliance with this Directives the following standards were applied EN61800 5 1 2003 Adjustable speed electrical power drive system Part 5 1 Safety requirements Electrical thermal and energy EN61800 3 2004 Adjustable speed electrical power drive system Part 3 EMC requirements and specific t...

Page 61: ...ire Others Signature DD MM YYYY date Note This paper becomes invalid if the user cannot be revisited Emerson Network Power Co Ltd Maintenance Record 2 Customer s company Address Post Code Contact person Tel Fax Drive s SN Power Model Contract NO Purchasing Date Service provider Contact person Tel Servicing person Tel Maintenance date Customer s comments on service quality Excellent Satisfactory Ac...

Page 62: ...hen PRC Customer Service Hotline 86 755 86010537 400 887 6510 Complaint Hotline 86 755 86010800 Notice 1 The warranty range is confined to the inverter only 2 Warranty period is 18 months within which period Emerson Network Power conducts free maintenance and repairing to the drive that has any fault or damage under the normal operation conditions 3 The start time of warranty period is the deliver...

Page 63: ...upon the receipt of the completed Product Quality Feedback Paper You will receive a special gift if you can give us any advices on improving the product and service quality Customer Service Dept Emerson Network Power Co Ltd Product Quality Feedback Form User s name Tel Address Post code Product model Installation date Product SN Product outline or structure Product performance Product package Prod...

Reviews: