background image

22

EN

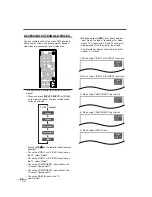
SCREEN INFORMATION

You can display the currently selected channel or
other information such as the audio mode on the
screen.

In the analog mode, the current channel and the
audio mode are displayed.

1

Display the channel number and the audio
mode.

• Press 

[INFO]

on the remote control.

The current channel number, audio mode, type
of resolutions for video signal, TV aspect ratio,
CC and TV rating are displayed at the top-right
of the screen.

• To clear the display, press 

[BACK]

or 

[INFO]

again.

6

SAP / 

STEREO

TV-PG DLSV

480i

480i

4:3

4:3

SD

SD

CC

CC

TV

ENTER

AUDIO

STILL

SETUP

BACK

SCREEN

MODE

INFO

CH RETURN

MUTE

VOL.

CH

7

8

9

-

0

BACK

INFO

In the digital mode, the detailed information for the
current channel such as the Program guide is dis-
played.

1

Display the detailed information for the channel.

• Press 

[INFO]

on the remote control.

The currently selected program details are dis-
played on the screen.

• The following information is displayed.

(1) Program title

(2) Broadcast station

(3) Program guide (max. 4 lines displayed)

(4) Channel number

(5) Audio language (“Other” is displayed when

the audio language cannot be acquired, or
the acquired languages are other than
English, Spanish or French.)

(6) Effective scanning lines and scan mode

(7) Program definition

(8) Program aspect ratio

(9) Program rating

(10) CC (Not available if the CC set to “Off”)

• The following screen is displayed when con-

necting to external devices:
e.g.) When using VIDEO1 input jack for con-

nection

Video1

TV-PG DLSV

480i

480i

SD

SD

CC

CC

NOTES:

• When the program guide is displayed in more than 5 lines,

use 

K

L

]

to scroll.

• “No description provided” is displayed when the program

guide is not provided.

6-1

English 1/2

TV-PG DLSV

1080i

1080i

16:9

16:9

HD

HD

CC

CC

Buffy Vampire Slayer

Buffy Vampire Slayer

HDTV

HDTV

A quarter-century ago,which may now qualify as the
good old days of newspapering,run-of-paper sales
accounted for 80 percent of the industry's advertising
revenues.Department stores and supermarket were

(1)

(2)

(4)

(9) (10)

(5)

(6), (7), (8)

(3)

DTV

Summary of Contents for EWL3706 A

Page 1: ...Digital Analog LCD TV Owner s Manual EWL3706 A EWL3706 IF YOU NEED ADDITIONAL ASSISTANCE WITH SET UP OR OPERATING AFTER READING OWNER S MANUAL PLEASE CALL TOLL FREE 1 800 256 2487 OR VISIT OUR WEB SITE AT http www EmersonAudioVideo com HIGH DEFINITION TELEVISION ENTER POWER SLEEP INPUT SELECT AUDIO STILL SETUP BACK SCREEN MODE INFO CH RETURN MUTE VOL CH 1 2 3 4 5 6 7 8 9 0 ...

Page 2: ...ings in the cabinet and the back or bottom are provided for ventilation and to ensure reliable operation of the TV and to protect it from overheating these openings must not be blocked or covered The openings should never be blocked by placing the TV on a bed sofa rug or other similar surface This TV should never be placed near or over a radiator or heat register This TV should not be placed in a ...

Page 3: ...cords as this can result in a risk of fire or electric shock 17 OBJECT AND LIQUID ENTRY Never push objects of any kind into this TV through openings as they may touch dangerous voltage points or short out parts that could result in a fire or electric shock Never spill liq uid of any kind on the TV 18 SERVICING Do not attempt to service this TV yourself as opening or removing covers may expose you ...

Page 4: ...the need of a difficult setting procedure V CHIP This feature allows you to block children s access to inappropriate programs Closed Caption Decoder This TV contains the built in Closed Caption Decoder that displays text across the screen It allows you to read the dialogue of a TV program or other information in the Closed Caption supported programs MTS SAP Tuner This feature allows you to select ...

Page 5: ...GISTER 15 ANTENNA CONFIRMATION 16 LANGUAGE SELECTION 17 WATCHING TV 18 CHANNEL SELECTION 18 VOLUME ADJUSTMENT 18 STILL MODE 19 SELECTING AUDIO CHANNELS 19 ACCESSING EXTERNAL DEVICES 20 CHANGING THE SCREEN DISPLAY MODE 21 SCREEN INFORMATION 22 SLEEP TIMER 23 OPTIONAL SETTINGS 23 SETUP SCREEN 23 PICTURE ADJUSTMENT 24 CLOSED CAPTION 25 DTV CLOSED CAPTION 26 CLOSED CAPTION STYLE 26 V CHIP 28 HDMI AUDI...

Page 6: ...urn the TV on and off Number buttons p18 Press to select a channel SETUP button p23 Press to display on screen menu s B K L buttons p12 To move left right up down through the items ENTER button p12 Press to confirm your selection BACK button p22 Press to return to previous menu operation VOL X X Y Y buttons p18 Press to adjust volume MUTE button p18 Press to turn sound on and off SLEEP button p23 ...

Page 7: ...ar of this TV from underneath ANT IN jack Coaxial cable connection for your antenna or cable box DIGITAL AUDIO OUT COAXIAL jack Digital audio coaxial cable connection for decoder or audio receiver Connect cable to DIGITAL AUDIO IN jack of external device AUDIO OUT jacks Audio cable connection for external audio equipment Use AUDIO IN jacks of external equipment HDMI IN jack HDMI cable connection f...

Page 8: ...IDEO2 COMPONENT2 AUDIO L R Pr Pb Y VIDEO2 VIDEO AUDIO L R VIDEO1 VIDEO AUDIO L R COMPONENT1 AUDIO L R Pr Pb Y ANT IN Coaxial cable not included Coaxial cable not included Cable box or Satellite box Satellite dish Rear of this TV Cable TV company or NOTES For your safety and to avoid damage to equipment please unplug the coaxial cable from the ANT IN jack before moving the unit If you use an antenn...

Page 9: ... above DVI does not show image if the 480i does not accept EIA CEA 861 861B ANT IN AUDIO OUT L R HDMI IN DIGITAL AUDIO OUT COAXIAL AUDIO L R HDMI DVI OUT AUDIO OUT R L To DVI output jack To audio output jacks Rear of this TV To HDMI IN jack Cable Box or Satellite Box with the DVI output jack To AUDIO input jacks HDMI DVI conversion cable not included Audio cable not included NOTES This TV accepts ...

Page 10: ...nect to your TV s S VIDEO2 input jack connect audio cables to the AUDIO L R jacks of VIDEO2 NOTE If you connect to the S VIDEO jack and the VIDEO jack at the same time the S Video connection will have priority S VIDEO1 S VIDEO2 VIDEO1 VIDEO VIDEO2 COMPONENT1 VIDEO Y Pb Pr COMPONENT2 Y Pb Pr AUDIO L R AUDIO L R AUDIO L R AUDIO L R AUDIO OUT VIDEO OUT S VIDEO OUT DVD VCR with the S Video output jack...

Page 11: ...IGITAL AUDIO OUT COAXIAL AUDIO L R HDMI AUDIO IN Rear of this TV Stereo system To AUDIO OUT jacks To audio input jacks Audio cable not included Manufactured under license from Dolby Laboratories Dolby and the double D symbol are trademarks of Dolby Laboratories ANT IN AUDIO OUT L R HDMI IN DIGITAL AUDIO OUT COAXIAL AUDIO L R HDMI COAXIAL Rear of this TV MD deck DAT deck etc Dolby Digital decoder T...

Page 12: ... either Air or Cable only once When you change the connection Air Cable set the Autoscan again Refer to page 13 If you connect a cable system directly contact the CATV installer When the scanning is not complete Helpful Hint will be displayed every time you turn on the power If you have previously registered channels when this screen appears you can select a channel with the Number buttons Toll fr...

Page 13: ...og channels 10ch Digital channels 6ch Autoscan Autoscan Autoscan will rescan all channels This may take a while to complete Select the destination of ANT IN jack Back Air Cable Cable 1hour Air Cable Or ANT IN AUTOSCAN With AUTOSCAN your TV automatically scans and memorizes your area s viewable channels Activate AUTOSCAN when you turn on your TV for the first time change broadcast sources e g from ...

Page 14: ...Select the channel you want to remove Using K L select the channel Press ENTER to highlight the channel select ed for removal You will not be able to select the channel again using CH K L To reactivate the removed channel highlight it and press ENTER When you remove a major channel you remove its minor channels too 4 To exit the setup press SETUP NOTE The channel with DTV indicated on the display ...

Page 15: ...CREEN MODE INFO 1 2 3 4 5 6 7 8 9 0 INPUT SELECT ENTER SETUP 1 2 3 4 5 6 7 8 9 0 3 Select the channel you want to add Using the Number buttons select your desired channel Select Register with ENTER 4 To exit the setup press SETUP NOTES If set up completes successfully Registered to the Channel List is displayed If Video 1 is being used set up will not be completed suc cessfully and Unavailable wil...

Page 16: ... want to check signal strength Antenna Antenna Back Ch Change 11 CH Now 70 Peak 80 Channel Channel Autoscan Channel List Manual Register Antenna ENTER POWER SLEEP AUDIO STILL SETUP BACK SCREEN MODE INFO CH RETURN MUTE VOL CH 1 2 3 4 5 6 7 8 9 0 INPUT SELECT ENTER SETUP 1 2 3 4 5 6 7 8 9 0 CH If the channel is set to external input you can not confirm the antenna situation 3 To exit the setup press...

Page 17: ...p screen appears 2 Select LANGUAGE and press ENTER to con firm Using K L select English Español or Français Press ENTER 3 To exit the setup press SETUP Language Language Select the language for setup display Elija idioma de preparación Sélectionner langue écran config Español Français English ENTER STILL SETUP BACK SCREEN MODE INFO CH RETURN MUTE VOL CH 0 ENTER SETUP ...

Page 18: ...n the air time In this case the main channel is called major channel and the minor channel is called minor channel ENTER 1 1 2 ENTER 1 2 ENTER POWER SLEEP AUDIO STILL SETUP BACK SCREEN MODE INFO CH RETURN MUTE VOL CH 1 2 3 4 5 6 7 8 9 0 INPUT SELECT ENTER CH RETURN 1 2 3 4 5 6 7 8 9 0 CH VOLUME ADJUSTMENT This section describes how to adjust the volume The mute function which turns the sound off a...

Page 19: ... SAP STEREO TV AUDIO STILL SETUP SCREEN MODE 7 8 9 0 AUDIO NOTE Press any key except POWER to cancel still mode Still AUDIO STILL SETUP SCREEN MODE 1 2 3 4 5 6 7 8 9 0 STILL When the broadcasting has all audio When the broadcasting has stereo audio and monaural audio When the broadcasting has SAP and monaural audio When the broadcasting is having only monaural audio cannot be switched STEREO Outpu...

Page 20: ...e the HDMI IN jack on the TV select HDMI TV DTV channel Video1 Video2 Component1 Component2 HDMI ENTER POWER SLEEP AUDIO STILL SETUP BACK SCREEN MODE INFO CH RETURN MUTE VOL CH 1 2 3 4 5 6 7 8 9 0 INPUT SELECT INFO CH INPUT SELECT When you press INFO the current external input mode the type of resolutions for video signal TV aspect ratio CC and TV rating will be displayed at the top right of the s...

Page 21: ...n necessary to fill the screen Cinema Cinema displays a 4 3 picture at a 16 9 size with less horizontal elongation necessary to fill the screen because a little bit of the top and bottom edge of the screen will be cut off Wide Wide displays the center of the picture as original size and the outer sides of the picture will be elongated The size of the picture will depend on the original signal Full...

Page 22: ...creen The following information is displayed 1 Program title 2 Broadcast station 3 Program guide max 4 lines displayed 4 Channel number 5 Audio language Other is displayed when the audio language cannot be acquired or the acquired languages are other than English Spanish or French 6 Effective scanning lines and scan mode 7 Program definition 8 Program aspect ratio 9 Program rating 10 CC Not availa...

Page 23: ...e like a DVD recorder Refer to HDMI AUDIO on page 30 You can change the language English Spanish French displayed on the setup screen Refer to LANGUAGE SELECTION on page 17 NOTE To cancel the setup screen press SETUP SLEEP TIMER The Sleep Timer can be set to automatically turn off your television after an incremental period of time 1 Press SLEEP on the remote control to set the Sleep Timer The set...

Page 24: ...60 36 0 0 ENTER SETUP BACK SCREEN MODE INFO ENTER SETUP Contrast Using s B adjust to increase or decrease contrast s To decrease contrast B To increase contrast Color Using s B adjust to be brilliant or pale color s To pale B To brilliant Tint Using s B adjust to obtain natural skin tones s To red B To green Sharpness Using s B adjust the detail of the picture s To soft B To clear Reset Settings U...

Page 25: ...uage translation simplified English or displayed at a slower rate CC2 CC4 Text2 and Text4 are rarely available and broadcasters use them only in special conditions such as when CC1 and CC3 are not available or Text1 and Text3 are not available There are three display modes according to programs Paint on mode Displays input characters on the screen immediately Pop on mode Once characters are stored...

Page 26: ...ice6 Closed Caption Closed Caption Off Off Conventional CC DTV CC CC Style Detail Detail Auto Closed Caption V chip HDMI Audio DTV CLOSED CAPTION STYLE 1 Display the setup screen Press SETUP The following setup screen appears 2 Select DETAIL and press ENTER to confirm Using K L select Closed Caption and press ENTER to confirm 3 Select CC Style and press ENTER to confirm 4 Switch the Closed Caption...

Page 27: ...r and Edge Type Font Opacity Font opacity of the displayed caption can be switched as below Back Color Background color of the displayed caption can be switched as below Back Opacity Background opacity of the displayed caption can be switched as below Edge Color Edge color of the displayed caption can be switched as below Edge Type Edge type of the displayed caption can be switched as below 7 To e...

Page 28: ...NFO 1 2 3 4 5 6 7 8 9 0 INPUT SELECT ENTER SETUP 1 2 3 4 5 6 7 8 9 0 3 Enter the password Use the Number buttons and enter the 4 digit number When you have not set up your password enter 0000 When the password is correct the following V Chip screen is displayed See the following description for setting each item 4 Display the MPAA Rating screen Using K L select MPAA Rating Press ENTER V Chip V Chi...

Page 29: ...ck BACK ENTER X NC 17 R PG 13 PG G NR 5 Set TV Rating Using K L select the rating Press ENTER and set to View or Block for the rating without sub categories For the rating with sub categories press K L s B and select the rating Then press ENTER and set to View or Block 6 To exit the setup press SETUP NOTES When you select a rating and set it to Block the higher ratings will be blocked automaticall...

Page 30: ... MPAA Rating TV Rating New Password C New Password HDMI AUDIO Set the method of sound input for HDMI jack 1 Display the setup screen Press SETUP The following setup screen appears 2 Select DETAIL and press ENTER to confirm Using K L select HDMI Audio and press ENTER to confirm 3 Switch the HDMI Audio Using K L select the desired HDMI Audio then press ENTER Select Auto if you connected to both digi...

Page 31: ...r you remove the stand 3 Attach the left and right TV rails to this TV using the four Phillips screws M4 x 12mm bolt and four M4 M5 washers included with the wall mount kit You don t need to use the lock washers for mounting this TV 4 Attach this TV to the wall If you want to attach the stand of this TV again insert the stand slowly as illustrated below and drive M4 screws in the 4 threaded holes ...

Page 32: ...y affect picture quality Adjust Contrast and Brightness in the setup screen View other TV channels The problem might be limited to the broadcasting station When the outside antenna is used check the wire condition and connection View other TV channels The problem might be limited to the broadcasting station Check the antenna or cable connection to the main unit When the outside antenna is used che...

Page 33: ...re quality View other TV channels The problem might be limited to the broadcasting station Move your TV away from nearby electric appliances Turn off the power and wait 30 minutes before turning it back on View other TV channels The problem might be limited to the broadcasting station Check the antenna or cable connection to the main unit When the outside antenna is used check the wire condition a...

Page 34: ...io channel delivered separately from main audio chan nel This audio channel is used as an alternate in bilingual broad casting Standard Definition TV SDTV Standard digital format that is sim ilar to the NTSC picture quality S Video Offers higher quality images by delivering each signal color c and luminance y independently of each other through separate cables CABINET CLEANING Wipe the front panel...

Page 35: ... R x 4 HDMI Audio Input HDMI jack RCA jack L R x 2 Coaxial Digital Audio Output One pin jack 500mVpp Analog Audio Output RCA jack L R x 2 Stereo Sound System Speaker ELECTRICAL SPECIFICATION Sound Output 5W 8 ohm x 2 OTHER SPECIFICATIONS Remote Control Digital encoded infrared light system Operating Temperature 5 C to 40 C 41 F to 104 F Power Requirements AC120V 60Hz Power Consumption Maximum 205W...

Page 36: ... ANY COSMETIC PARTS COMPLETE ASSEMBLY PARTS DEMO OR FLOOR MODELS FUNAI CORP AND ITS REPRESENTATIVES OR AGENTS SHALL IN NO EVENT BE LIABLE FOR ANY GENERAL INDIRECT OR CONSEQUENTIAL DAMAGES ARISING OUT OF OR OCCASIONED BY THE USE OF OR THE INABILITY TO USE THIS PRODUCT THIS WARRANTY IS MADE IN LIEU OF ALL OTHER WARRANTIES EXPRESS OR IMPLIED AND OF ALL OTHER LIABILITIES ON THE PART OF FUNAI ALL OTHER...

Reviews: