Instruction Manual
D200149X012
3610J and 3620J Positioners
September 2017
37
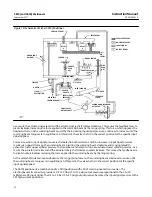
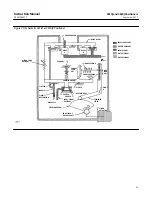
Figure 24. Schematic of Fisher 3621JP Positioner
38A6592‐A
B2147
MINOR LOOP
GAIN ADJ
ZERO ADJ
RANGE SPRING
COARSE
SPAN
ADJ
CROSS‐OVER
ADJ
RELAY BEAM
RELAY
B
RELAY
A
SUPPLY PRESSURE
NOZZLE PRESSURE
INPUT SIGNAL
OUTPUT SIGNAL
AIR
SUPPLY
FINE
SPAN
ADJ
PIVOT B
FEEDBACK
LEVER
INPUT MODULE
PIVOT A
FLAPPER
NOZZLE
FIXED
RESTRICTION
CAVITY A
CAVITY B
PISTON
ACTUATOR
SUMMING BEAM
COUNTER SPRING
FLAPPER
NOZZLE
FIXED
RESTRICTION
MAGNET
SUPPLY
COIL 4 TO
20 mA INPUT
OUTPUT SIGNAL
Disassembling the Bypass Valve
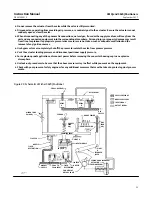
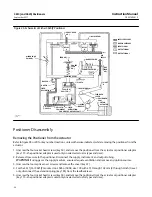
Refer to figure 26 for key number locations while disassembling the bypass valve.
1. Remove all pressure from the positioner. Disconnect the supply, instrument, and output tubing.
WARNING!
If using gas as the supply medium, ensure adequate ventilation and remove any ignition sources.
2. Remove the four socket head screws (key 169), and lift the bypass body (key 161) and bypass body gasket (key 163)
from the bypass body adaptor (key 162). Inspect the gasket and replace if necessary.
3. Remove the wire tie (key 166) and the retaining ring (key 165).
4. With a gentle pulling and turning motion, slide the bypass lever assembly (key 160) from the bypass body (key
161). Inspect the O‐rings (keys 159, 167, and 168) for nicks or wear and replace if necessary. Apply lubricant (key
153) to the O‐rings before replacement.
5. Remove the two socket head screws (key 54) and remove the bypass body adaptor (key 162) and adaptor gasket
(key 164) from the gauge block (key 158).
6. Inspect the adaptor gasket (key 164) and replace if necessary.
Disassembling the Gauge Block


