Instruction Manual
D103292X012
C1 Controllers and Transmitters
March 2017
6
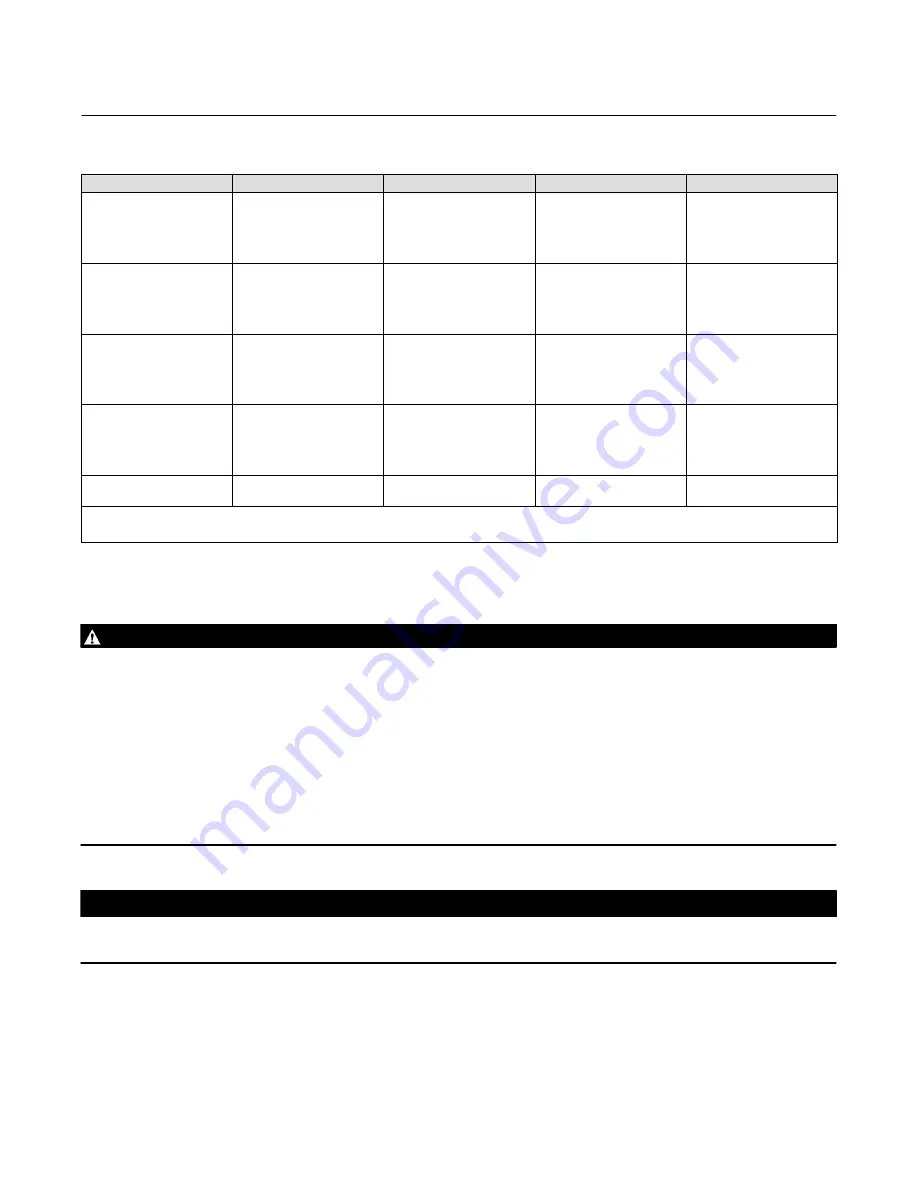
Table 6. Common Signal Pressure Conversions
Mps
kg/cm
2
bar
kPa
Psi
0.02
0.03
0.04
0.05
0.06
0.2
0.3
0.4
0.5
0.6
0.2
0.3
0.4
0.5
0.6
20
35
40
50
60
3
5
6
7
9
0.07
0.08
0.09
0.10
0.12
0.8
0.8
1.0
1.0
1.3
0.8
0.8
1.0
1.0
1.2
75
80
95
100
125
11
12
14
15
18
0.14
0.15
0.17
0.18
0.20
1.4
1.5
1.8
1.9
2.0
1.4
1.5
1.7
1.9
2.0
140
150
170
185
200
20
22
25
27
30
0.22
0.23
0.24
0.34
0.55
2.2
2.3
2.5
3.5
5.6
2.2
2.3
2.4
3.4
5.5
220
230
240
345
550
32
33
35
50
80
0.69
1.03
7.0
10.5
6.9
10.3
690
1035
100
150
1. Values as listed in ANSI/S7.4.
2. Values as listed in IEC Standard 382.
3. Values rounded to correspond with kPa values.
Installation
WARNING
To avoid personal injury or property damage resulting from the sudden release of pressure:
D
Always wear protective clothing, gloves, and eyewear when performing any installation operations.
D
Personal injury or property damage may result from fire or explosion if natural gas is used as the supply medium and
appropriate preventive measures are not taken. Preventive measures may include, but are not limited to, one or more
of the following; remote venting of the unit, re-evaluating the hazardous area classification, ensuring adequate
ventilation, and the removal of any ignition sources. For information on remote venting of this controller/ transmitter,
refer to page 11.
D
If installing into an existing application, also refer to the WARNING at the beginning of the Maintenance section in this
instruction manual.
D
Check with your process or safety engineer for any additional measures that must be taken to protect against process
media.
CAUTION
Do not use sealing tape on pneumatic connections. This instrument contains small passages that may become obstructed
by detached sealing tape. Thread sealant paste should be used to seal and lubricate pneumatic threaded connections.
Standard Installation
The instruments are normally mounted vertical with the case/cover as shown in figure 1. If installing the instrument in
any other position, be sure that the vent opening shown in figure 2 is facing downward.


