background image

ENARDO 2000 SERIES EMERGENCY PRESSURE RELIEF VENT (EPRV) 

ENARDO 2500 SERIES EMERGENCY RELIEF VENT WITH VACUUM (EPRV-V) 
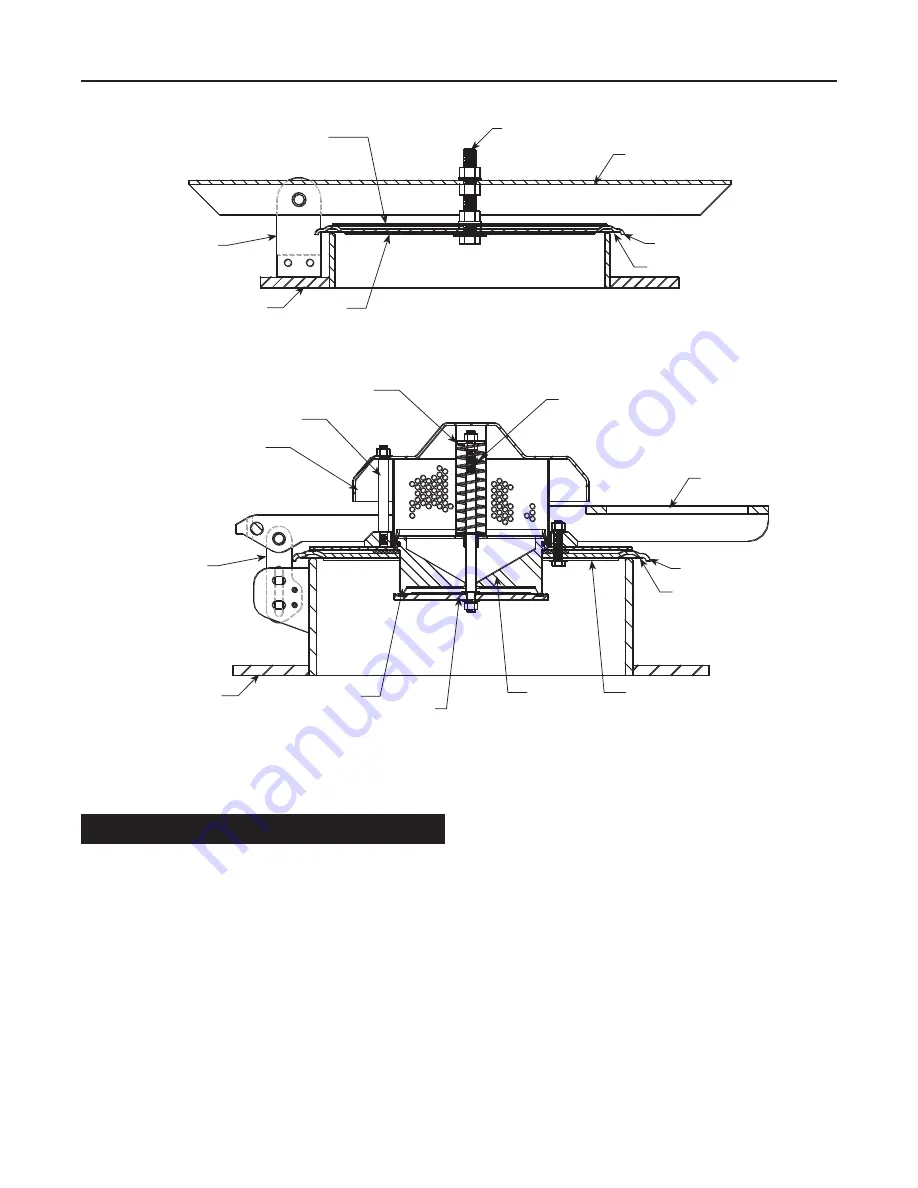
HINGE EAR

REINFORCEMENT DISK

CENTER BOLT

ARM

VENT COVER

PRESSURE SEAL

SEAL 

SUPPORT

BASE  

ASSEMBLY

GUIDE SLEEVE

VACUUM SPRING

VENT ROD

WEATHER  

HOOD

HINGE

BASE  

ASSEMBLY

VACUUM 

SEAL

VACUUM 

PALLET

VACUUM 

SEAT

SEAL 

SUPPORT

PRESSURE SEAL

VENT COVER

ARM

Figure 7. 

Enardo 2000 and Enardo 2500 Series Assembly Drawing

Installation


 WARNING

The EPRV Series is shipped with its lid held 

partially open. The lid assembly has attached 

weights and is heavy. Use caution when 

removing the shipping blocks and metal bands 

to avoid injury to fingers and hands.

Before installing the relief vent, remove the unit from its 

crate and discard any protective coverings. Follow the 

instruction below for the installation of the Enardo 2000 and 

Enardo 2500 Series. 
Install the Enardo 2000 and Enardo 2500 Series on the 

flange bolt patterns that match with bolt pattern of the vent. 

The attachment flange base should be at level surface. 

1.  Carefully remove the Enardo 2000 and Enardo 2500 

Series from its crate. The seal portion of the vents is 

delicate, protect this surface while handling the unit.

2. 

Place the appropriate gasket on the level attachment flange 

and center the vent into place.

3.  Insert the appropriate number of bolts and make sure the 

vent is fastened securely. Installed bolts should be clear of 

the lid assembly when it is in the full open position.

4.  Inspect the installed unit from items that would keep it 

from working properly. The sealing area should be free of 

any debris that would cause leakage. The arm of the vent 

should be able to fully open.

5

Enardo 2000 and Enardo 2500 Series

Outside North 

America Only

Summary of Contents for FISHIER Enardo 2000 Series

Page 1: ...n Either condition may result in equipment damage or personal injury Only a qualified person shall install or service the emergency pressure relief vent Figure 1 Enardo 2000 Series Emergency Pressure Relief Vent Figure 2 Enardo 2500 Series Emergency Pressure Relief Vent with Vacuum Figure 3 Enardo 2000 Series with Smart Wireless Monitoring Introduction Scope of the Manual This Instruction Manual p...

Page 2: ...um 304 Stainless steel and 316 Stainless steel Seal Buna N FEP Teflon and Viton Enardo 2500 Series Base Arm and Hood Carbon steel 304 Stainless steel and 316 Stainless steel Disk and Seal Support Aluminum and 316 Stainless steel Seal FEP Teflon Viton and Buna N Vacuum Spring 302 Stainless steel Vacuum Pallet and Vacuum Seat Polyphenylene Sulfide and 316 Stainless steel Certification EN IEC 60079 0...

Page 3: ...Number Product Identification and Marking Hazardous Locations Fisher Emergency Pressure Relief Vents are available with outer housings of carbon steel stainless steel or aluminum as indicated in Figure 4 Nameplate A nameplate is attached to the vent and contains the following information Model Number Ex 2024 24T 1 Connection Flange Size 24 in Serial Number Tag Number Optional Notified Body Number ...

Page 4: ... of the EPRV a proximity sensor and a wireless transmitter The built in proximity sensor detects the open or closed position using a magnetic target located on the arm assembly on the hinged end A signal is sent to the wireless transmitter which can then be sent to a control room via any WirelessHART Gateway This wireless sensor networking technology is based on the Highly Addressable Remote Trans...

Page 5: ...s Follow the instruction below for the installation of the Enardo 2000 and Enardo 2500 Series Install the Enardo 2000 and Enardo 2500 Series on the flange bolt patterns that match with bolt pattern of the vent The attachment flange base should be at level surface 1 Carefully remove the Enardo 2000 and Enardo 2500 Series from its crate The seal portion of the vents is delicate protect this surface ...

Page 6: ...nder pressure Follow the instruction below for the preventive maintenance of the Enardo 2000 and Enardo 2500 Series 1 Loosen fasteners on top of the vent and remove the hood and the spring chamber 2 Inspect and clear away any debris or buildup that may cause the vent to become lodged or impede air flow through the unit Do not adjust the height of the installed spring Clean the internal components ...

Page 7: ...ns when cleaning the transmitter The surface resistivity of the antenna assembly is greater than 1 GΩ To avoid electrostatic charge build up it must not be rubbed or cleaned with solvents or dry cloth vent can achieve depends on the individual vent size and material Minimum settings are reached when the unit is installed by itself However when weights are added to the arm of the unit elevated pres...

Page 8: ... 30 D103818X012 2015 2021 Emerson Process Management Regulator Technologies Inc All rights reserved 12 21 The Emerson logo is a trademark and service mark of Emerson Electric Co All other marks are the property of their prospective owners Fisher is a mark owned by Fisher Controls International LLC a business of Emerson Automation Solutions The contents of this publication are presented for informa...

Reviews: