background image


14

OPERATING INSTRUCTIONS

Turn On

Once the AC supply has been applied to the unit, power will be applied to the load (bypass 

mode) immediately when the 30 A input circuit breaker is initially closed. Turn the unit ON 

(inverter mode) by pressing the ON button 


once. 

Manual Bypass

To manually put the unit in Bypass mode, press the Standby button 


once. Pressing this 

button once will cause the load to be transferred to bypass power. Pressing this button a sec-

ond time will result in loss of power to the output receptacles and connected loads. 

Standby

To put the unit in Standby mode, press the Standby button 


while the unit is in bypass 

mode. 

!

CAUTION
Pressing the Standby/Manual Bypass button during normal 

operation while the inverter is on will transfer the load to bypass 

power, if the bypass voltage and frequency are within a safe 

range. 
The bypass power path does NOT protect the connected 

equipment from disturbances on the utility supply.

!

CAUTION
Pressing the Standby/Manual Bypass button when the UPS is in bypass 

mode will shut off power to the output receptacles and connected loads. 

Turning the unit off leaves the UPS in standby mode. To fully isolate the 

load from power, open the input circuit breaker.

Summary of Contents for GXT5000R-208

Page 1: ...POWER AVAILABILITY GXT5000R 208 with GXT5VBATTW120 GXT5VBATT Battery Cabinets USER MANUAL 5000VA 3750W 208Volt ...

Page 2: ......

Page 3: ...GENERAL DESCRIPTION 7 GENERAL INSTALLATION 9 CONTROLS AND INDICATORS 10 MODES OF OPERATION 12 Normal Mode Operation 12 Battery Mode Operation 12 Bypass Mode 13 Battery Recharge Mode 13 OPERATING INSTRUCTIONS 14 Turn On 14 Manual Bypass 14 Standby 14 OPTIONAL BATTERIES PROGRAMMABLE RUN TIME 15 Programming the GXT5000R 208 for Battery Cabinet Count 15 Procedure to confirm the battery count 16 Proced...

Page 4: ...ICATIONS 25 FIGURES Figure 1 GXT5000R 208 UPS Front view 7 Figure 2 GXT5000R 208 UPS Rear view 7 Figure 3 GXT5VBATTW120 battery cabinet with auxiliary 120 VAC power Rear view 8 Figure 4 GXT5VBATT battery cabinet Rear view 8 TABLES Table 1 Pin configuration 17 Table 2 LED indicators 22 Table 3 Troubleshooting guide 23 ...

Page 5: ...Install unit in an environment free from conductive contaminants moisture flammable liquids gases or corrosive substances This UPS and BATTERY CABINETS contain no user serviceable parts The UPS ON Standby push buttons do not electrically isolate internal parts Under no circumstances attempt to gain access internally due to risk of electric shock or burn Do not continue to use the UPS if the front ...

Page 6: ...TTERY PARAMETERS in the Battery Cabinet Specifications CAUTION Do not dispose of battery or batteries in a fire The battery may explode CAUTION Do not open or mutilate the battery or batteries Released electrolyte is harmful to skin and eyes It may be toxic CAUTION A battery can present a risk of electrical shock and high short circuit current The following precautions should be observed when work...

Page 7: ... Indicates caution followed by important instructions Requests the user to consult the manual Indicates the unit contains a valve regulated lead acid battery Recycle DC voltage Equipment grounding conductor Bonded to ground AC voltage ON Standby i ...

Page 8: ...ATTW120 provides batteries and an auxiliary transformer to provide up to 400VA at 120V Both battery cabinets provide two battery connectors to allow the daisy chain connection of additional battery cabinets The UPS may be used with either battery cabinet depending on whether the additional 120V 400VA power supply is needed For applications requiring 120V one GXT5VBATTW120 should be the first batte...

Page 9: ...T5000R 208 Inverter In normal operation the inverter utilizes the DC output of the power factor correction circuit and inverts it into precise regulated sinewave AC power When utility power fails the inverter takes power from the battery through the DC to DC converter and inverts it into alternating current In both modes of operation the UPS inverter is on line and continuously generating clean pr...

Page 10: ...ature or an internal UPS failure If a malfunction does occur the UPS automatically transfers the connected load to bypass Bypass operation is indicated by an alarm and illuminated Bypass LED other LEDs also may be illuminated to indicate the diagnosed problem To manually transfer the con nected load from the inverter to bypass press the Standby button once NOTE The bypass power path does NOT prote...

Page 11: ... output with circuit breaker L6 20R Input cord L6 30P 30A input circuit breaker RELAYCARD INT alarm contacts EPO DB 9 connector No user connection Cooling fans 30A AC output L6 30R 208 VAC power to auxiliary power input connector on external battery cabinet see Figure 3 DC cable to external battery cabinet see Figures 3 and 4 ...

Page 12: ...ear view 208 VAC power from rear of GXT5000R 208 to auxiliary power input connector see Figure 2 DC cable from rear of GXT5000R 208 to external battery cabinet see Figure 2 External battery connectors Auxiliary power 120 VAC 400 VA with 4A circuit protector Auxiliary power input connector External battery connectors ...

Page 13: ...t any 120V loads to the 5 15R receptacles on the rear of the GXT5VBATTW120 if used Verify that the 4A circuit protector is not tripped 6 Connect the DC cable from the GXT5000R 208 to the first battery cabinet If additional battery cabinets are used connect each battery cabinet to the next using the 18 inch battery cable supplied with each additional cabinet 7 Connect the input cord to the nearest ...

Page 14: ...ity LEDs on The Battery Capacity LEDs will flash during the battery test Standby Manual Bypass button This button controls output power to connected load s and has dual functions Standby Manual bypass CAUTION Pressing the Standby Manual Bypass button during normal operation while the inverter is on will transfer the load to bypass power if the bypass voltage and frequency are within a safe range P...

Page 15: ...utility power has not been interrupted Should the battery fail this test the Battery Capacity LEDs will flash and the failure code will be dis played Fault indicator 1 red LED The Fault indicator LED is illuminated if the UPS detects a problem Also one or more of the Load Level Battery Level indicators may be illuminated refer to Troubleshooting On Bypass indicator 1 amber LED The On Bypass indica...

Page 16: ... converter to the inverter to generate power for the connected load CAUTION Turning off the UPS while in battery mode will shut off output power ON Manual battery test On Inverter indicator illuminated Fault indicator NOT illuminated Battery capacity indicators On bypass indicator NOT illuminated Load level indicators illuminated LEDs indicate load level Standby Manual bypass AC input indicator il...

Page 17: ...ry Recharge Mode Once utility power is restored the UPS resumes normal operation and the Battery Charger begins recharging the battery ON Manual battery test On Inverter indicator NOT illuminated Fault indicator NOT illuminated Battery capacity indicators On bypass indicator illuminated Load level indicators illuminated LEDs indicate load level Standby Manual bypass AC input indicator NOT illumina...

Page 18: ...ut receptacles and connected loads Standby To put the unit in Standby mode press the Standby button while the unit is in bypass mode CAUTION Pressing the Standby Manual Bypass button during normal operation while the inverter is on will transfer the load to bypass power if the bypass voltage and frequency are within a safe range The bypass power path does NOT protect the connected equipment from d...

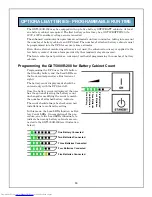
Page 19: ...f battery cabinets Programming the GXT5000R 208 for Battery Cabinet Count Programming the UPS uses the ON button the Standby button and the Load LEDs on the front control panel see illustration at right The battery count display mode should be entered only with the UPS load off Once the battery count is displayed the user has the option of leaving the battery count unchanged or modifying the count...

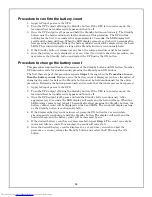
Page 20: ...ts Steps 1 through 3 in the Procedure to con firm the battery count However once the battery count is displayed you have the option of changing the count As before the Standby button must be held continuously for the entire procedure Releasing the button prematurely will require that the whole process be repeated 1 Apply AC input power to the UPS 2 Turn the UPS output off using the Standby button ...

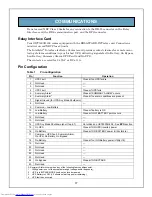
Page 21: ...losed if SUMMARY ALARM occurs 6 Summary Alarm Closed if no alarm conditions are present 7 Signal Ground for UPS Any Mode Shutdown 8 Not Used 9 Common Low Battery 10 Low Battery Closed if battery is OK 11 Low Battery Closed if LOW BATTERY point occurs 12 Not Used 13 Not Used 14 UPS Any Mode Shutdown short to pin 7 Not utilized on GXT5000R 208 See EPO section 15 On UPS Closed if ON UPS inverter powe...

Page 22: ...inal is located on the rear of the UPS next to the DB 9 connector If an EPO switch is used it must have the characteristics of an emergency but ton closed under normal conditions and held open mechanically when operated If this con nection is removed the unit will not start up Connections must not exceed NEC Class 2 limits ...

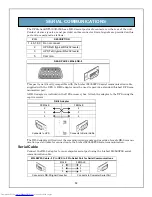
Page 23: ...to the UPS using the captive screws The DB 9 adapter will redirect the communication signals and provide a female DB 9 commu nication port suitable for connection to the Liebert M3LS9P9S serial communication Serial Cable Connect the DB 9 adapter to your computer serial port using the Liebert M3LS9P9S serial communication cable PIN DESCRIPTION 1 4 6 7 8 9 Do not connect 2 UPS RxD typical RS 232 lev...

Page 24: ...k when you purchase a MultiLink License Kit For more information about the Intellislot SNMP Web Card and Mul tiLink License Kits please visit the Web site http multilink liebert com or contact your local dealer or Liebert representative Several option cards are available for use in the Intellislot bay of the UPStation GXT5000R 208 The Intellislot SNMP Web Card provides SNMP and Web based monitorin...

Page 25: ...d to obtain their design life The UPS contin uously charges the batteries when connected to the utility supply When storing the UPS for an extended period connect it to utility power for at least 24 hours every six months to keep the batteries fully charged CAUTION Only qualified service personnel may replace internal batteries in the battery cabinets ...

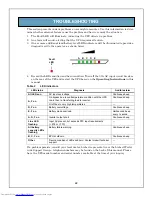
Page 26: ...esentative or the Liebert World wide Support Group telephone numbers may be found on the back of this manual Please have the UPS model number and serial number available at the time of your inquiry Table 2 LED indicators LED status Diagnosis Audible alarm All LEDs on AC input overvoltage Continuous beep A F on On bypass due to overtemperature condition until the UPS cools then re transferring load...

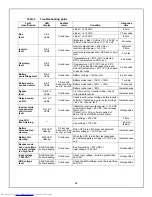
Page 27: ...orts Instantaneous Relay bonded on N O A C F LEDs Continuous Check inverter output voltage before inverter soft start If detected inverter output voltage 85 VAC then set fault Instantaneous Inverter mode output power short circuit fault A D F LEDs Continuous If detected inverter output power I 70 ADC and output voltage 90 VDC then increase short_cnt If short_cnt 30 any time in period of 96 ms then...

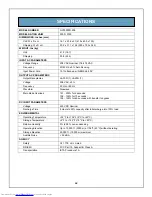
Page 28: ...Frequency 50 Hz or 60 Hz Waveform Sinewave Main Mode Overload 151 300 for 2 seconds 126 150 for 10 seconds 105 125 for 60 seconds with transfer to bypass DC INPUT PARAMETERS Voltage 240 VDC Nominal Recharge Time 8 Hours to 90 capacity after full discharge into 100 load ENVIRONMENTAL Operating Temperature 32 F to 104 F 0 C to 40 C Storage Temperature 5 F to 122 F 15 C to 50 C Relative Humidity 0 to...

Page 29: ...midity 0 to 95 non condensing Operating Elevation Up to 10 000 ft 3000 m at 104 F 40 C without derating AGENCY Safety UL 1778 c UL Listed RFI EMI FCC Part 15 Subpart B Class A Transportation ISTA Procedure 1A GXT5VBATT MODEL NUMBER GXT5VBATT DIMENSIONS inches mm Unit W x D x H 16 1 x 18 5 x 5 1 410 x 470 x 130 Shipping W x D x H 23 2 x 31 1 x 12 8 590 x 790 x 325 WEIGHT lbs kg Unit 107 3 48 7 Ship...

Page 30: ...26 ...

Page 31: ......

Page 32: ...damages resulting from use of this information or for any errors or omissions 2002 Liebert Corporation All rights reserved throughout the world Specifications subject to change without notice Liebert and the Liebert logo are registered trademarks of Liebert Corporation All names referred to are trademarks or registered trademarks of their respective owners 23156 Rev 0 7 02 Technical Support Servic...

Reviews: