background image

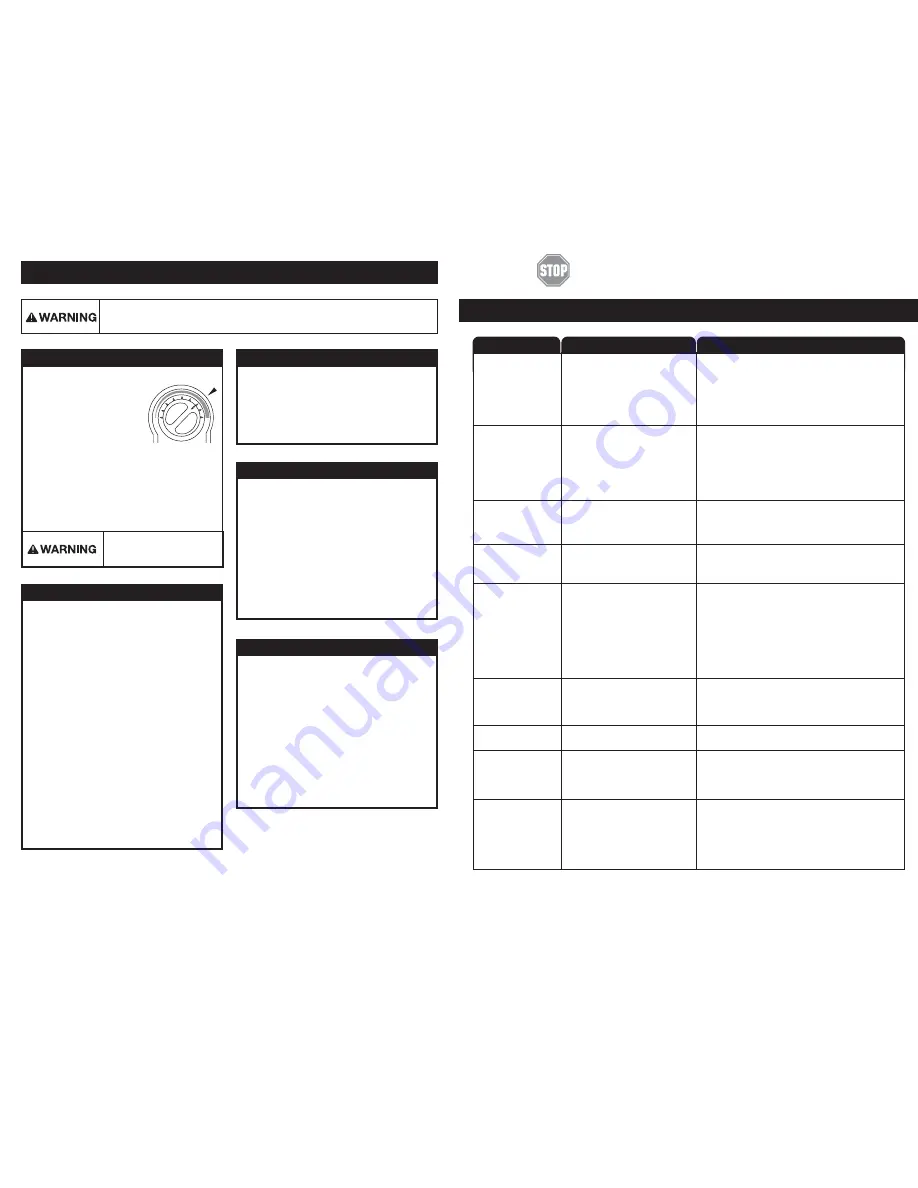
TROUBLESHOOTING

WHAT TO DO

Water and steam spits
forcefully from spout
without turning on the
dispenser faucet.

Water is not hot.

• Unit is boiling.

May be normal during initial setup.

• The unit is unplugged.

• The electric outlet is inoperative.

• Activate faucet lever to release some water from 

the tank.

• Adjust water temperature using dial on tank front.

Remember that at higher altitudes, water boils 
at lower temperatures.

• Make sure the unit is connected to a properly grounded 

electric outlet.

• Make sure the circuit breaker or fuses are 

functioning properly.

• Check that the outlet is not switched off.

Water is too hot 
or not hot enough.

• Thermostat is not adjusted to 

your needs.

• Adjust the thermostat slowly, then activate faucet lever for 20

seconds to bring in fresh water to be heated at the new setting.
Allow 5-7 minutes for water to reach new temperature.

Water comes out the
vent instead of spout.

• Outlet tube is blocked.

• Check that outlet tube is not kinked, twisted or pinched.

• Unscrew spout end piece and clean out any debris.

Water is dripping from 
the spout/vent
intermittently.

• The expansion chamber isn’t

draining properly due to low 
water pressure.

• The spout is blocked.

• Unplug the unit. If the dripping doesn’t stop after a few

minutes, check the supply valve to ensure that is fully
open and there are no obstructions in the water line
reducing the pressure below 30 psi (

i.e., a poorly mounted

saddle valve, a clogged water filter, or a partially opened
shut-off valve).

• Unscrew spout end piece and clean out any debris.

Water is dripping 
from the spout/vent
constantly.

• Debris in the water line may be 

in the faucet valve seat causing a 
slow water leak.

• Unscrew spout end piece and clean out any debris.

• Activate faucet lever 7-10 times to flush faucet & lines.

Divided stream.

• Debris in the end piece.

• Unscrew spout end piece and clean out any debris.

Water continues to run
after releasing lever.
(View/ Wave)

• Mounting nut too tight.

• Mounting washers not 

installed properly

• Loosen mounting nut, 1/4 turn at a time, until shut-off occurs.

• See page 6, Step 2B to check proper mounting 

washer installation.

PROBLEM

POSSIBLE CAUSE

If you are still experiencing trouble call the AnswerLine

1-800-558-5700.

Please read Troubleshooting Guide and/or visit 
www.insinkerator.com before calling AnswerLine

Water discoloration/rusty
appearance.

• Corrosion of unit.

• Unplug and drain unit as described in the Seasonal Storage/

Drainage Section on page 12 of this manual. If the water
discoloration remains after draining and refilling unit,
discontinue use and contact an authorized InSinkErator
service agent.

Electric Shock Hazard: 

To prevent electrical shock, disconnect power before 

servicing unit. Use only a properly grounded and polarized electric outlet.

Scalding Hazard: 

Do not allow

water to boil. May result in 
severe burns.

Factory temperature pre-set
is 200˚F.

To reset the 

thermostat to 200°, turn 
the indicator two notches
to the right of vertical.

Adjust the thermostat
slowly, turning the dial
clockwise to increase temperature 
or counter clockwise to decrease
temperature, then activate faucet
handle for 20 seconds to bring in fresh
water to be heated at the new setting.
Allow 5-7 minutes for water to reach
new temperature.


Regularly inspect the unit for any signs
of leakage. If there are signs of water
damage, immediately remove the unit
from service.


To avoid water damage from leakage,
replace all cut, loose or split tubing

.


A drain pan, plumbed to an appropriate 
drain or outfitted with a leak detector, 
should be used in those applications
where any leakage could cause
property damage.

PROPERTY DAMAGE

CARE AND USE

approx. 200°


Only use mild cleaners to clean the
faucet and plastic components. 


Cleaners with acids, abrasives, 
alkaline or organic solvents will 
result in deterioration of the plastic
components and void the warranty. 

CLEANING THE FAUCET AND TANK

Anytime the instant hot water dispenser is not
used for extended periods of time, unplug and
drain unit. If it is below freezing you will need to
unplug the unit and drain it.


Disconnect power from unit.


Push hot water dispenser faucet lever
and allow water to flow until it is cool.


Shut the cold water supply off at the valve.


Locate and remove drain screw from
bottom center of water tank and drain
the water into empty pail.


Empty the tank and then reinstall drain
screw into the bottom of tank, turning
until snug. Do NOT over tighten.


If filter system installed, remove and
discard filter cartridge.


To put back into working order, install
new filter cartridge (if required), fill tank
with water and reconnect the electrical
cord. (Refer to Page 10, Step 6)

SEASONAL STORAGE/DRAINAGE

ADJUSTING THE THERMOSTAT

For fresher tasting water, add filtration to
your instant hot water dispenser system.
InSinkErator offers the only water filtration
system designed specifically for instant 
hot water dispensers. For more information, 
visit www.insinkerator.com.


Regularly check for signs of corrosion
by examining the appearance of the
dispensed water.


If there is any discoloration or rusty
appearance, unplug and drain unit 
as described in the Seasonal 
Storage/Drainage section on this 
page of the manual

.


If the water discoloration remains after
draining and refilling unit, discontinue
use and contact an authorized
InSinkErator service agent.

PERSONAL INJURY

12

13

Summary of Contents for InSinkErator H770

Page 1: ...tor com Installation Care Use Instalacion cuidado uso Installation soin et utilisation InSinkErator may make improvements and or changes in the specifications at any time in its sole discretion without notice or obligation and further reserves the right to change or discontinue models 2009 InSinkErator a division of 44275 REV A Printed in USA Emerson Electric Co All Rights Reserved ...

Page 2: ...ll instructions cautions warnings and dangers before installing or using this instant hot water dispenser This particular unit is not intended for commercial use Make sure that all electrical wiring and connections conform to local codes A standard 120 volt grounded electrical outlet is required under the sink for the dispenser s electrical power The wall outlet powering your dispenser must have p...

Page 3: ...ng into a surface other than stainless steel C Required minimum from center of hole to wall Maximum counter thickness depth What if you don t have a sprayer hole or don t want to use it Many homeowners replace the soap dispenser in their sink with an instant hot water dispenser If drilling a hole into a stainless steel sink or counter top you can cut a mounting hole for the dispenser with a hole s...

Page 4: ...nk hole remove extension Place 21 4 large steel washer over threads on faucet base Reinstall extension B View Wave Faucet is factory ready for installation into a standard 11 2 sink counter hole 15 8 Small Steel Washer 21 4 Large Steel Washer 15 8 Rubber Washer 7 Standard 11 2 hole Hole larger than 11 2 Installing into hole smaller than 11 2 Star Nut Fiber Washer Figure 1 Figure 2 Property Damage ...

Page 5: ...arks Turn screws into pre drilled holes leaving 1 4 exposed Hang the tank on the screws Tighten the screws with only 1 2 turn clockwise B Screws provided are for use in wood studs or cabinets only Use wall anchors not supplied for installation into drywall Leave 1 4 for hanging tank Property Damage Check to make sure tubes are connected properly and are pushed down as far as possible 1 2 3 MOUNTIN...

Page 6: ...you are in doubt as to whether the instant hot water dispenser is properly grounded WARRANTY INFORMATION Fire Hazard To minimize possibility of fire DO NOT store flammable items such as rags paper or aerosol cans near the tank DO NOT store or use gasoline or other flammable vapors and liquids in the vicinity of this or any other appliance An instant hot water dispenser like any water heater has a ...

Page 7: ...orized InSinkErator service agent Electric Shock Hazard To prevent electrical shock disconnect power before servicing unit Use only a properly grounded and polarized electric outlet Scalding Hazard Do not allow water to boil May result in severe burns Factory temperature pre set is 200 F To reset the thermostat to 200 turn the indicator two notches to the right of vertical Adjust the thermostat sl...

Page 8: ... apariencia ferrosa antes de instalar esta unidad se recomienda utilizar nuestro sistema de filtración de agua Este producto contiene acero inoxidable El fabricante no puede garantizar contra el agua ferrosa debido a la cantidad de factores que están involucrados más allá del control del fabricante No obstante la apariencia repentina de agua ferrosa descargada del distribuidor de agua caliente pue...

Page 9: ...ieren su atención durante el proceso Estas instrucciones están divididas en apartados principales indicados por números y apartados secundarios indicados por letras mayúsculas El manual está organizado en esta forma para permitir al usuario hacer una pausa en cualquier momento después de terminar un apartado principal o secundario sin afectar el proceso de instalación Lo que usted verá en el manua...

Page 10: ...nstalación en un orificio estándar de 11 2 de fregaderos o gabinetes 15 8 4 1 cm arandela de acero pequeña 15 8 4 1 cm arandelas decaucho INSTALACIÓN DEL GRIFO VIEW WAVE 21 4 5 7 cm arandela grande de acero Figura 1 Figura 2 15 8 4 1 cm arandela de acero pequeña 15 8 4 1 cm arandelas de caucho 15 8 4 1 cm arandela de acero pequeña 15 8 4 1 cm arandelas de caucho PREPARACIÓN COMIENCE AQUÍ LA INSTAL...

Page 11: ...a sostener el dispensador en su lugar mientras se fija C D Arandela de montaje H770 H770 NO QUITE el tornillo de montaje o la junta de fibra de la base del dispensador INSTALACIÓN DEL GRIFO H770 Daños materiales No apriete ni rompa el tubo de cobre No deforme la última pulgada 2 5 cm del extremo del tubo de cobre PRECAUCIÓN Asegúrese de usar una junta de caucho para obtener un sellado correcto 2 B...

Page 12: ...dero No utilice extensiones eléctricas con el dispensador ADVERTENCIA CONEXIÓN FINAL DEL AGUA LLENE EL TANQUE Y ENSEGUIDA ENCHÚFELO Monte el tanque verticalmente en un lugar que permita tener un espacio libre abajo para drenarlo si es necesario NO APRIETE los tornillos excesivamente Haga orificios guía de 1 8 0 3 cm en las marcas Inserte los tornillos en los orificios guía y deje 1 4 0 6 cm de tor...

Page 13: ...tectar posibles signos de fugas y retírela de servicio inmediatamente si sospecha que presenta fugas Lesiones personales Este tanque no trabaja a presión NO MODIFIQUE este sistema NO CIERRE el tubo de purga ni conecte otro tipo de dispensadores o válvulas en el tanque Utilice sólo el grifo del dispensador InSinkErator proporcionado Utilice sólo las partes incluidas en el paquete Si necesita repara...

Page 14: ... debido a una presión baja del agua El grifo está bloqueado Desenchufe la unidad Si el goteo no cesa después de algunos minutos revise la válvula de suministro para verificar que esté completamente abierta y que no haya obstrucciones en la tubería de agua que causen reducción de la presión por abajo de 30 psi por ejemplo la válvula de asiento mal instalada el filtro de agua tapado o la válvula de ...

Page 15: ...té lisez bien toutes les instructions précautions avertissements et dangers avant d installer ou d utiliser ce distributeur d eau très chaude instantanée Cette unité spécifique n est pas destinée à un usage commercial Assurez vous que tous les raccordements et le câblage électrique sont conformes aux codes locaux Une prise électrique avec prise de terre de 120 volts ordinaire est nécessaire sous l...

Page 16: ...C Que se passe t il si vous n avez pas de trou d arroseur ou que vous ne voulez pas l utiliser De nombreux propriétaires remplacent le distributeur à savon de leur évier par un distributeur d eau très chaude instantanée Si vous percez un trou dans un évier ou le dessus du comptoir en acier inoxydable vous pouvez découper un trou de montage pour le distributeur à l aide d une scie cylindrique pour ...

Page 17: ...nsion filetée sur la base en serrant bien Vissez l écrou étoile sur l extension jusqu à ce qu il serre bien Figure 2 Par dessous l évier glissez la rondelle en fibres de 21 4 po 5 7 cm sur l extension filetée Serrez l ensemble à l aide d un écrou étoile en plastique Vissez l écrou étoile sur l extension jusqu à ce qu il serre bien Modèles chaud et froid seulemen Fixez le raccord rapide aux extrémi...

Page 18: ... po 7 9 mm sur le raccord lisse à l extrémité de droite et faites le descendre sur environ 1 2 po 12 7 mm 3 Vérifiez visuellement s il y a des tubes pincés ou écrasés 4 A Dommage matériel Les conduits d eau pincés ou bloqués peuvent causer des dommages au réservoir du distributeur Aucun de ces raccordements ne requiert de collier de serrage Dommage à la propriété Vérifiez pour vous assurer que les...

Page 19: ...réduire la possibilité d incendie N ENTREPOSEZ PAS d articles inflammables tels que chiffons papier ou canettes aérosols près du réservoir N ENTREPOSEZ PAS ou n utilisez pas d essence ou autres vapeurs et liquides inflammables à proximité de cet appareil ou de tout autre appareil Un distributeur d eau chaude instantané comme tout chauffe eau a une durée utile limité et tombera en panne tôt ou tard...

Page 20: ...OSTICS Danger de choc électrique Pour éviter un choc électrique débranchez le courant avant de réparer l appareil Servez vous d une prise électrique polarisée et convenablement mise à la terre ATTENTION La température à l usine est préréglée à 200 F Pour remettre à zéro le thermostat à 200 tournez l indicateur d deux fentes à la droite de la verticale Ajustez lentement le thermostat en tournant le...

Reviews: