background image

Electrical Connections—UPS

Liebert

®


e

XM

24

3.2.8 Safety Ground

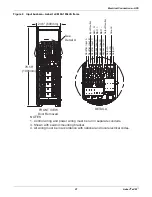
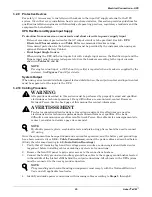
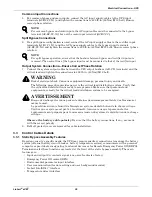
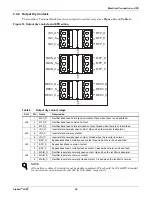
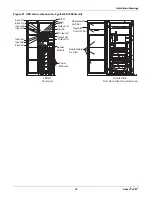
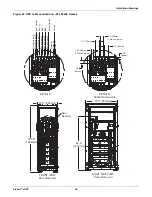
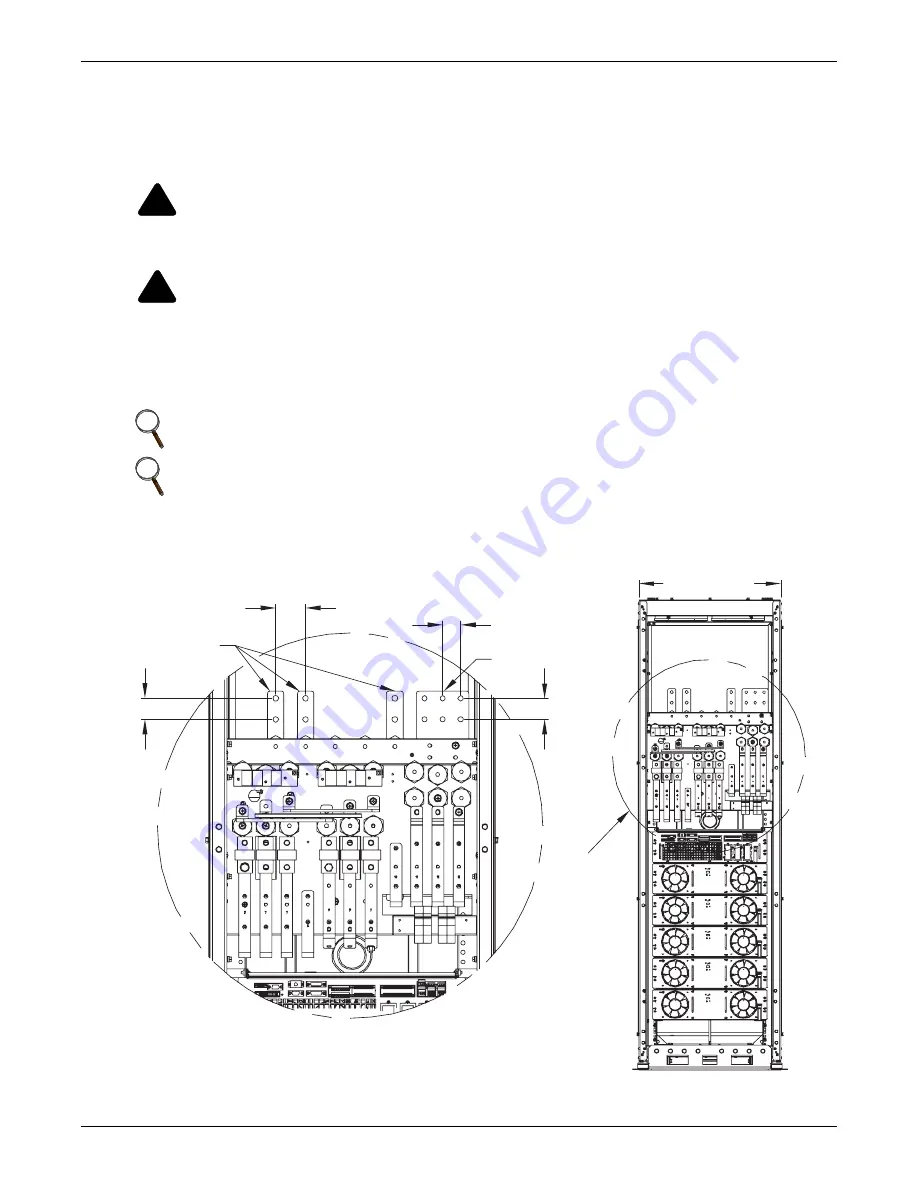
The safety ground busbar is below the neutral input and output busbars as shown in 

Figure 12


below. The safety ground cable must be connected to the ground busbar and bonded to each cabinet in 

the system. This ground busbar is then connected to the ground electrode conductor (GEC).
All cabinets and cable conduit should be grounded in accordance with local regulations.

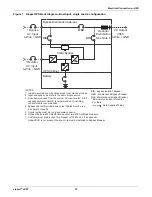
Figure 12 Ground and neutral busbar connections—60-100kVA frame busbars

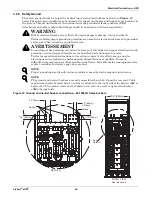
!

WARNING

Risk of electrical shock and arc flash. Can cause property damage, injury and death.
Failure to follow proper grounding procedures can result in electric shock hazard to personnel 

or the risk of fire, should a ground fault occur.

!

AVERTISSEMENT

Le non-respect des procédures de mise à la terre peut entraîner des risques d’électrocution du 

personnel, ou des risques d’incendie en cas de défectuosité de la mise à la terre.
Toutes les opérations décrites dans cette section ne doivent être effectuées que par des 

électriciens ou des techniciens professionnels dûment formés et qualifiés. En cas de 

difficultés, communiquez avec Emerson Network Power. Pour obtenir les renseignements de 

contact, consultez la dernière page de ce manuel.

NOTE

Proper grounding significantly reduces problems caused by electromagnetic interference.

NOTE

The ground and neutral busbars are easily accessible when the I/O panel is removed. Cable 

connections should be made before a cabinet is attached to the right side of the Liebert 

e

XM or 

before the UPS is placed where another obstruction, such as a wall, is against the Liebert 

e

XM’s the right side.

See
Detail A

Neutral

Ground

2.5" (64mm)
2 Places

2.5" (64mm)

1.75" (44mm)

FRONT VIEW

Door Removed

DETAIL A

23.6" (600mm)

1.75" (44mm)

Summary of Contents for Liebert eXM

Page 1: ...Liebert eXM User Manual 60 100kVA 50 60Hz ...

Page 2: ......

Page 3: ...Static Bypass Assembly 14 3 0 ELECTRICAL CONNECTIONS UPS 15 3 1 Power Cabling 15 3 1 1 Lug Size and Cable Rating 15 3 2 External Protective Devices 16 3 2 1 Rectifier and Bypass Input Supply of the UPS 16 3 2 2 UPS Output 16 3 2 3 UPS Input Configuration 17 3 2 4 UPS Input Configuration with Transformers 19 3 2 5 Cabling Guidelines 20 3 2 6 Cable Connections 20 3 2 7 Accessory Fuses and Back Feed ...

Page 4: ...8 6 10 UPS History Log 49 6 11 Types of LCD Screens 50 6 11 1 Opening Display 50 6 11 2 Default Screen 50 6 11 3 UPS Help Screen 51 6 11 4 Screen Saver Window 51 6 12 Pop Up Windows 51 6 12 1 From Bypass to Inverter Mode With Power Interruption 51 6 12 2 From Inverter to Bypass Mode With Interruption 51 6 12 3 System Self Test 52 6 12 4 Battery Capacity Test Confirmation 52 6 12 5 Battery Self Tes...

Page 5: ...D Protection 65 7 12 OperationStatic Bypass Switch 65 8 0 SPECIFICATIONS AND TECHNICAL DATA 66 8 1 Conformity and Standards 66 8 2 UPS Environmental 66 8 3 UPS Electrical Characteristics 67 9 0 MAINTENANCE 70 9 1 Safety Precautions 70 9 2 Limited Life Components 72 9 3 Routine Maintenance 72 9 3 1 Record Log 72 9 3 2 Air Filters 73 9 3 3 Torque Requirements 74 9 4 Detecting Trouble 74 9 5 Reportin...

Page 6: ...put dry contacts 28 Figure 16 Output dry contacts and EPO wiring 30 Figure 17 Battery cabinet interface J22 31 Figure 18 EPO wiring and signal names for J2 32 Figure 19 Single UPS Remote Emergency Power Off 33 Figure 20 UPS dimensions Front view 34 Figure 21 UPS main components Typical 60 100kVA unit 35 Figure 22 UPS cable connections 60 100kVA frames 36 Figure 23 Liebert IntelliSlot Web card disp...

Page 7: ... with battery breaker open 58 Table 20 Mimic indicators for normal mode operation with battery breaker closed 58 Table 21 Environmental requirements 66 Table 22 UPS mechanical characteristics 66 Table 23 UPS currents and terminals Input for single input unit 208V operation 67 Table 24 UPS currents and terminals Input for dual input unit only 208V operation 67 Table 25 UPS currents and terminals By...

Page 8: ...vi ...

Page 9: ...autions are required for procedures involving handling installation and maintenance of the UPS system Observe all safety precautions in this manual before handling or installing the UPS system Observe all precautions before as well as during performance of all maintenance procedures Observe all DC safety precautions before working on or near the DC system AVERTISSEMENT Risque de décharge électriqu...

Page 10: ...ge et l équilibre des armoires avant de transporter l appareil Maintenez en tout temps l inclinaison verticale minimale Les fentes situées à la base des armoires du module sont conçues pour utiliser le chariot élévateur Les fentes situées à la base peuvent soutenir le système seulement si les fourches se trouvent complètement sous le système Lisez toutes les instructions ci dessous avant de tenter...

Page 11: ...ry property damage and death EARTH CONNECTION IS ESSENTIAL BEFORE CONNECTING THE INPUT SUPPLY Earth leakage current exceeds 3 5 mA and is less than 1000 mA Transient and steady state earth leakage currents which may occur when starting the equipment should be taken into account when selecting instantaneous RCCB or RCD devices Residual Current Circuit Breakers RCCBs must be selected sensitive to DC...

Page 12: ...ges matériels et même la mort Les précautions de sécurité habituelles suffisent lorsque le système ASC est en mode de fonctionnement normal et que toutes les portes sont fermées La zone entourant le système ASC doit être exempte de flaques d eau d humidité excessive et de débris Des précautions de sécurité spéciales sont requises pour les procédures associées à la manutention à l installation et à...

Page 13: ... a residential area Operation of this unit in a residential area may cause harmful interference that the user is solely responsible for correcting WARNING Failure to follow adequate grounding procedures can result in electric shock hazard to personnel or the risk of fire should a ground fault occur All operations described in this section must be performed by properly trained and qualified electri...

Page 14: ...l shock Indicates caution followed by important instructions AC input AC output Requests the user to consult the manual Indicates the unit contains a valve regulated lead acid battery Recycle DC voltage AC voltage Equipment grounding conductor Bonded to ground i PbH2SO4 R ...

Page 15: ... Transformer Cabinet The Liebert eXM provides continuous high quality AC power to business critical equipment such as telecommunications and data processing equipment The Liebert eXM supplies power free of the disturbances and variations in voltage and frequency common to utility power which is subject to brownouts blackouts surges and sags The Liebert eXM utilizes the latest in high frequency dou...

Page 16: ... any damage is noted file a damage claim with the shipping agency immediately and contact Liebert Services at 1 800 LIEBERT to inform them of the damage claim and the condition of the equipment 2 Compare the contents of the shipment with the bill of lading Report any missing items to the carrier and your local Emerson representative immediately 3 Check the product label on the back of front door a...

Page 17: ... in Moving the Liebert eXM Ensure that the UPS weight is within the designated surface weight loading lb ft2 or kg cm2 of any handling equipment See Table 22 for weights of various units The Liebert eXM may be rolled on its casters for short distances only For longer distances move the UPS with a forklift or similar equipment to ease the relocation and to reduce vibration Final Positioning When th...

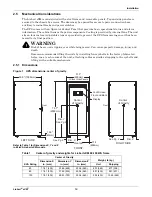
Page 18: ...e being moved Can cause property damage injury and death Emerson recommends lifting the units by installing four eyebolts in the factory fabricated holes one at each corner of the unit attaching cables or similar strapping to the eyebolts and lifting with a suitable mechanism Table 1 Center of gravity and weights for Liebert eXM 60 100kVA frame KVA Rating Center of Gravity Weight lb kg Dimension X...

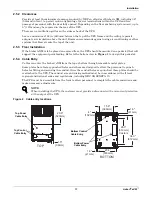
Page 19: ...nt point loading Refer to the bottom view in Figure 1 to design this pedestal 2 5 4 Cable Entry Cables can enter the Liebert eXM from the top or bottom through removable metal plates Some plates have factory punched holes and others are designed to allow the personnel to punch holes for fitting and securing the conduit Once the conduit holes are punched these plates should be reattached to the UPS...

Page 20: ...bypass for servicing the UPS with optional input transformer and output distribution Liebert bypass cabinets are designed to be bolted to the right side of the UPS see Figure 3 Refer to SL 25653 the Liebert eXM Bypass Distribution Cabinet manual for further details Paralleling Cabinets Optional Liebert eXM Paralleling Cabinets are available to provide connections enabling parallel operation of up ...

Page 21: ... eXM Battery Cabinet Battery Cabinet Liebert eXM Battery Cabinet Liebert eXM connected only to Liebert BDC MBC The Liebert BDC MBC must be on right side of the Liebert eXM Liebert eXM connected to Liebert BDC MBC and Battery Cabinets BDC MBC must be on right side of the Liebert eXM Battery Cabinets must be on the left side of the Liebert eXM ALL UNITS VIEWED FROM ABOVE Liebert eXM connected to Bat...

Page 22: ...24V rectifier overtemperature rectifier failure including battery SCR short circuit battery converter failure soft start failure main circuit back feed abnormal input current inverter failure output short circuit bypass SCR short circuit fault inverter relay short circuit fault abnormal bus voltage module not ready module ID out of range and duplicated module ID Flashing Red Charger failure abnorm...

Page 23: ...e battery cabinet and is available at Liebert s Web site www liebert com The power cables can be sized to suit the UPS unit rating according to Table 23 WARNING Risk of electric shock Can cause property damage injury and death Before connecting input power to the Liebert eXM ensure that you are aware of the location and operation of the overcurrent protection devices that connect the UPS input byp...

Page 24: ...tective devices should be installed for the rectifier input and bypass input in the incoming mains distribution panel A shunt trip coil of 120V must be installed in the bypass input breaker if the system does not include a Liebert Bypass Cabinet Earth Leakage RCD Devices Any residual current detector RCD installed upstream of the UPS input supply Must be sensitive to DC unidirectional pulses Class...

Page 25: ...rs then wire the main feed to the main busbars see Figure 9 Figure 6 Single UPS block diagram Dual input single source configuration without bypass cabinet NOTES 1 Install in accordance with national and local electrical codes 2 Input and bypass must share the same single source 3 A neutral is required from the system AC input source A full capacity neutral conductor is recommended Grounding condu...

Page 26: ... in separate conduits 5 Control wiring must be run in separate conduits 6 Optional 54 pole 400A distribution panel or two 225A subfeed breakers 7 Customer must supply shunt trip breaker with 120V coil If an optional Liebert BDC is not present the shunt trip must be installed to Bypass Breaker BIB Bypass Isolation Breaker MBB Maintenance Bypass Breaker MIB Maintenance Isolation Breaker External Ove...

Page 27: ...sformer Cabinet is the only approved method for supplying the eXM from two independent sources See SL 25655 for details Both feeds must be protected externally with properly sized protective devices Figure 8 Liebert eXM in a split bypass configuration The bypass distribution cabinet is available with a 480V 600V or 208V optional internal transformer Dual Transformer Cabinet Optional Bypass Distrib...

Page 28: ...ion 4 Refer to SL 25651 for guidelines and instructions when sizing battery cables 5 In most installations the load equipment is connected to a distribution network of individually protected busbars fed by the UPS output rather than connected directly to the UPS itself When this is the case the UPS output cables can be rated to suit the individual distribution network demands rather than being ful...

Page 29: ...Neutral Output A Output B Output C Ground Rectifier Input B Rectifier Input C Batt N Batt Batt Input Neutral 78 56 1994mm 23 6 600mm See Detail A FRONT VIEW Door Removed DETAIL A NOTES 1 Control wiring and power wiring must be run in separate conduits 3 Shown with seismic mounting bracket 4 All wiring must be in accordance with national and local electrical codes ...

Page 30: ... Figure 11 shows the back feed breaker wiring located on the bypass static switch assembly The Liebert eXM does not include internal back feed protection A shunt trip coil of 120V must be installed in the bypass input breaker if the system does not include a Liebert Bypass Cabinet This is a safety feature and will prevent the UPS inverter from back feeding the bypass source The BDSUi fuse block pr...

Page 31: ...er operation 2 A 120V shunt trip coil is required for proper operation Dual Input Control Wiring Upstream Bypass Input Breaker Upstream System Input Breaker Single Input Control Wiring Backfeed Breaker Fuse Block FH1 Backfeed Breaker Fuse Block FH1 Upstream Rectifier Input Breaker UAM04030 Rev 3 MX MX AUX AUX 1 C2 C2 C1 C1 1 3 3 N PH B 1 3 N PH B MX AUX 1 C2 C1 3 J24 J24 J23 J23 BFP_O J23 J25 J24 ...

Page 32: ...édures de mise à la terre peut entraîner des risques d électrocution du personnel ou des risques d incendie en cas de défectuosité de la mise à la terre Toutes les opérations décrites dans cette section ne doivent être effectuées que par des électriciens ou des techniciens professionnels dûment formés et qualifiés En cas de difficultés communiquez avec Emerson Network Power Pour obtenir les rensei...

Page 33: ... below Study the reference drawing in 4 0 Installation Drawings 1 Verify that all incoming high and low voltage power circuits are de energized and locked out or tagged out before installing cables or making any electrical connections 2 Remove the front I O panel to gain easier access to the connections busbars 3 Connect the facility ground and ancillary ground bus cables to the copper ground busb...

Page 34: ...r Remote Emergency Power Off REPO Terminations for these functions are located at the front of the static bypass assembly The main features are Input and output dry contacts signal one pair of contacts of relay Emergency Power Off control EPO Environmental parameter input interface User communication for data setting and user background monitor Liebert IntelliSlot interface Temperature detect inte...

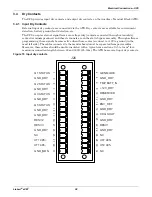
Page 35: ...C MAIN_O MAIN_S MAIN_C MFP_O MFP_S MFP_C RESV_O RESV_S RESV_C RESV_O RESV_S RESV_C 1 3 5 7 9 11 13 15 17 19 21 23 25 27 29 31 2 4 6 8 10 12 14 16 18 20 22 24 26 28 30 32 J26 Q1 STATUS GND_DRY Q2 STATUS GND_DRY Q3 STATUS GND_DRY Q5 STATUS GND_DRY GND_DRY RESV2 RESV3 GND_DRY UT1 485 GND_MON UT1 485 GEN MODE 12V_DRY GND_DRY GND_DRY TMP BATT IN _ RESERVED ENV_DET GND_DRY CHG SHUT GND_DRY RESV1 UT2 485...

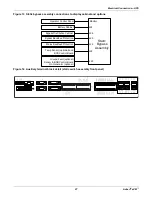
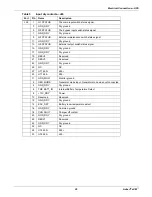
Page 36: ...e signals become active when these contacts connect to 12V to ground in the most left side The cables connected to the monitor board must be separated from power cables Moreover these cables should be double insulated with a typical cross section of 0 5 to 1mm2 for a maximum connection length between 82 and 165ft 25 50m The ATB has several input dry contacts Figure 15 Input dry contacts J26 2 4 6 ...

Page 37: ...nal 15 GND_DRY Dry ground 17 GND_DRY Dry ground 19 RESV2 Reserved 21 RESV3 Reserved 23 GND_DRY Dry ground 25 NC NC 27 UT1 485 485 29 UT1 485 485 31 GND_MON Monitor ground 2 GEN MODE Generator mode input Generator mode when not connected 4 GND_DRY Dry ground 6 TMP BATT_IN Internal Battery Temperature Detect 8 12V_DRY Power 10 Reserved Reserved 12 GND_DRY Dry ground 14 ENV_DET Battery room temperatu...

Page 38: ...state normally open contact Closed when the inverter is normal J23 1 BFP_O Bypass back feed normally open contact Open when there is no back feed 3 BFP_S Bypass back feed common contact 5 BFP_C Bypass back feed normally closed contact Closed when there is no back feed J24 2 MAIN_O Rectifier input state normally open contact Open when the rectifier is abnormal 4 MAIN_S Rectifier input state common ...

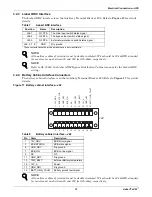
Page 39: ... NOTE All auxiliary cables of terminal must be double insulated Wire should be 20 16AWG stranded for maximum runs between 80 and 200 feet 25 60m respectively NOTE Refer to SL 25653 the Liebert eXM Bypass Distribution Cabinet manual for the Liebert BDC wiring Table 8 Battery cabinet interface J22 Pin Name Description 1 12V_DRV BCB driver signal 3 BCB STATUS BCB state signal 5 GND_DRY Dry ground 7 B...

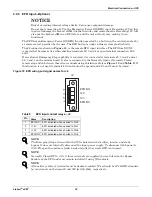
Page 40: ...It also is connected to the Normally Open or Normally Closed remote stop switch between these two terminals using shielded cable see Figure 18 and Table 9 If this function is not used terminals J2 3 and 4 must be opened and J2 1 and 2 must be closed Figure 18 EPO wiring and signal names for J2 Table 9 EPO input contact relays J2 Pin Name Description 1 EPO NC EPO activated when opened to Pin 2 2 12...

Page 41: ...s UPS 33 Liebert eXM Figure 19 Single UPS Remote Emergency Power Off Field Supplied Wiring Remote Emergency Power Off Customer Supplied Single Liebert eXM Module Liebert eXM Bypass Module 1 2 3 4 EPO_NC EPO_NO 12V 12V X9_J2 ...

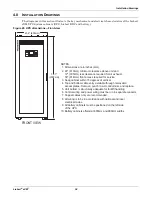
Page 42: ...front access required for service 3 Keep cabinet within 15 degrees of vertical 4 Top and bottom cable entry available through removable access plates Remove punch to suit conduit size and replace 5 Unit bottom is structurally adequate for forklift handling 6 Control wiring and power wiring must be run in separate conduits 7 Copper cables only are recommended 8 All wiring is to be in accordance wit...

Page 43: ... unit Replaceable Air Filter Replaceable Air Filter Operator Control Filter Power Modules Bypass Module Input mN Batt N FRONT Door Open RIGHT SIDE Door Open Side Panel Removed Ground Output oN Output oC Output oB Output oA Batt Batt Input mC Input bC Input mB Input bB Input mA Input bA ...

Page 44: ...utput Neutral Output A Output B Output C Ground Rectifier Input B Rectifier Input C Batt N Batt Batt Input Neutral 2 5 64mm 4 Places typical 1 9 48mm 6 Places typical 1 8 46mm 1 8 46mm 3 1 79mm 3 4 86mm 63 6 1615mm 78 56 1994mm 37 5 953mm 23 6 600mm See Detail A FRONT VIEW Door Removed RIGHT SIDE VIEW Panel Removed DETAIL A DETAIL B Busbar Dimensions ...

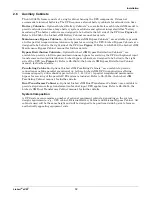
Page 45: ...HTTP Network Interface Card This network interface card provides all real time data and status information as SNMPv1 traps for connection to a 10 100 baseT Ethernet connection The same card also will transmit the same status information and all measured parameters for display via a Web browser The Liebert IntelliSlot bays are on the right side of the control module and labeled as IntelliSlot1 Inte...

Page 46: ...ll communication protocols are active simultaneously Liebert IntelliSlot Dry Contact Card IS RELAY Provides dry contact alarm information including On Battery On Bypass Low Battery Summary Alarm UPS Fault and On UPS signals for communication to a remote monitoring system or for use with Liebert MultiLink software IS 485EXI The Liebert IntelliSlot 485 EXI Card provides connection to a Liebert SiteL...

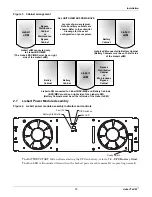
Page 47: ...2 black 10 18 as shown in Figure 24 Figure 24 Pin location and numbering Refer to your Liebert product user manual for the pin configuration for the terminal blocks Table 11 Relay card pin configuration Pin Function Operation 1 Common Low Battery 2 Low Battery Closed if Low Battery point occurs 3 Low Battery Closed if battery is OK 4 Common UPS Fault 5 UPS Fault Closed if UPS fault occurs 6 UPS Fa...

Page 48: ...be tied together The jumpers should be removed if there is any external voltage source that may intentionally or inadvertently be connected to the relay Removing the shunt from any two pins breaks the connection between the relay commons so they are not tied together Table 12 Jumper connections Jumper Relay P6 On Battery P5 UPS Fault P4 Low Battery P3 On Bypass P7 Summary Alarm NOTE Refer to the L...

Page 49: ...buttons turn the Liebert eXM On or Off silence alarms Figure 26 Overview of control panel Table 13 Descriptions of UPS operator control and display panel Mimic Current Path Control Buttons Item Function Button Function 1 Rectifier indicator AC to DC EPO EPO switch 2 Battery indicator backup DC power INVERTER ON Inverter start button 3 Bypass input indicator INVERTER OFF Inverter shutdown button 4 ...

Page 50: ...shing Green Battery pre warning low battery Battery or battery converter abnormal Battery and converter are normal and battery is not discharging 3 Bypass Load on Bypass Power Bypass out of normal range Bypass Normal 4 Inverter Inverter Powering the Load Normally Flashing Green Inverter on standby Inverter fault Inverter normal but Off 5 Load UPS output On UPS output overloaded UPS has no output p...

Page 51: ...e critical load INVERTER ON Press this button to start the inverter and transfer from static bypass to inverter NOTE If the inverter is not ready this will not activate the UPS INVERTER OFF Press this button to shut down the inverter during operation The load will be transferred to static bypass FAULT CLEAR After the UPS shuts down due to a fault and the alarm condition has been resolved press thi...

Page 52: ...se sections UPS system information view UPS name and model date and time overall status LCD Menu choose a category of data items to appear below the menus see Table 17 Data and settings view data items for the selected menu see Table 17 Current status messages check the most recent UPS event and alarm messages see Table 38 in Appendix B UPS Status Messages Navigation key icons look at the icon abo...

Page 53: ...icons displayed above the keys Use F3 and F4 on the display simultaneously to view individual Module information such as Input and Output conditions and individual Module Firmware versions Use F2 as an ESC key Use HELP to access help information on the LCD or to enter a choice Table 16 Icons for navigation keys Key F1 F2 F3 F4 HELP Functions Available Home Exit Left Right Enter Up Down Help F1 F2 ...

Page 54: ...ty and messages when the battery is boost float charging or disconnected Events View the events log displays all recent events added to the log new records added at end Records Access the history log displays all records in the log new records added at end Language Select a language for LCD text choices appear in the native language Settings Configure UPS settings adjust the display contrast choos...

Page 55: ...kVAR Records history log Language Choices for display Mains input L N voltage V L N current A Frequency Hz L L voltage V Power factor Load Sout kVA Pout kW Qout kVAR Load level Crest factor Bypass L N voltage V Frequency Hz L L voltage V Output L N voltage V L N current A Frequency Hz L L voltage V Power factor Settings Display contrast Date format set Date time Comm1 baud rate Comm2 baud rate Com...

Page 56: ...ng F2 ESC and F1 All text on the LCD will now be displayed in the selected language Figure 32 Language selection screen 6 9 Current Date and Time To change the system date and time 1 From the main menu press the F4 shift key to move the cursor to the Settings menu at the bottom of the screen 2 Press HELP to select the Settings menu 3 Use F3 and F4 up and down to select the Date Time option then pr...

Page 57: ...by accessing the Records menu Figure 34 History log records See Table 38 in Appendix B UPS Status Messages for a complete list of status messages along with a description and any recommended actions F1 F2 F3 F4 HELP Single eXM 02 17 47 Display contrast Date format set Y M D D M Y M D Y Y M D Date time 2010 07 15 02 17 45 Settings F1 F2 F3 F4 HELP Single eXM 02 17 47 1 Mains volt abnormal 2010 06 0...

Page 58: ...efault Screen After the UPS has powered up and completed a self test the output screen appears as shown in Figure 36 This window is the default screen Figure 36 Default screen F1 F2 F3 F4 HELP Single eXM 02 17 47 EMERSON Network Power Press any key back to main menu F1 F2 F3 F4 HELP Single eXM 02 17 47 L1 N L2 L2 N L3 L3 N L1 L N voltage V 118 4 L N current A 0 0 Frequency Hz 59 97 L L voltage V 2...

Page 59: ...ransfer to inverter after an interruption of about 15ms when the user presses the INVERTER ON button Before transferring the system will let the user confirm whether the interruption can be accepted as shown at right If the bypass voltage returns to normal before the user makes confirmation the UPS will transfer to inverter mode automatically At the same time the prompt window will close 6 12 2 Fr...

Page 60: ...le the Battery Equalize feature Press the Help Enter key and the pop up window closes 6 12 7 Battery Reset The user can reset the battery statistics to a new battery state Use the F3 or F4 button to select Battery Reset Press the Help Enter key and the pop up window closes 6 12 8 Battery Refresh Charge Aborted Condition Not Met When a battery refreshening charge is started from the Command menu an...

Page 61: ...vel The percent of the UPS rating load Crest factor Output current Crest Factor System Sout kVA Sout Apparent power Pout kW Pout Active power Qout kVAR Qout Reactive power Single unit When configured as a single unit UPS displays only native load no system load Battery Battery voltage V Battery bus voltage Battery current A Battery bus current Battery temperature C Internal battery temperature C R...

Page 62: ...password Protocol System protocol ECO Mode Configures UPS for ECO mode Battery Equalize Charge Configures UPS for equalize charge Command Start Stop Battery System Tests Battery maintenance test This test performs a partial discharge of the battery to obtain a rough estimate of the battery capacity Load must be between 20 and 80 Battery capacity test This test performs a full discharge of the batt...

Page 63: ...ircuits that are energized with high DC as well as AC voltages Check for voltage with both AC and DC voltmeters before working within the UPS Check for voltage with both AC and DC voltmeters before making contact Only properly trained and qualified personnel wearing appropriate safety headgear gloves shoes and glasses should be involved in installing the UPS or preparing the UPS for installation W...

Page 64: ... occurs inverter fails inverter overload capacity is exceeded inverter is manually turned off by user ECO Mode When ECO Mode is enabled the Liebert eXM switches inverter power from the UPS input to the bypass input to save energy by improving UPS efficiency In this mode the bypass is the preferred source If the bypass voltage or frequency becomes outside preset limits the UPS load is transferred b...

Page 65: ...external power isolators must be closed Once those general conditions are met the UPS may be started AVERTISSEMENT Risque d arc ou de décharge électrique pouvant entraîner des dommages matériels des blessures et même la mort L entrée et la sortie du système ASC doivent être protégées par des dispositifs de protection de surintensité externes En mode d entretien les barres omnibus d entrée et de so...

Page 66: ...R ON button for 2 seconds The inverter indicator flashes while the inverter is starting After the inverter is ready the UPS transfers from bypass to inverter the bypass indicator turns Off and the inverter indicator turns On The UPS is in Normal Mode The mimic LEDs will appear as shown below 9 Close the battery breaker Table 18 Mimic indicators after initialization LED Status Rectifier Indicator G...

Page 67: ...ER ON button After the inverter enters normal operation the UPS transfers to Normal Mode 7 3 UPS Battery Start The Battery Start option permits starting the Liebert eXM with power supplied only by the batteries at charged condition NOTICE Risk of loss of power to the connected load Can cause equipment damage Before attempting to start the UPS without utility power present ensure that the batteries...

Page 68: ...sert the Key into the lock on the MBB and turn the Key 5 Close the MBB 6 Verify the MBB is closed Failure to close the MBB will interrupt power to the load 7 Open the MIB 8 Remove the key from the lock on the MIB Insert the key into the lock K0 and turn the key 9 The UPS system is now isolated from the critical load 10 For a single input system with three breaker bypass distribution cabinet and pa...

Page 69: ... tension L entretien ne doit être confié qu à un personnel qualifié et dûment formé Notes 1 Install in accordance with national and local electrical codes 2 Input and bypass must share the same single source 3 UPS system input and output cables must be run in separate conduits 4 Control wiring must be run in separate conduits 5 Optional 54 pole 400A distribution panel or two 225A subfeed breakers ...

Page 70: ...dicator turns Off and the inverter indicator turns On The UPS is in Normal Mode The indicator will appear as shown in Table 20 WARNING Risk of electrical shock and arc flash Can cause property damage injury and death This procedure must be performed by properly trained and qualified personnel who are knowledgeable about the operation of this system Failure to follow these instructions will result ...

Page 71: ...reaker MIB If the MBC is a customer issued switchgear or a non Emerson cabinet open the breaker s that supply power to the critical bus 4 Open the Rectifier Input Circuit Breaker and Bypass Input Breaker if dual input If the MBC is a customer issued switchgear or a non Emerson cabinet open the breaker s that supply power to the UPS input and bypass input if dual input 5 Allow 5 minutes for all DC ...

Page 72: ... circuit has been designed to switch Off the UPS in emergency conditions e g fire flood etc The system will turn Off the rectifier inverter and stop powering the load immediately including the inverter and bypass and the battery stops charging or discharging If the input utility is present the UPS s controls will remain active however the output will be turned Off To remove all power from the UPS ...

Page 73: ... restored the EPO condition will clear and the UPS will enable the static bypass and restore the output 7 11 Battery Protection 7 11 1 Battery Undervoltage Warning Before the end of discharge the Liebert eXM displays a low battery warning After this warning the battery has the capacity for 5 minutes discharging with full load default time The Liebert eXM can be user configured to display this warn...

Page 74: ...000 4 2 Criteria B FCC Part 15 Class A Radiated Immunity IEC 61000 4 3 Criteria A Conducted Immunity IEC 61000 4 6 Criteria A Low Frequency Signals IEC 61000 2 2 Criteria A Transportation ISTA Procedure 1H ISO 9001 Misc OSHA ASME NEMA PE 1 Table 21 Environmental requirements Item Requirements Acoustical Noise dBA at 55 in 1 4m 59 Operating Altitude 3281 ft 1000m 1 maximum kW derate per 328 ft 100m...

Page 75: ...00 M12 400 2 3 0 2 4 0 80 237 273 350 M12 460 2 4 0 2 300 kcmil 100 297 341 450 M12 610 2 350 2 400 kcmil Table 25 UPS currents and terminals Bypass input for dual input units 208V operation Unit Rating Nominal Input Current OCP Device Rating Bolt Size 75 C Wire Current total Copper Wire Aluminum Wire 60 167 225 M12 285 1 300 2 2 0 80 222 300 M12 400 2 3 0 2 4 0 100 278 350 M12 460 2 4 0 2 300 kcm...

Page 76: ...Derated operation for reduced input voltage 208V Operation 125 177VAC 220V Operation 132 187VAC Table 29 Recommended lug sizes compression type M12 1 2 bolt Cable Size T B Copper Two Hole T B Aluminum Two Hole 6AWG 256 030695 868 4AWG 256 030695 733 2 3AWG 54811BE 1AWG 54857BE 1 0AWG 256 30695 593 2 0AWG 54862BE 60238 3 0AWG 54864BE 60244 4 0AWG 54866BE 60250 250kcmil 54868BE 60256 300kcmil 54870B...

Page 77: ...n 0 1 single Liebert Power Module Assembly 0 25 five Liebert Power Module Assemblies Voltage Adjustment Range 5 Factory set to 60Hz 50Hz selectable by commissioning engineer Frequency converter operation is also selectable Table 32 Bypass input Parameter 60 100 kVA Rated AC Voltage 208 120V or 220 127V 50 60Hz 3 Phase 4 Wire Plus Ground Rated Current 208V 167 222 278 220V 157 210 262 Overload 110 ...

Page 78: ...ized by Emerson Maintain the UPS cabinets free of foreign materials such as solder wire cuttings etc Call Liebert Services if you are not sure of the procedures to follow or if you are not familiar with the design or operation of the equipment AVERTISSEMENT Risque d arc ou de décharge électrique pouvant entraîner des dommages matériels des blessures et même la mort L entretien et la réparation de ...

Page 79: ...traîner des dommages matériels des blessures et même la mort Les opérations d entretien requièrent une extrême prudence Soyez toujours conscient du fait que le système ASC contient des tensions c c et c a élevées Une fois l alimentation d entrée et du boîtier facultatif de batteries coupées la haute tension aux condensateurs de filtrage et aux circuits d alimentation devrait se dissiper en moins d...

Page 80: ...tervals to customers to avoid unanticipated interruptions in critical load operations 9 3 Routine Maintenance Become thoroughly familiar with the equipment but at no time go beyond the specific procedures in this manual while performing maintenance or correcting a malfunction If you have any doubt as to what must be done call Emerson Network Power Liebert Services at 1 800 LIEBERT for further inst...

Page 81: ...n new buildings more often then extend the inspection period as experience dictates Replacing Air Filters Installing the two air filter sizes in a Liebert eXM requires only a Phillips screwdriver Each filter is held in place by a bracket on either side of each filter Two sets of washable and reusable dust filters are shipped with each UPS Refer to 9 3 2 Air Filters for details about filter mainten...

Page 82: ... phase should be within 10 of the average input current Alarm messages indicate malfunction or impending malfunction A daily check of the Operator Control Panel will help to provide an early detection of problems Refer to Appendix B UPS Status Messages to interpret alarm messages 4 Tracing a problem to a particular section is facilitated by alarm messages and the metered parameter indications Thes...

Page 83: ...ycle Calibration data for the instruments should be maintained in equipment history files and the instruments labeled for audit and verification Table 36 Recommended test equipment and tools Qty Test Equipment Manufacturer Model or Type 1 Oscilloscope Tektronix H P or Fluke DC to 50 MHz 2 Voltage Probes Tektronix H P or Fluke 10X with 10 ft Cable 2 Voltage Probes Tektronix H P or Fluke 100X with 1...

Page 84: ...rent technical level the following parts still contain hazardous substances due to the lack of reliable substitute or mature solution 1 All solders in the products contain lead 2 Copper alloy contains lead 3 Backlight bulb contains mercury 4 The ceramic materials of the ceramic capacitor the copper terminals and copper leads of metallic film capacity contain lead 5 The glass of resistor contains l...

Page 85: ...itude of rectifier Mains Freq Abnormal Mains frequency is out of limit range and results in rectifier shutdown Check the rectifier s input voltage frequency Rectifier Fault Rectifier Fault Contact Liebert Services at 800 543 2378 for assistance Rectifier Overtemp The temperature of heat sink is too high to keep the rectifier running The UPS can recover automatically Check the environment and venti...

Page 86: ...locked until power off Contact Liebert Services at 800 543 2378 for assistance Output Fuse Fail At least one of the output fuses is open Contact Liebert Services at 800 543 2378 for assistance Control Power 2 Fail Control Power 2 is abnormal or lost Contact Liebert Services at 800 543 2378 for assistance Unit Overload The UPS is confirmed to be overload when the load arises above 105 nominal ratin...

Page 87: ...ere shutdown because DC bus voltage is too high Check whether there is a fault in rectifier side If no then check whether overload occurs Restart the inverter after resetting the fault If fault does not clear contact Liebert Services at 800 543 2378 for assistance LBS Active The LBS setting is active The UPS is acting as an LBS master or slave in a dual bus configuration Battery ground fault Batte...

Page 88: ...ult Battery converter output voltage beyond limits or battery fuse failed Battery converter shuts down Battery backup not available Operation Invalid This record is registered following an incorrect operation Byp Abnormal Shutdown Both bypass and inverter voltages unavailable Load interruption Mains Neutral Lost AC Input mains reference neutral not detected Battery Room Alarm Environment in batter...

Page 89: ...Maintenance 81 Liebert eXM NOTES ...

Page 90: ...Maintenance Liebert eXM 82 ...

Page 91: ......

Page 92: ...ert com Monitoring liebert monitoring emerson com 800 222 5877 Outside North America 00800 1155 4499 Single Phase UPS Server Cabinets liebert upstech emerson com 800 222 5877 Outside North America 00800 1155 4499 Three Phase UPS Power Systems 800 543 2378 Outside North America 614 841 6598 Environmental Systems 800 543 2778 Outside the United States 614 888 0246 Locations United States 1050 Dearbo...

Reviews: