background image

UPS Specifications

38

6.0

UPS S

PECIFICATIONS

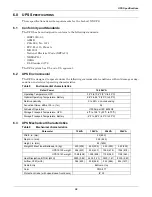
These specifications describe requirements for the Liebert NX UPS.

6.1

Conformity and Standards

The UPS has been designed to conform to the following standards:

• IEEC1000-4-5
• ASME
• CSA 22.2, No. 107.1
• FCC Part 15, Class A
• ISO 9001
• National Electrical Code (NFPA-70)
• NEMA PE-1
• OSHA
• UL Standard 1778

The UPS system has UL and c-UL approval. 

6.2

UPS Environmental 

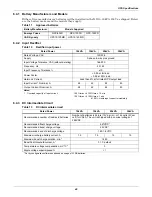
The UPS is designed to operate under the following environmental conditions without damage or deg-

radation in electrical operating characteristics:

6.3

UPS Mechanical Characteristics

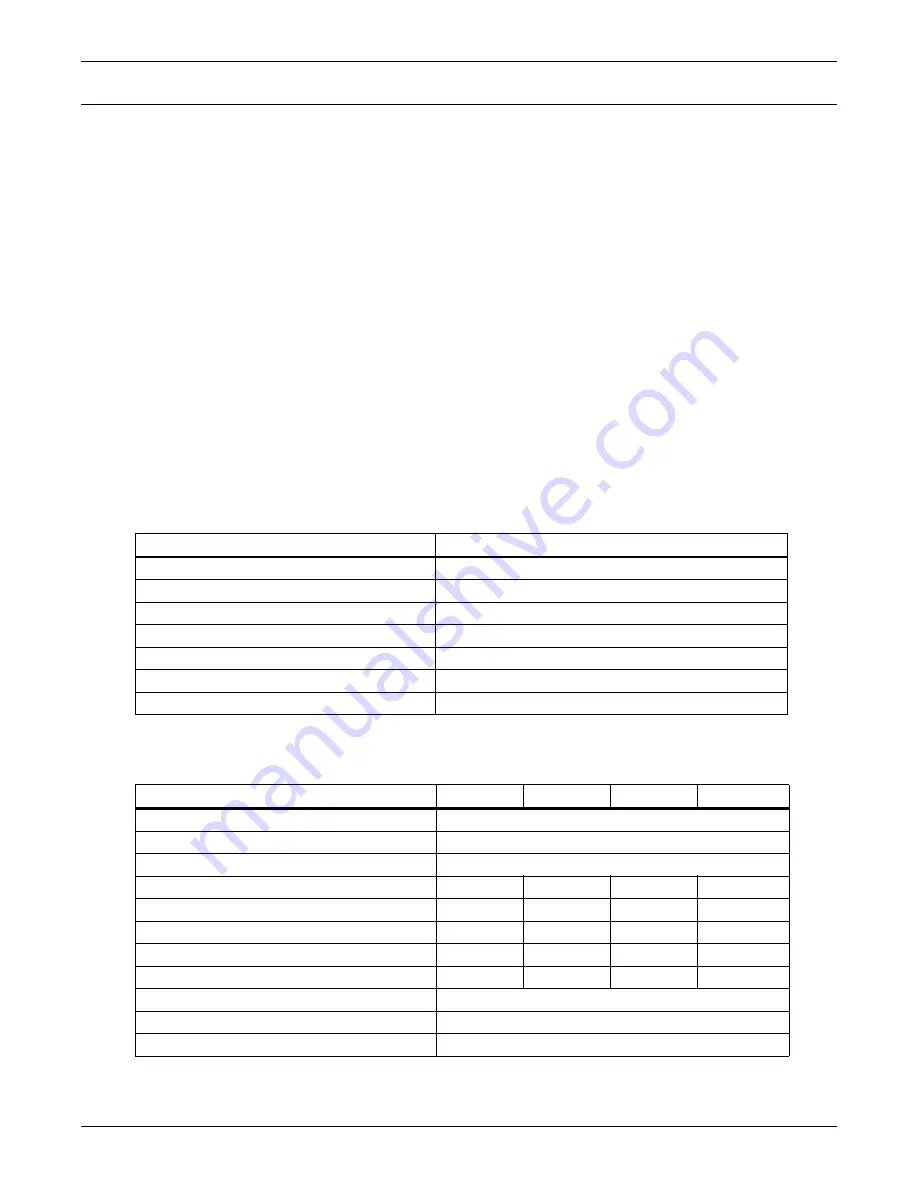
Table 8

Environmental characteristics

Rated Power

10-30kVA

Operating Temperature, UPS

32°F to 104°F (0°C to 40°C)

Optimal Operating Temperature, Battery

68°F to 86°F (20°C to 30°C)

Relative Humidity

0 to 95%, non-condensing

Acoustical Noise, dBA at 39 in. (1m)

54

Altitude of Operation

1000m per IEC 62040/3

Storage-Transport Temperature, UPS

-4°F to 158°F (-20°C to 70°C)

Storage-Transport Temperature, Battery

-4°F to 86°F (-20°C to 30°C)

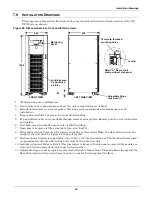
Table 9

Mechanical characteristics

Parameter

10kVA

15kVA

20kVA

30kVA

Width, in. (mm)

24 (600)

Depth, in. (mm)

32.5 (825)

Height, in. (mm)

63 (1600)

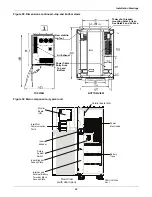
Weight Without Inner Batteries, lb. (kg)

450 (205)

450 (205)

550 (250)

550 (250)

UPS12-100 weight

954 (433)

954 (433)

1054 (478)

1054 (478)

UPS12-140 weight

1098 (498)

1098 (498)

1198 (543)

1198 (543)

Heat Dissipation, BTU/H (kWH)

2800 (0.82)

4200 (1.23)

5500 (1.61)

8300 (2.43)

Airflow, CFM (m

3

/h)

384 (652)

558 (948)

522 (886)

834 (1417)

Cable Entry

Bottom or top

Color

PMS 877

Protection Grade (with open/closed front doors)

IP 20

Summary of Contents for Liebert NX

Page 1: ...AC Power For Business Critical Continuity Liebert NX UPS Installation Manual 10 30kVA 208V 60Hz ...

Page 2: ......

Page 3: ...6 1 Clearances 7 1 6 2 Floor Installation 7 1 6 3 Cable Entry 7 1 6 4 Optional Cabinets 8 2 0 ELECTRICAL CONNECTIONS 9 2 1 Power Cabling 9 2 1 1 Cable Rating 9 2 1 2 UPS Input Configuration 10 2 1 3 Cabling Guidelines 10 2 1 4 Cable Connections 11 2 1 5 Safety Ground 12 2 1 6 Protective Devices 12 2 1 7 Cabling Procedure 13 2 2 Control Cables 14 2 2 1 Monitor Board Features 14 2 3 Dry Contacts 15 ...

Page 4: ... Requirements 30 5 1 2 DBS Cable and Settings 30 5 2 Configuring Parallel System Operation 31 5 2 1 General 31 5 2 2 Features of Parallel System 31 5 2 3 Operating Principles 32 5 2 4 Operation Modes Summary 32 5 3 Installing Parallel System 32 5 3 1 Conditions for Parallel System 32 5 3 2 Cabinet Installation 32 5 3 3 Preliminary Checks 32 5 3 4 Protective Devices 32 5 3 5 Power Cables 33 5 3 6 P...

Page 5: ...nel 27 Figure 20 Maintenance bypass control wire location 28 Figure 21 Load Bus Synchronization cable connection 30 Figure 22 1 N system block diagram 31 Figure 23 Connecting 1 N system parallel control cables 33 Figure 24 Auxiliary dry contact cables for output breaker in multi module system 34 Figure 25 Dry contacts multiple UPS modules with distribution panel 34 Figure 26 Connecting EPO push bu...

Page 6: ... NX 50 Table 20 Interconnect wiring 1 N Type A connection to NX 51 Table 21 Interconnect wiring 1 N Type A1 connection to NX 52 Table 22 Interconnect wiring 1 N Type B connection to NX 53 Table 23 Interconnect wiring 1 N Type B1 connection to NX 54 Table 24 Interconnect wiring 1 N Type C connection to NX 55 Table 25 Interconnect wiring 1 N Type C1 connection to NX 56 Table 26 Interconnect wiring 1...

Page 7: ...plosive and sulfuric acid can cause severe burns When connected the nominal battery voltage is 288VDC and is potentially lethal In case of fire involving electrical equipment use only carbon dioxide fire extinguishers or those approved for use in fighting electrical fires Extreme caution is required when performing maintenance Be constantly aware that the UPS system contains high DC as well as AC ...

Page 8: ...Always check with an AC and DC voltmeter to ensure safety before making contact or using tools Even when the power is turned Off dangerously high electric charges may exist within the UPS All power and control wiring should be installed by a qualified electrician All power and control wiring must comply with the NEC and applicable local codes ONLY qualified service personnel should perform mainten...

Page 9: ...s caution followed by important instructions AC input AC output Requests the user to consult the manual Indicates the unit contains a valve regulated lead acid battery Recycle DC voltage Equipment grounding conductor Bonded to ground AC voltage i PbH2SO4 R ...

Page 10: ...xamine the UPS and battery equipment for transit damage both internally and externally Report any such damage to the shipper and to Liebert immediately 2 Check the nameplate inside the cabinet door to verify that the model number and rating correspond to the ones specified Record the model number and serial number in the front of this installation manual This information is necessary should servic...

Page 11: ...fied operating range 32 F to 104 F 0 C to 40 C For optimal UPS and battery system performance and service life maintain the operating tempera ture within the range of 74 80 F 23 27 C The NX UPS cooled by internal fans Cooling air enters the unit through the front of the unit and is exhausted out the top To permit proper air flow and prevent overheating do NOT block or cover the ventilation opening...

Page 12: ...els are secured to the chassis by screws The doors may be opened for access to power connections bars auxiliary termi nals blocks and power switches The UPS comes with an operator control panel which provides basic operational status and alarm information The cabinet houses both the power components and the internal batteries Cooling is provided by internal fans The unit sits on four casters Adjus...

Page 13: ...e UPS Connecting cables to the NX may require that the UPS be accessible from the left side to allow per sonnel to complete the connections and make necessary adjustments After installation is complete the NX may be serviced from the front 10 30kVA UPS The 10 30kVA NX consists of a single cabinet housing the UPS components and the internal battery string Optional battery cabinets are available to ...

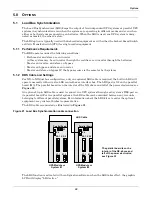
Page 14: ...ttery cabinets may be bolted to either side of the NX unless used in configurations that include a Maintenance Bypass Cabinet If used with a Maintenance Bypass Cabinet battery cabinets must be installed on the right side of the UPS see Figure 1 below Figure 1 Cabinet arrangement NX connected only to MBC MBC must be on left side of the NX NX connected to Maintenance Bypass Cabinet and Battery Cabin...

Page 15: ...ed for the nominal output current given in Table 10 with respect to the unit rating and the output AC voltage Battery cables Each UPS unit has its own internal batteries factory wired If connecting an external battery cabinet the battery cables must be sized for the battery discharge current at the end of discharge voltage as given in Table 10 with respect to the unit rating The power cables can b...

Page 16: ...ust follow the most direct route possible Control wiring and power wiring must be run in separate conduit Output and input cables must be run in separate conduit 3 Consider using paralleled smaller cables for heavy currents this can ease installation 4 When sizing battery cables a maximum voltage drop of 4VDC is permissible at the current ratings in Table 10 For terminal connection sizing see Tabl...

Page 17: ...y compartment The batteries are connected to fuses to protect the NX and connected equipment see Figure 4 Figure 4 Battery fuses and connections NOTE External battery connection access requires removal of a protective panel on the lower front of the UPS to the left of the bottom two battery shelves C B OUTPUT BYPASS A C B A Rectifier Input Busbars Phases are indicated by letters below the bars Out...

Page 18: ...Table 12 for overload capacity High speed fuses and SCRs are used for internal battery circuit overcurrent protection When an external battery supply is used overcurrent protection for the battery circuit is to be provided by the customer Dual Input When wiring the UPS with dual inputs the Rectifier input and the Bypass input must be pro tected separately Size the breakers according to the input c...

Page 19: ...onnect the AC input supply cables between the power distribution panel and the UPS input busbars A B C terminals and tighten the connections to 44 lb in 5 N m using the M6 bolt provided 8 For Rectifier Input connect AC input supply cables between the power distribution panel and the UPS input circuit breaker A B C terminals 9 The bypass and rectifier input neutral cables must be connected to the i...

Page 20: ...ternal devices or for Remote Emergency Power Off REPO The monitor board arranged for this purpose is located on the rear of the operator access door The main features are Input and Output dry contacts signal one pair of contacts of relay Emergency Power Off control EPO Environmental parameter input interface User communication for data setting and user background monitor Intellislot interface Mode...

Page 21: ... C J4 3 GEN1 2 Generator Join Detection N O J4 4 12V 12V Power 1 Must be configured by configuration software before becoming active 2 When activated the charger current can be limited via software to a percentage of the full charger current 0 100 3 Activating this feature turns the battery charger off NOTE The black square on each slot indicates Pin 1 J3 J1 J13 J21 J25 J28 J4 J26 J30 J10 J22 J23 ...

Page 22: ...ftware before becoming active NOTE All auxiliary cables of terminal must be double insulated Wire should be 20 16AWG stranded for maximum runs between 82 and 164 feet 25 50m respectively Table 3 BCB box interface Position Name Description J10 1 DRV BCB Driver Signal Reserved J10 2 FB BCB Contact State J10 3 GND Power Ground J10 4 OL BCB On Line Input This pin will become active when BCB interface ...

Page 23: ... bypass SCR is shorted J13 3 BFP_S Bypass feedback protection relay center J13 4 BFP_C Bypass feedback protection relay Normally closed Open when bypass SCR is shorted J21 2 INV_O Inverter mode relay Normally open Closed when UPS is in inverter mode J21 3 INV_S Inverter mode relay center J21 4 INV_C Inverter mode relay Normally closed Open when UPS is in inverter mode J25 2 ACF_O Main input fault ...

Page 24: ...erminals X2 3 and 4 must be opened and X2 1 and 2 must be closed Figure 11 EPO wiring for firmware M200 or later Table 6 EPO input contact relays Position Name Description J28 1 EPO_NC EPO Activated when opened to J28 2 J28 2 EPO_NC EPO Activated when opened to J28 1 J28 3 EPO_NO EPO Activated when shorted to J28 4 J28 4 EPO_NO EPO Activated when shorted to J28 3 NOTE The Emergency Stop action wit...

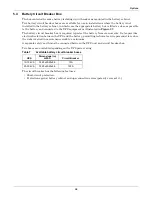
Page 25: ...e NX is connected to input power and turned On NOTE The NX as shipped has 24 12 volt batteries installed internally in each unit WARNING The NX s internal batteries are connected and energized even if the UPS is turned Off To minimize the risk of injury a qualified service person should disconnect internal batteries before any maintenance is performed on the unit The center of the battery is conne...

Page 26: ...ustrate the broad principles to be followed when fitting and connecting the majority of battery cabinet installations When installing an external battery cabinet that is NOT a Liebert NX battery cabinet the customer must provide overcurrent protection See Table 10 for sizing of protection devices 3 4 2 Connecting the Batteries If the NX battery cabinets are installed on a raised floor the battery ...

Page 27: ...rrow battery cabinet 27 in 690mm rear view Figure 14 Wide battery cabinet 57 in 1488mm front view BCB plate and BCB Battery trays Top cable entry Batteries Battery tray Top cable entry BCB plate and BCB Service shelf Battery tray support ...

Page 28: ...t be installed with no less than 3 feet 1m of clearance at the front of the cabinet when operating Side and rear panels do not require service clear ance Cables Cables may be run between the cabinets through cutouts in the top of the cabinet eliminat ing the need for external conduit runs Route cables before moving cabinets into final position for bolt ing together No top or bottom entry cables ar...

Page 29: ...ower cables run across top of Liebert NX Power cables black enter channel down side of NX to power input connections RIGHT SIDE CABLE ENTRY SHOWN CUTOUTS ON LEFT SIDE PERMIT CONNECTION FROM THAT SIDE Slot in support secured by screw in connector at corner of battery tray and notched end of support slips into slot at top corner of battery compartment Battery tray supports attach to interior surface...

Page 30: ...battery cabinet BCB N as shown in Figure 34 Be sure that the battery connections are made with the right polarity and tighten the connections to 44 lb in 5 N m M6 Bolt Do not close the battery circuit breaker before the equipment has been commissioned 7 Connect supplied auxiliary control cable to pins J10 2 and J10 3 on the U2 monitoring board see 2 3 Dry Contacts Add a jumper wire between J10 3 a...

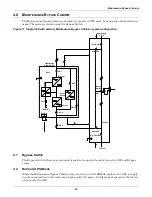
Page 31: ...y and rapid transfer of connected loads between the UPS and Bypass source 4 2 Normal UPS Mode While the Maintenance Bypass Cabinet rotary switch is in the NORMAL position the UPS is supply ing the connected load with continuous high quality AC power In this mode of operation the load is protected by the UPS Qin UPS Battery1 Fuse Charger UPS 1 CB 1 Rectifier Static Switch Inverter SW1 C SW1 D SW1 A...

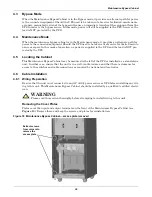
Page 32: ...o tected by the UPS 4 5 Locating the Cabinet This Maintenance Bypass Cabinet may be mounted to the left of the UPS or installed as a stand alone unit In either case ensure that the unit is in a well ventilated area and that there is clearance for access to the switches and cable connections as required by national and local codes 4 6 Cable Installation 4 6 1 Wiring Preparation Be sure that the uni...

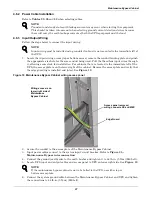
Page 33: ...em input circuit breaker Refer to Figure 35 Maintenance Bypass interconnection 4 Connect the ground earth wire to the earth busbar and tighten it to 44 lb in 5 N m M6 bolt 5 Locate UPS input and output cables and access panel to UPS on lower right side See Figure 19 6 Connect the system ground cable between the Maintenance Bypass Cabinet and UPS and tighten the connections to 44 lb in 5 N m M6 bol...

Page 34: ...rminals and UPS output busbars A B C N terminals and tighten the connections to 44 lb in 5 N m M6 bolt 9 Connect supplied control wire to X3 on the Parallel M3 board see Figure 20 Figure 20 Maintenance bypass control wire location WARNING The control wire must be installed to ensure proper operation of the system and fully protect the load when switching between bypass cabinet and UPS NOTE For sta...

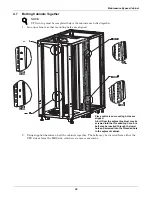
Page 35: ...inserted from either the UPS side or from the MBS side whichever is more convenient NOTE UPS wiring must be completed before the cabinets are bolted together Place cabinets so mounting holes are aligned A bolt from the adjacent cabinet may be screwed into the threaded top hole or a bolt may be inserted through the lower hole and screwed into the threaded hole in the adjacent cabinet ...

Page 36: ...ings For NX to NX dual bus configuration only one optional LBS cable is required the built in LBS will operate normally without extra LBS control box or interface box The LBS port is X4 on the parallel board M3 The parallel board is on the interior of the NX above and left of the power electronics see Figure 30 An optional 9 pin LBS cable is used to connect two UPS systems through each system s DB...

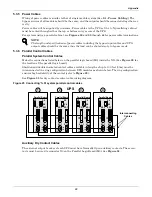
Page 37: ... the settings in configuration software It is easy to install the parallel cables in a ring providing high reliability and redundancy And the intelligent paralleling logic provides the user with maximum flexibility For example shut ting down or starting up the UPS modules in the parallel system can be done in any sequence If an overload transfer occurs the whole system can recover automatically fr...

Page 38: ...aintenance bypass mode is the same as for transferring a single module system The maintenance bypass switches should be switched on as synchronously as pos sible Thus the system can be repaired without interrupting the power supply to critical load 5 3 Installing Parallel System The basic installation procedure of parallel system is the same as that of single module system The following sections i...

Page 39: ...le in lengths of up to 100 feet 30m must be interconnected in a ring configuration between UPS modules as shown below The ring configuration ensures high reliability of the control refer to Figure 23 See Figure 25 for dry contacts control cable wiring diagram Figure 23 Connecting 1 N system parallel control cables Auxiliary Dry Contact Cables The external output breaker of each UPS must have Norma...

Page 40: ...e auxiliary control wire must be installed to ensure proper operation of the system NOTE For startup procedure see the UPS operations and maintenance manual SL 25210 485 P2 X2 2 485 DBS X3 P1 X2 1 X T M A I N T Input Distribution UPS 1 M3 Board X3 Ext Maint Ext Out UPS 2 M3 Board X3 Ext Maint Ext Out UPS N M3 Board X3 Ext Maint Ext Out To Load QUPS QByp Q1Ext Q2Ext QnExt ...

Page 41: ...described for the single unit installation that an individual emergency stop button is provided for each unit Figure 26 Connecting EPO push button UPS2 UPS1 Monitor Board Monitor Board X2 1 X2 2 X2 1 X2 2 Normally Closed EPO UPS1 X2 3 X2 4 Monitor Board UPS2 X2 3 X2 4 Monitor Board Normally Open EPO ...

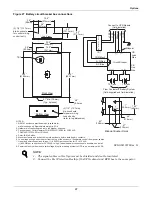
Page 42: ...red to protect the battery from overcurrents It also provides electrical isolation between the UPS and the battery permitting technical service personnel to reduce the risks involved in maintenance work to a minimum A separate safety earth must be connected between the UPS unit and circuit breaker box Two boxes are available depending on the UPS power rating The circuit breaker has the following f...

Page 43: ...conduit entry refer to top dimension NOTES 1 NEMA 1 enclosure provided which is suitable for wall mounting only Approximate weight is 60 lb 2 Hardware for connecting cables to the breaker supplied 3 Circuit breaker Cutler Hammer FD4125ED13D15A02 for 20 30 kVA FD4070ED13D15A02 for 10 15 kVA 4 Color IBM off white 5 Mount enclosure and pull all cables into enclosure before installing dry contacts 6 L...

Page 44: ...ature UPS 32 F to 104 F 0 C to 40 C Optimal Operating Temperature Battery 68 F to 86 F 20 C to 30 C Relative Humidity 0 to 95 non condensing Acoustical Noise dBA at 39 in 1m 54 Altitude of Operation 1000m per IEC 62040 3 Storage Transport Temperature UPS 4 F to 158 F 20 C to 70 C Storage Transport Temperature Battery 4 F to 86 F 20 C to 30 C Table 9 Mechanical characteristics Parameter 10kVA 15kVA...

Page 45: ...106 62204 20 50 63 76 80 6M 1 4 54107 62204 30 75 94 113 125 6M 1 4 54152 62205 Bypass input for dual input units Unit Rating Nominal Input Current OCP Current OCP Device Rating Bolt Size Maximum Recommended Lug Lug T B One Hole 54000 Lug T B One Hole REDDY 10 28 35 35 6M 1 4 54105 62204 15 42 53 60 6M 1 4 54106 62204 20 56 70 70 6M 1 4 54107 62204 30 83 104 110 6M 1 4 54152 62205 Output Unit Rati...

Page 46: ...t Less than 4 at full rated UPS output load Input Current 1 Nominal A 28 42 56 83 Output Current Nominal A 28 42 56 83 Notes 1 Overload capacity of input current 100 Imax I 125 Imax 125 Imax I 150 Imax I 150 10 min 1 min Limits input current immediately Table 13 DC intermediate circuit Rated Power 10kVA 15kVA 20kVA 30kVA Recommended number of lead acid batteries Number of batteries is 24 jars 12V ...

Page 47: ...0 25 in parallel mode Maximum rate of change of frequency Hz sec For single mode the slew rate is adjustable from 0 1Hz s to 3Hz s Current rating of neutral cable A 1 5 x input current Table 15 Bypass input Rated Power 10kVA 15kVA 20kVA 30kVA Rated voltage VAC 120 208 Supply Three phase 4 wire plus ground Rated Current A 208VAC 28 42 56 83 Bypass voltage tolerance Upper limit 10 15 or 20 Lower lim...

Page 48: ...ashable type size 354x314 8 Threaded mounting holes used for seismic anchoring or floor stand Note If a floor stand is used the weight of the unit must be supported under all casters 9 Each mounting location is supported by two 10 GA 135 galvanized steel The threaded 12mm insert is approximately 3 4 deep Mounting bolts must be threaded into unit 10 Includes side panel Refer to Detail A for dimensi...

Page 49: ...Area Top and Bottom Air 10mm dia threaded mounting holes 4 typ See Notes 8 and 9 above TOP VIEW BOTTOM VIEW Monitor Board U2 IntelliSlot Communication Ports Input Breaker Input Breaker Access Plate Internal and External Battery Terminal Block Access Plate Battery Trays Power Electronics Parallel Board M3 Front View with door open DPN U3812048 Rev 1 Rotary System Switch ...

Page 50: ...e run in separate conduit Output and input cables must be run in separate conduit 4 Aluminum and copper clad aluminum cables are not recommended 5 All wiring is to be in accordance with national and local electrical codes Input Output Neutral Bypass AC input cable connections AC output cable connections Input Neutral Bus side view Output Neutral Bus side view 4 2 to external battery cabinet Earth ...

Page 51: ...Installation Drawings 45 Figure 32 Location of internal batteries Battery 417mm 687mm 186mm ...

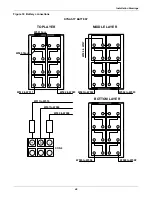
Page 52: ... 33 Battery connections N W501 3pcs W500 18pcs W510 to W511 W502 to W503 W503 to W502 W504 to W505 W511 to W510 W507 to W506 W509 to W508 W506 to W507 TOP LAYER MIDDLE LAYER BOTTOM LAYER W505 to W504 W508 to W509 CON4 DYNASTY BATTERY ...

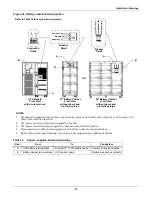
Page 53: ...ors and protective plates 59 Battery Cabinet Front View without doors and protective plates Connection Detail Breaker Detail Breaker Detail Positive Midpoint N Negative Positive Midpoint N Negative A B B A OR B A NOTES 1 All Liebert supplied cable must be repositioned prior to and while the cabinets are being placed in their final installed location 2 All interconnection hardware supplied by Liebe...

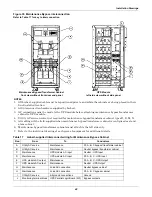
Page 54: ...l block UPS Parallel Logic Board M3 Bypass contacts NOTES 1 All Liebert supplied cable must be repositioned prior to and while the cabinets are being placed in their final installed location 2 All interconnection hardware supplied by Liebert 3 AC connections must be made to the UPS module before attaching maintenance bypass transformer cabinet to UPS module 4 Utility AC source neutral not required...

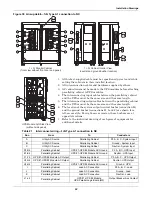
Page 55: ...net Load AC Connection PH A B C Load A00 BR0 CR1 DR1 I Utility AC Source All Ground Connections Ground A00 BR0 CR1 DR1 J Monitoring Terminal Block UPS Parallel Logic Board M3 Auxiliary Contacts A00 BR0 CR1 DR1 K1 UPS 1 Module AC Input Paralleling Cabinet PH A B C UPS CR1 DR1 K2 UPS 1 Module AC INPUT Paralleling Cabinet PH A B C UPS CR1 DR1 G Type A00 D1 D2 H J I Type BR0 G B A I J Type DR1 CR1 I B...

Page 56: ...net Load AC Connection PH A B C E UPS Module AC Output Distribution Cabinet PH A B C G UPS Module AC Output Distribution Cabinet Neutral H UPS Module AC Output All Ground Connections Ground E E H G B D G H A C D H NOTES 1 All Liebert supplied cable will need to be repositioned prior to and while setting the cabinets in their installed location 2 All interconnection cables and hardware supplied by ...

Page 57: ...Neutral Load I1 I4 Paralleling Cabinet UPS 1 UPS 4 Module Parallel Logic Board M3 Output Breaker Aux Contact 1 N Parallel Cabinet front view without front door and panel 1 All Liebert supplied cable must be repositioned prior to and while setting the cabinets in their installed location 2 All interconnection cables and hardware supplied by others 3 AC connections must be made to the UPS modules be...

Page 58: ...ralleling Cabinet UPS 1 UPS 4 Module UPS Parallel Logic Board M3 Output Breaker Aux Contact 1 N Parallel Cabinet front view without front door and panel 1 N Cabinet Interior View neutral and ground busbar location UPS Module Left Side View without side panel 1 All Liebert supplied cable must be repositioned prior to and while setting the cabinets in their installed location 2 All interconnection c...

Page 59: ...UPS Parallel Logic Board M3 Output Breaker Aux Contact 1 N Parallel Cabinet front view without front door and panel 1 N Cabinet Interior View neutral and ground busbar location UPS Module Left Side View without side panel I1 I2 1 All Liebert supplied cable must be repositioned prior to and while setting the cabinets in their installed location 2 All interconnection cables and hardware supplied by ...

Page 60: ...aker Aux Contact M1 M4 Paralleling Cabinet UPS 1 UPS 4 Module UPS Parallel Logic Board M3 Rotary Switch Aux Contact 1 N Parallel Cabinet front view without front door and panel 1 N Cabinet Side View without side panel or door 1 N Cabinet Interior View neutral and ground busbar location UPS Module Left Side View without side panel 1 All Liebert supplied cable must be repositioned prior to and while...

Page 61: ...gic Board M3 Rotary Switch Aux Contact 1 N Parallel Cabinet front view without front door and panel 1 N Cabinet Side View without side panel or door 1 N Cabinet Interior View neutral and ground busbar location UPS Module Left Side View without side panel 1 All Liebert supplied cable must be repositioned prior to and while setting the cabinets in their installed location 2 All interconnection cable...

Page 62: ...S 4 Module UPS Parallel Logic Board M3 Output Breaker Aux Contact 1 N Parallel Cabinet front view without front door and panel 1 N Cabinet Side View without side panel or door 1 N Cabinet Interior View neutral and ground busbar location UPS Module Left Side View without side panel 1 All Liebert supplied cable must be repositioned prior to and while setting the cabinets in their installed location ...

Page 63: ...r Aux Contact M1 M4 Paralleling Cabinet UPS 1 UPS 4 Module UPS Parallel Logic Board M3 Rotary Switch Aux Contact 1 N Parallel Cabinet front view without front door and panel 1 N Cabinet Side View without side panel or door 1 N Cabinet Interior View neutral and ground busbar location UPS Module Left Side View without side panel 1 All Liebert supplied cable must be repositioned prior to and while se...

Page 64: ...tallation Drawings 58 Figure 45 SlimLine locations Battery MBC UPS SlimLine MBC UPS SlimLine UPS Battery SlimLine UPS SlimLine UPS SlimLine 1 N Paralleling Cabinet SlimLine 1 N Paralleling Cabinet SlimLine ...

Page 65: ...th Compression Lugs For Power Wiring Wire Size or Range Lb in N m 6 4 100 11 3 1 125 14 1 0 2 0 150 17 3 0 200 MCM 200 23 250 400 MCM 250 28 500 700 MCM 300 34 Circuit Breakers With Compression Lugs For Power Wiring Current Rating Lb in N m 400 1200 Amps 300 00 34 00 Terminal Block Compression Lugs For Control Wiring AWG Wire Size or Range Lb in N m 22 14 3 5 to 5 3 0 4 to 0 6 NOTE Use the values ...

Page 66: ...3 125 208 83 125 30 E N 480 48 60 480 36 50 30 E N 600 39 50 600 29 40 30 E N 220 106 125 220 79 100 20 A J 208 69 90 208 56 70 20 B K 480 31 40 208 56 70 20 B K 600 25 30 208 56 70 20 B K 220 68 90 208 56 70 20 C L 480 32 40 480 24 30 20 C L 600 26 40 600 19 30 20 C L 220 70 90 220 52 70 20 D M 480 31 40 208 56 70 20 D M 600 25 40 208 56 70 20 D M 208 72 90 208 56 70 20 D M 220 68 90 208 56 70 20...

Page 67: ...l input kVA Type System I P Voltage VAC Rectifier Max Input Current Rectifier Input OCP CB Size A Bypass Max Input Current Bypass Input OCP CB Size A O P Voltage VAC Nominal O P Current Rating A Output OCP CB Size A 30 F P 480 42 50 47 50 208 83 125 30 F P 600 33 40 37 40 208 83 125 30 F P 208 95 125 107 125 208 83 125 30 F P 220 90 125 101 125 208 83 125 30 F P 240 83 100 93 100 208 83 125 20 F P...

Page 68: ... 208 56 70 15 208 53 70 208 42 60 10 208 35 45 208 28 40 CR1 30 208 107 150A 208 83 125 CR1 DR1 30 220 101 150A 208 83 125 CR1 DR1 30 480 46 70A 208 83 125 CR1 DR1 30 600 37 60A 208 83 125 CR1 20 208 71 100A 208 56 70 CR1 DR1 20 220 68 100A 208 56 70 CR1 DR1 20 480 31 50A 208 56 70 CR1 DR1 20 600 25 40A 208 56 70 CR1 15 208 54 80A 208 42 60 CR1 DR1 15 220 51 80A 208 42 60 CR1 DR1 15 480 23 40A 208...

Page 69: ...08 111 150 CR1 15 208 146 200A 208 83 125 CR1 DR1 15 220 138 200A 208 83 125 CR1 DR1 15 480 63 80A 208 83 125 CR1 DR1 15 600 51 70A 208 83 125 CR1 10 208 219 300A 208 56 70 CR1 DR1 10 220 207 300A 208 56 70 CR1 DR1 10 480 95 125A 208 56 70 CR1 DR1 10 600 76 100A 208 56 70 SR0 W00 30 208 210 300 208 167 225 20 208 140 200 208 111 150 15 208 105 150 208 83 125 10 208 70 100 208 56 70 Table 31 Multi ...

Page 70: ... 167 225 30 480 95 125 208 167 225 30 600 76 100 208 167 225 HR1 10 220 68 100 208 56 70 10 480 31 50 208 56 70 10 600 25 40 208 56 70 15 220 102 150 208 83 125 15 480 47 70 208 83 125 15 600 38 50 208 83 125 20 220 137 200 208 111 150 20 480 63 100 208 111 150 20 600 50 70 208 111 150 30 220 205 300 208 167 225 30 480 94 125 208 167 225 30 600 75 100 208 167 225 TR0 X00 30 208 210 300 208 167 225...

Page 71: ...250 400 30 480 142 200 208 250 400 30 600 114 150 208 250 400 HR1 10 220 102 150 208 83 125 10 480 47 60 208 83 125 10 600 38 50 208 83 125 15 220 154 200 208 125 200 15 480 70 90 208 125 200 15 600 56 80 208 125 200 20 220 205 300 208 167 225 20 480 94 125 208 167 225 20 600 75 100 208 167 225 30 220 307 400 208 250 400 30 480 141 200 208 250 400 30 600 113 150 208 250 400 TR0 X00 30 208 315 400 ...

Page 72: ...0 400 30 480 142 200 208 250 400 30 600 114 150 208 250 400 MR1 10 220 102 150 208 83 125 10 480 47 60 208 83 125 10 600 38 50 208 83 125 15 220 154 200 208 125 200 15 480 70 90 208 125 200 15 600 56 80 208 125 200 20 220 205 300 208 167 225 20 480 94 125 208 167 225 20 600 75 100 208 167 225 30 220 307 400 208 250 400 30 480 141 200 208 250 400 30 600 113 150 208 250 400 UR0 Y00 30 208 315 400 20...

Page 73: ...33 500 30 480 190 250 208 333 500 30 600 152 200 208 333 500 MR1 10 220 137 175 208 111 150 10 480 63 80 208 111 150 10 600 50 60 208 111 150 15 220 205 250 208 167 225 15 480 94 125 208 167 225 15 600 75 90 208 167 225 20 220 273 400 208 222 300 20 480 125 150 208 222 300 20 600 100 125 208 222 300 30 220 410 500 208 333 500 30 480 188 225 208 333 500 30 600 150 200 208 333 500 UR0 Y00 30 208 421...

Page 74: ...62204 30 240 6M 1 4 54152 62205 30 220 6M 1 4 54152 62205 30 208 6M 1 4 54152 62205 20 600 6M 1 4 NA 62204 20 480 6M 1 4 54130 62204 20 240 6M 1 4 54107 62204 20 220 6M 1 4 54107 62204 20 208 6M 1 4 54107 62204 15 600 6M 1 4 NA 62204 15 480 6M 1 4 NA 62204 15 240 6M 1 4 54106 62204 15 220 6M 1 4 54106 62204 15 208 6M 1 4 54106 62204 10 600 6M 1 4 NA 62204 10 480 6M 1 4 NA 62204 10 240 6M 1 4 54130...

Page 75: ...0 62204 10 208 6M 1 4 54130 62204 Table 33 Battery cabinet physical characteristics Battery Cabinet Type Dimensions WxDxH in mm Net Weight Without Batteries lb kg Short Narrow 27 2x31 4x63 690x825x1600 551 250 Short Wide 58 5x31 4x63 1488x825x1600 889 400 Table 34 Maintenance Bypass Cabinet weights UPS Rating Maintenance Bypass Cabinet Style lb kg A B C D E F J K L M N P 10kVA 408 185 545 247 675 ...

Page 76: ...ble 36 Multi module paralleling cabinet dimensions 1 1 Cabinet Type Width Depth Height 1 N Narrow 27 2 31 4 63 Types A00 BR0 CR1 DR1 690 825 1600 1 N Cabinet Type Width Depth Height 1 N Narrow 27 2 31 4 63 Types A00 E00 J00 690 825 1600 1 N Wide 58 5 31 4 63 All other types 1488x 825x 1600 Table 37 Distance to connection points on the NX UPS Connection Point on UPS Distance From Floor in mm From T...

Page 77: ...Specifications and Technical Data 71 NOTES ...

Page 78: ...Specifications and Technical Data 72 ...

Page 79: ......

Page 80: ...ebert Corporation All names referred to are trademarks or registered trademarks of their respective owners Technical Support Service Web Site www liebert com Monitoring 800 222 5877 monitoring emersonnetworkpower com Outside the US 614 841 6755 Single Phase UPS 800 222 5877 upstech emersonnetworkpower com Outside the US 614 841 6755 Three Phase UPS 800 543 2378 powertech emersonnetworkpower com En...

Reviews: