background image

Installation Manual

13

I/O Wiring – Model 2400S Analog Transmitters

P

o

wer Su

ppl

y

I/O
 W
irin
g

 – DP 

an

DN

I/

O W

iri

n

g

 – AN

Be
fo

re
 Y

o

Begin

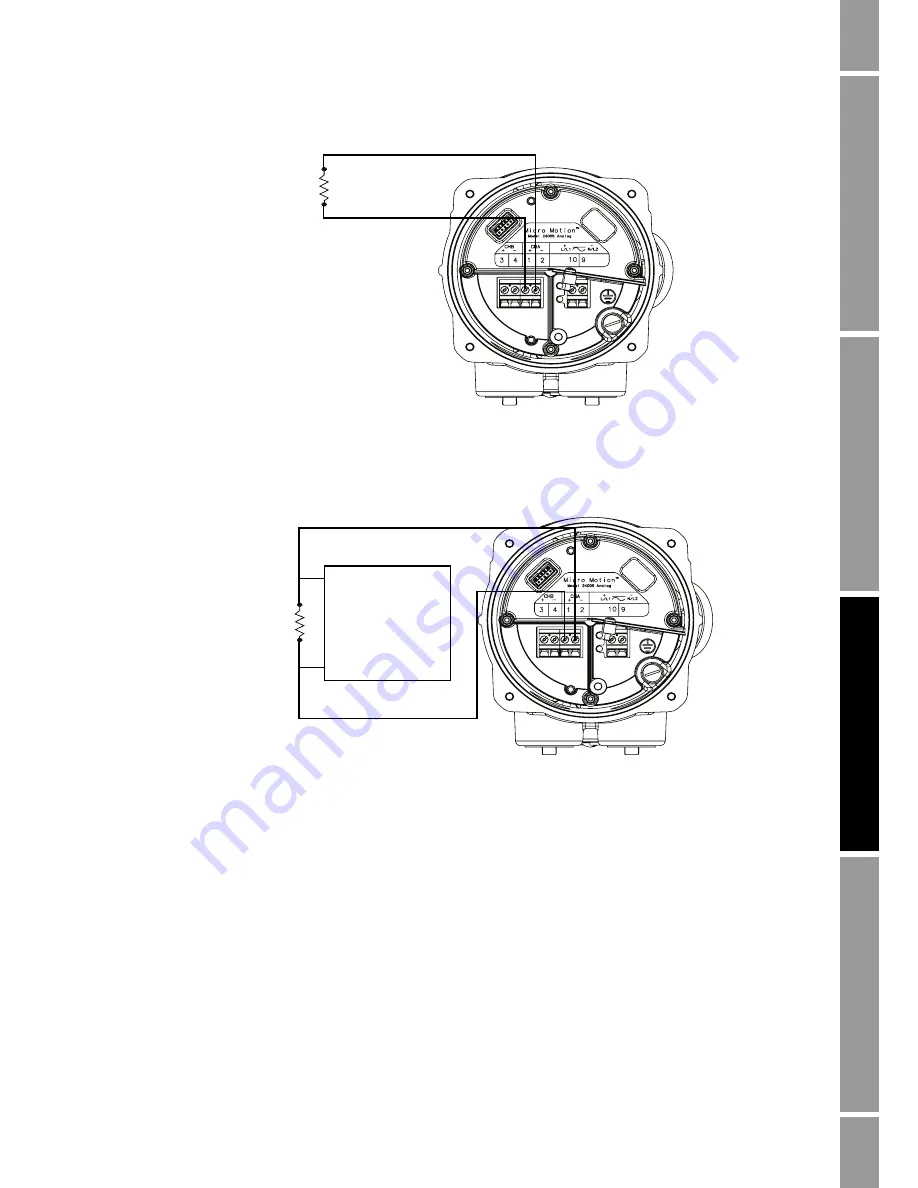
Figure 3-1

Basic mA output wiring – Internal power 

Figure 3-2

HART/analog single-loop wiring – Internal power 

820 Ohm maximum

loop resistance

+

HART-compatible 
host or controller

For analog communications:

• 820 Ohm maximum loop 

resistance

For HART communications:
• 600 Ohm maximum loop 

resistance

• 250 Ohm minimum loop 

resistance

+

Summary of Contents for Micro Motion 2400S

Page 1: ...Installation Manual P N 20003402 Rev D April 2008 Micro Motion Model 2400S Transmitters Installation Manual ...

Page 2: ... MVD Direct Connect are trademarks of Micro Motion Inc Boulder Colorado Micro Motion is a registered trade name of Micro Motion Inc Boulder Colorado The Micro Motion and Emerson logos are trademarks and service marks of Emerson Electric Co All other trademarks are property of their respective owners ...

Page 3: ...ts 7 2 5 1 DC power requirements for Model 2400S Analog and PROFIBUS DP transmitters 8 2 6 Wiring the power supply 8 Chapter 3 I O Wiring Model 2400S Analog Transmitters 11 3 1 Overview 11 3 2 Moisture protection 11 3 3 I O options 11 3 4 Wiring the outputs 12 3 4 1 mA output wiring 12 3 4 2 Frequency output wiring 16 3 4 3 Discrete output wiring 17 3 4 4 Discrete input wiring 19 Chapter 4 I O Wir...

Page 4: ...y Models 2400S Analog and PROFIBUS DP 27 A 4 Electrical connections 28 A 5 User interface 29 A 6 Input output signals 31 A 7 Digital communications 32 A 8 Host interface 32 A 9 Environmental limits 33 A 10 Environmental effects 33 A 11 Hazardous area classifications 33 Appendix B Return Policy 35 B 1 New and unused equipment 35 B 2 Used equipment 35 Index 37 ...

Page 5: ...essage carefully before proceeding to the next step Improper installation in a hazardous area can cause an explosion When installing in a hazardous area refer to Micro Motion approvals instructions shipped with the product or available from the Micro Motion web site Hazardous voltage can cause severe injury or death Make sure power is shut off before installing the transmitter Follow all instructi...

Page 6: ...400S PROFIBUS DP and DeviceNet transmitters see Chapter 4 1 5 Flowmeter documentation Table 1 1 lists documentation sources for other required information Table 1 1 Flowmeter documentation resources Topic Document Sensor installation Sensor documentation shipped with sensor Hazardous area installation See the approval documentation shipped with the transmitter or download the appropriate documenta...

Page 7: ... U S A phone 800 522 MASS 800 522 6277 toll free In Canada and Latin America phone 1 303 527 5200 U S A In Asia In Japan phone 3 5769 6803 In other locations phone 65 6777 8211 Singapore In Europe In the U K phone 0870 240 1978 toll free In other locations phone 31 0 318 495 555 The Netherlands Customers outside the U S A can also email Micro Motion customer service at International MMISupport Eme...

Page 8: ...4 Micro Motion Model 2400S Transmitters ...

Page 9: ...ter failure Install the meter so that the conduit openings do not point upward and install drip legs in conduit or cable Inspect and grease all gaskets and O rings Fully close and tighten all housing covers and conduit openings 2 3 Rotating the transmitter on the sensor optional For easier access to the user interface or the wiring terminals the transmitter can be rotated on the sensor in 45 incre...

Page 10: ...the transmitter before removing the housing cover in a hazardous area 2 Referring to Figure 2 2 remove the transmitter housing cover and user interface module a Loosen the four transmitter housing cover screws b Remove the transmitter housing cover c Loosen the two user interface screws d Gently lift the user interface module disengaging it from the user interface connector on the transmitter 3 On...

Page 11: ...ower supply requirements are AC power 85 265 VAC 50 60 Hz 4 watts typical 7 watts maximum DC power 18 100 VDC 4 watts typical 7 watts maximum The Model 2400S DeviceNet transmitter is powered from the DeviceNet network per the DeviceNet specification There is no need to connect separate power supply wiring for the Model 2400S DeviceNet transmitter Skip to Chapter 4 4 Transmitter housing cover screw...

Page 12: ...nd user interface module as described in Section 2 4 2 Unscrew the warning flap screw and raise the warning flap Figure 2 3 shows the warning flap in the open position 3 Connect the power supply wires to terminals 9 and 10 as shown in Figure 2 3 4 Ground the power supply to the transmitter s internal grounding screw shown in Figure 2 3 5 Lower the warning flap and tighten the warning flap screw Ta...

Page 13: ...oltage directive 2006 95 EC European installations a switch in close proximity to the transmitter is required Figure 2 3 Wiring the transmitter power supply L N Transmitter internal grounding screw User interface connector Warning flap screw Warning flap Model 2400S Analog transmitter L N Transmitter internal grounding screw User interface connector Warning flap screw Warning flap Model 2400S PROF...

Page 14: ...10 Micro Motion Model 2400S Transmitters ...

Page 15: ...operly sealed housings can expose electronics to moisture which can cause measurement error or flowmeter failure Install the meter so that the conduit openings do not point upward and install drip legs in conduit or cable Inspect and grease all gaskets and O rings Fully close and tighten all housing covers and conduit openings 3 3 I O options Table 3 1 lists the options for the transmitter s two I...

Page 16: ...grams see Section 3 4 2 For discrete output wiring diagrams see Section 3 4 3 For a discrete input wiring diagram see Section 3 4 4 3 Replace the user interface module and transmitter housing cover Note It is not necessary to open the power compartment to wire the outputs Do not open the power compartment unless you are also wiring the power supply 3 4 1 mA output wiring The wiring diagrams in thi...

Page 17: ... Begin Figure 3 1 Basic mA output wiring Internal power Figure 3 2 HART analog single loop wiring Internal power 820 Ohm maximum loop resistance HART compatible host or controller For analog communications 820 Ohm maximum loop resistance For HART communications 600 Ohm maximum loop resistance 250 Ohm minimum loop resistance ...

Page 18: ...urrent will damage the transmitter Do not exceed 30 VDC input Terminal current must be less than 500 mA Figure 3 4 HART analog single loop wiring External power Note See Figure 3 5 for voltage and resistance values VDC Rload Note See Figure 3 5 for voltage and resistance values VDC Rload 250 600 Ohm resistance HART compatible host or controller ...

Page 19: ...ting with HART a minimum of 250 Ohms is required Total mA load resistance Ohms Minimum required external voltage Volts OPERATING REGION HART compatible host or controller HART compatible transmitter SMART FAMILY transmitter Note For optimum HART communication make sure the output loop is single point grounded to an instrument grade ground 24 VDC loop power supply required for HART 4 20 mA passive ...

Page 20: ...ure 3 7 External power Figure 3 8 Figure 3 7 Frequency output wiring Internal power Figure 3 8 Frequency output wiring External power Excessive current will damage the transmitter Do not exceed 30 VDC input Terminal current must be less than 500 mA Counter 000042 Note See Figure 3 11 for output voltage versus load resistance Output voltage level is 24 VDC 3 with high resistance load Note See Figur...

Page 21: ...these configurations Internal power Figure 3 9 External power Figure 3 10 Figure 3 9 Discrete output wiring Internal power Figure 3 10 Discrete output wiring External power Excessive current will damage the transmitter Do not exceed 30 VDC input Terminal current must be less than 500 mA Total load Note See Figure 3 11 for output voltage versus load information Pull up resistor or DC Relay 3 30 VDC...

Page 22: ...4 12 10 8 6 4 2 0 0 20000 40000 60000 80000 100000 High level output voltage Volts Load resistance Ohms Open circuit output voltage 24 VDC 3 OPERATING REGION 3 400 4400 4000 3600 3200 2800 2400 2000 1600 1200 800 6 9 12 15 18 21 24 27 30 Supply voltage Volts External pull up resistor range Ohms Recommended resistor value range Note When using a discrete output to drive a relay choose external pull...

Page 23: ...for these configurations Internal power Figure 3 13 External power Figure 3 14 If external power is configured power may be supplied by a PLC or other device or by direct DC input See Table 3 2 for input voltage ranges Figure 3 13 Discrete input wiring Internal power Figure 3 14 Discrete input wiring External power Table 3 2 Input voltage ranges for external power VDC Range 3 30 High level 0 0 8 L...

Page 24: ...20 Micro Motion Model 2400S Transmitters ...

Page 25: ... openings 4 3 I O wiring for Model 2400S PROFIBUS DP transmitters To connect the I O wiring for a 2400S PROFIBUS DP transmitter 1 Remove the user interface cover and user interface module See Section 2 4 for instructions 2 Wire the transmitter to the PROFIBUS DP segment according to the diagram in Figure 4 1 Follow all local safety regulations 3 Replace the user interface module and user interface...

Page 26: ... Figure 4 2 Model 2400S PROFIBUS DP internal termination impedance switch Spur to PROFIBUS DP segment according to the Installation Guideline for PROFIBUS DP FMS available at www profibus org COM A green COM B red Note The Model 2400S PROFIBUS DP transmitter does not have terminals for termination wiring An external terminator is not required The transmitter has an internal terminator There is a s...

Page 27: ...the DeviceNet segment according to the diagram in Figure 4 3 The transmitter is shipped with a DeviceNet male sealed Micro Connector Eurofast that has been preinstalled and wired according to the DeviceNet specification Follow all local safety regulations A transmitter that has been improperly wired or installed in a hazardous area could cause an explosion Make sure the transmitter is wired to mee...

Page 28: ...24 Micro Motion Model 2400S Transmitters ...

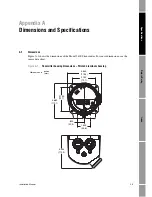
Page 29: ...ns A 1 Dimensions Figure A 1 shows the dimensions of the Model 2400S transmitter For sensor dimensions see the sensor data sheet Figure A 1 Transmitter housing dimensions Painted aluminum housing Dimensions in inches mm 4 545 115 4 3 140 79 7 3 140 79 7 4 689 119 1 800 20 3 1 600 40 6 4 344 110 3 ...

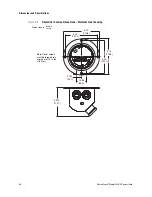
Page 30: ...and Specifications Figure A 2 Transmitter housing dimensions Stainless steel housing Dimensions in inches mm 5 70 114 8 5 20 132 1 5 70 114 8 5 20 132 1 0 793 20 1 1 586 40 3 4 515 114 7 Note Cover screws must be torqued to a minimum of 16 in lbs 1 8 N m ...

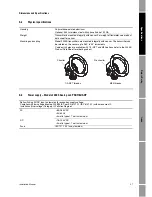
Page 31: ...rs are mounted integrally with sensor The transmitter can be rotated on the sensor up to 360 in 45 increments Cable entry holes are available with 1 2 NPT and M20 options refer to the 2400S Product Data Sheet for ordering codes Self switching AC DC input automatically recognizes supply voltage Complies with low voltage directive 2006 95 EC per EN 61010 1 IEC 61010 1 with amendment 2 Installation O...

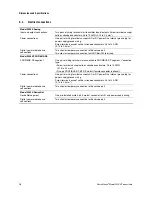
Page 32: ...nnection to HART Bell 202 terminals Model 2400S PROFIBUS DP PROFIBUS DP segment One pair of wiring terminals for connection to PROFIBUS DP segment Connection type Screw terminals accept solid or stranded conductors 26 to 14 AWG 0 14 to 2 5 mm2 Five pin PROFIBUS DP M12 Eurofast female connector optional Power connections One pair of wiring terminals accepts AC or DC power One internal ground lug fo...

Page 33: ...sions and Specifications Return Policy Index Specifications A 5 User interface Model 2400S Analog Model 2400S PROFIBUS DP Model 2400S DeviceNet With display Without display With display Without display With display Without display ...

Page 34: ...00S PROFIBUS DP with or without display Three rotary switches for selecting network address network address is also software selectable DIP switch for enabling internal termination resistor Address and network LEDs that indicate PROFIBUS DP status All models with display Depending on purchase option transmitter housing cover has glass or plastic lens User interface module includes LCD panel LCD li...

Page 35: ...24 VDC 3 with a 2 2 kohm internal pull up resistor External passive 30 VDC maximum 24 VDC typical Output is linear with flow rate to 12 500 Hz One active or passive discrete output Not intrinsically safe Can report five discrete events flow switch forward reverse flow calibration in progress or fault Power Internal active 24 VDC 3 with a 2 2 kohm internal pull up resistor External passive 30 VDC m...

Page 36: ...ation protocol Automatically recognizes network baud rate Address selectable by 3 rotary switches or software selectable Model 2400S DeviceNet DeviceNet Digital 2 way communication protocol Address and baud rate selectable by 3 rotary switches 2 to select address 1 to select baud rate or software selectable Model 2400S Analog ProLink II v2 5 or later from Micro Motion supports full device configur...

Page 37: ...n condensing at 140 F 60 C Vibration limits Meets IEC68 2 6 endurance sweep 5 to 2000 Hz 50 sweep cycles at 1 0 g All models EMI effects Complies with electromagnetic compatibility directive 2004 108 EC per EN 61326 industrial Conforms to NAMUR NE21 Version 10 02 2004 Model 2400S Analog only Ambient temperature effect On mA output 0 005 of span per C All models CSA 1 C US 1 CSA is a Canadian appro...

Page 38: ...34 Micro Motion Model 2400S Transmitters ...

Page 39: ...pment Only equipment that has not been removed from the original shipping package will be considered new and unused New and unused equipment requires a completed Return Materials Authorization form B 2 Used equipment All equipment that is not classified as new and unused is considered used This equipment must be completely decontaminated and cleaned before being returned Used equipment must be acc...

Page 40: ...36 Micro Motion Model 2400S Transmitters ...

Page 41: ...e module on transmitter 6 transmitter dimensions 25 M mA output wiring 12 external power 14 HART multidrop 15 HART single loop external power 14 internal power 13 internal power 13 Moisture protection 5 11 21 P Power supply requirements 7 wiring 8 PROFIBUS DP 21 impedance switch 22 R Return policy 35 S Safety messages 1 Sensor 1 Specifications 25 T Transmitter 1 dimensions 25 documentation 2 I O o...

Page 42: ...38 Micro Motion Model 2400S Transmitters Index HART single loop external power 14 HART single loop internal power 13 internal power 13 moisture protection 11 21 power supply wiring 8 PROFIBUS DP 21 ...

Page 43: ......

Page 44: ...awa ku Tokyo 140 0002 Japan T 81 3 5769 6803 F 81 3 5769 6844 Micro Motion Asia Emerson Process Management 1 Pandan Crescent Singapore 128461 Republic of Singapore T 65 6777 8211 F 65 6770 8003 Micro Motion United Kingdom Emerson Process Management Limited Horsfield Way Bredbury Industrial Estate Stockport SK6 2SU U K T 44 0870 240 1978 F 44 0800 966 181 2008 Micro Motion Inc All rights reserved P...

Reviews: