background image

15

Use only well-known brands of tape. Avoid use of C-120 cassettes.

Furthermore, do not expose cassettes to direct sunlight, dust or oil, and do not
touch the tape surfaces.

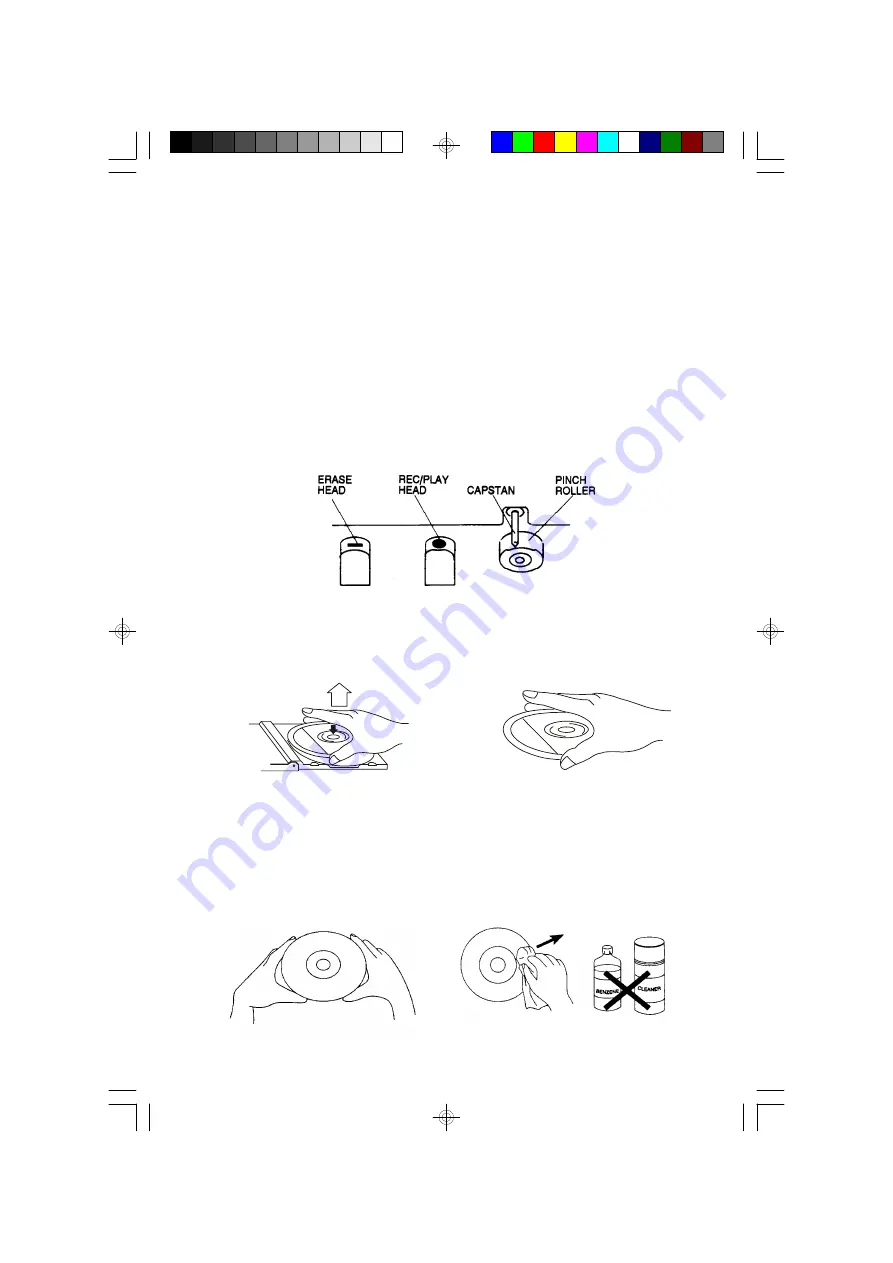
HEAD CLEANING

The tape heads, pinch roller and capstan require periodic cleaning. This removes
particles of the metal oxide coating that wear off the tape and accumulate on these parts
and impair performance. Switch off the power, press the STOP/EJECT key to open the
cassette door, and press the PLAY key. Clean the tape heads, pinch roller and capstan
with a soft cloth or cotton pad dampened in isopropyl alcohol or special tape head
cleaner.

COMPACT DISC CARE

To remove a disc from its storage case, press down on the center of the case
and lift the disc outs, holding it carefully by the edges.

Fingerprints and dust should be carefully wiped off the disc’s recorded surface
with a soft cloth.Unlike conventional records, compact discs have no grooves to
collect dust and microscopic debris, so gently wiping with a soft cloth should
remove most particles. Wipe in a straight line from the inside to the outside of
the disc. Small dust particles and light stains will have absolutely no effect on
reproduction quality.

MS7625_ib.p65

02/19/2001, AM 10:59

15

Summary of Contents for MS7625

Page 1: ...SYSTEM with CD PLAYER and CASSETTE RECORDER IMPORTANT Call toll free 1 800 210 2281 for exciting information and special discounts on Extended Service Plans Visit our web site at www emersonradio com MS7625_ib p65 02 19 2001 AM 11 00 19 ...

Page 2: ...merson audio system This compact unit has been designed to take up a minimum of space while still providing an AM FM stereo radio a compact disc player and a cassette player recorder The CD player has a 19 track programmable memory and high speed music search The cassette player recorder will record directly from the radio or from the CD player There is a pair of matching stereo speakers for when ...

Page 3: ...dealer or an experienced radio TV technician for help This device complies with Part 15 of the FCC Rules Operation is subject to the following two conditions 1 This device may not cause harmful interference and 2 This device must accept any interference received including interference that may cause undesired operation IMPORTANT NOTES Operate controls and switches as described in the manual Before...

Page 4: ...m the AC power cord and extend it to its full length Unwind the FM lead wire antenna and extend it to its full length Place the main unit in the desired location It should be on a level surface convenient to an AC outlet and away from direct sunlight or sources of heat dust moisture or humidity Do not block the ventilation slots on the back of the main unit Set the FM MODE BEAT CUT switch on the b...

Page 5: ...ety feature to reduce the possibility of electric shock If this plug will not fit in your AC outlet you probably have an outdated non polarized outlet You should have your outdated outlet changed by a qualified licensed electrician Do not file the wide blade on the plug or use an adapter to make the plug fit into your outlet This defeats the safety feature and could expose you to electric shock Th...

Page 6: ...icator 11 FM STEREO Indicator 12 CD Door 13 CD Door OPEN Button 14 CD Track Number Display 15 POWER On Indicator 16 CD PLAY PAUSE Indicator 17 CD REPEAT Indicator 18 CD PLAY PAUSE Button 19 TUNING Knob 20 CD PROGRAM Button 21 POWER On Off Button BACK PANEL 22 FM MODE STEREO MONO BEAT CUT Switch 23 External FM Wire Antenna 24 SPEAKER Jacks 25 PHONES Stereo Headphone Jack 26 AC Power Cord 14 13 15 1...

Page 7: ...EREO LED indicator comes on 5 Adjust the VOLUME control to the desired level 6 When you are finished listening press the POWER button again to turn the unit Off The POWER LED indicator goes off HINTS FOR BETTER RECEPTION FM The FM lead wire antenna on the back panel should be extended to its full length You may also have to vary the direction of this antenna until you find the position that provid...

Page 8: ...being played and the Play Pause LED Indicator Dot comes on 7 Adjust the VOLUME control as desired 8 After the last track has been played the disc stops and the display again shows the total number of tracks on the disc The LED Play Pause Indicator Dot goes off To stop playback before the disc ends press the STOP button The disc stops immediately and the display shows the total number of tracks on ...

Page 9: ...Press repeatedly to skip to higher numbered tracks Press the Skip Reverse button once during playback to return to the beginning of the current track Press repeatedly to skip to lower numbered tracks HIGH SPEED MUSIC SEARCH This feature allows you to search forward or backward at high speed to locate a specific musical passage within a track To search forward or backward during playback depress an...

Page 10: ...shes in the display 4 Press the PROGRAM button again to enter the selected track number in the program Memory The track number disappears and the flashing Zero 0 returns 5 Repeat Steps 3 and 4 to continue entering tracks in the program Memory You may program tracks to play more than once if desired You can program up to 19 tracks total 6 When you have finished entering tracks in the program memory...

Page 11: ...epeat the entire disc Press the REPEAT button twice The Dot between the two digits of the track number stays On This indicates you selected the Repeat All Mode Press the PLAY PAUSE button to begin playback The entire disc will be repeated continuously Note The Repeat Playback feature can be activated while the disc is stopped or while the disc is playing To cancel the Repeat Mode press the REPEAT ...

Page 12: ... desired point on the tape press the PLAY key to resume normal playback To stop the tape momentarily press the PAUSE key Press again to cancel Pause and resume playback To stop the tape before it ends press the STOP EJECT key Press again to open the cassette door to remove your tape 7 When the tape ends the Auto Stop mechanism releases the PLAY key and stops the tape motor Press STOP EJECT key to ...

Page 13: ...You may raise or lower the VOLUME control during the recording or shut it off completely if desired You can use the PAUSE key to stop the recording temporarily to avoid recording unwanted material such as radio commercials 5 When you are finished recording press the STOP EJECT key once to stop the tape and again to open the cassette door IMPORTANT NOTES ABOUT RECORDING Do not force the RECORD butt...

Page 14: ...lug to this jack for private listening The speakers shut off automatically when headphones are connected to the headphone jack When using headphones reduce the volume to a low level before you connect the headphones Then connect the headphones put them on and gradually increase the volume to a comfortable level MS7625_ib p65 02 19 2001 AM 10 59 13 ...

Page 15: ... allow the record key to function again CASSETTE CARE Two common causes of trouble experienced when using cassettes are 1 Tape jamming Leading to uneven speed in playback and 2 Tape tangling Where the tape wraps itself around vital parts of themechanism To reduce the likelihood of these problems occurring the following precautions should be observed Check that there are no loose layers of tape vis...

Page 16: ... capstan with a soft cloth or cotton pad dampened in isopropyl alcohol or special tape head cleaner COMPACT DISC CARE To remove a disc from its storage case press down on the center of the case and lift the disc outs holding it carefully by the edges Fingerprints and dust should be carefully wiped off the disc s recorded surface with a soft cloth Unlike conventional records compact discs have no g...

Page 17: ...o get inside the unit while cleaning Clean the disc periodically with a soft lint free dry cloth Never use detergents or abrasive cleaners to clean the disc If necessary use a CD cleaning kit Never write on or affix labels to the surface of compact discs FOR ADDITIONAL SET UP OR OPERATING ASSISTANCE PLEASE CALL 1 972 884 2350 TO FIND THE LOCATION AND PHONE NUMBER OF YOUR NEAREST SERVICE CENTER PER...

Page 18: ...RADIO RADIO Volume at minimum Increase Volume Cassette Player No sound Function switch is not set to Set the Function switch to TAPE TAPE Volume at minimum Increase Volume Sound distorted Dirty head Clean the head Speed varies Tape old or worn Replace the tape Dirty roller and capstan Clean roller and capstan Cassette Recorder Will not record Erase prevention tab removed Cover hole with tape Disto...

Page 19: ... Damage to equipment not properly connected to the product Cost incurred in shipping your unit to and from an authorized Depot Repair Facility Ordinary adjustments which you can perform as outlined in the owner s manual Signal reception problems caused by external antenna or cable systems Products purchased used serviced or damaged outside of the United States Damage to compact discs or cassettes ...

Page 20: ...EMERSON RADIO CORP EMERSON Part No 16 2812 102 01 Printed in China MS7625_ib p65 02 19 2001 AM 11 00 20 ...

Reviews: