background image

4

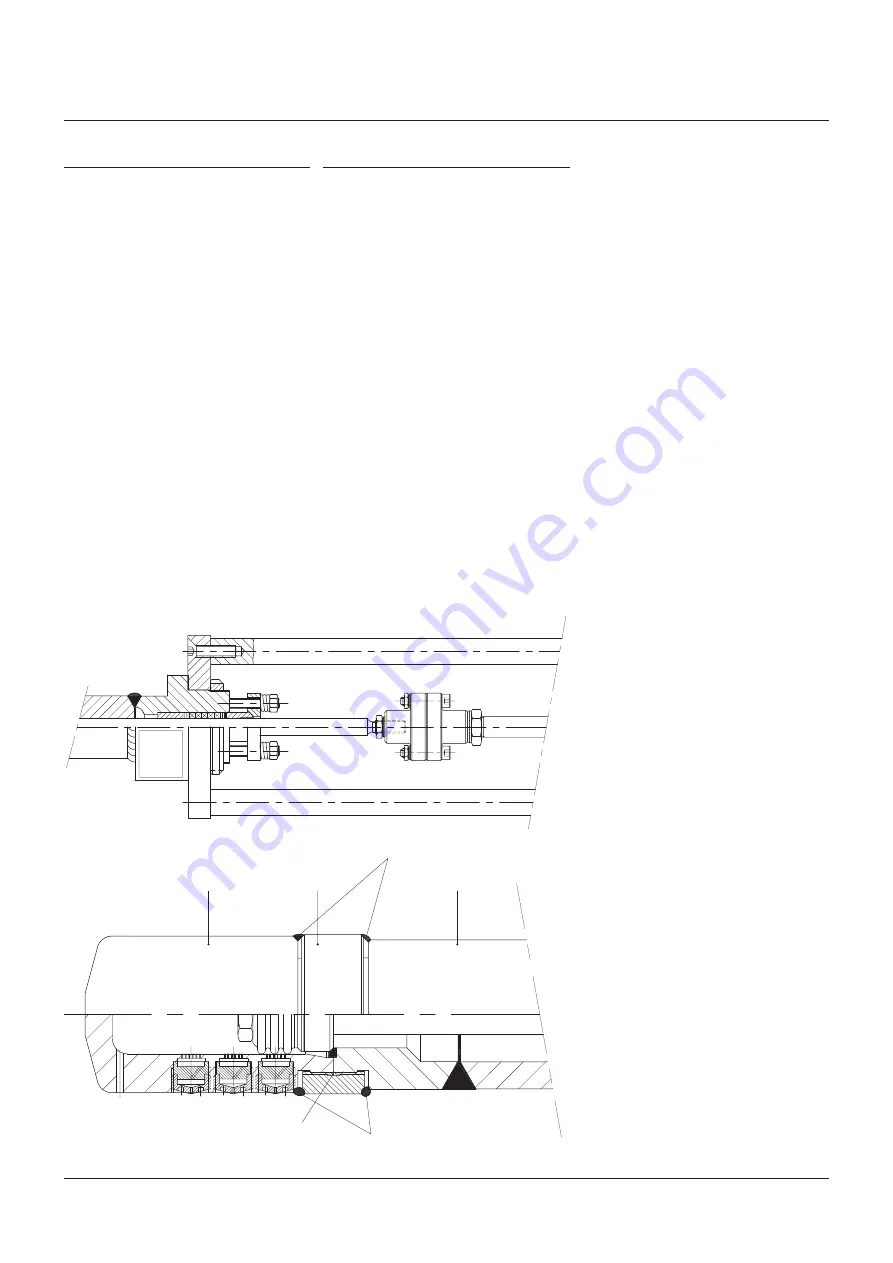
Figure 7

Figure 8

spray cylinder

Fastener ring

Tack welds

Body extension

Area lapped before assembly

Tack welds

YarwaY 

A.T.-Temp CryogeniC desuperheATer sTAndArd duTy

InstallatIon and MaIntenance InstructIons

removal

Before removing the A.T.-Temp Cryogenic 
desuperheater from the system, ensure that 
both the process -and injection liquid pipework 
are pressureless and vented.
isolate any electrical supplies to the actuator 
and/or ancillaries, prior to disconnection. 
Vent and remove instrument air supply piping. 
Loosen process flange and liquid flange bolting, 
but vent connections before complete removal.

start-Up

ensure that all components are installed 
correctly. Connection of electrical supplies and 
instrument air piping should be in accordance 
with the manufacturer’s instruction manual. 
Verify and adjust, if necessary, set points for 
filter regulators and valve positioners, following 
the manufacturer’s recommendations. 
similarly, calibrate the temperature 
transmitter/controller, verifying automatic 
response to temperature changes.
Check the liquid pressure at the A.T.-Temp 
Cryogenic desuperheater. Verify the operation 
of the temperature transmitter and controller 
by manually increasing and decreasing the 
output signal and observing indicated and 
recorded temperatures.
When satisfactory coordination between 
instrument signals and temperature are 
attained, adjustment of the set point can be 
made and the system transferred to automatic 
operation.
it is recommended to record the various 
process coordinates, over a sustained period, to 
verify operation, adjusting where necessary.

maintenance

note: 

maintenance of the A.T.-Temp 

Cryogenic desuperheater is straight forward 
and does not require any special tools or 
training. Care should be taken during any 
maintenance operation, particularly when 
working with grinders, compressed air and 
rotating machinery. it is imperative that safety 
glasses and protective workwear are used in 
accordance with standard safety procedures. 
in case of doubt, consult your supervisor or 
safety officer before commencing any work 
on the equipment.

The A.T.-Temp Cryogenic desuperheater 
may now be removed from the system. it is 
recommended that the A.T.-Temp Cryogenic 
desuperheater is transported to a convenient 
workshop which has a workbench and vice. Lift 
the unit by means of straps around the body. 
do not attempt to lift the A.T.-Temp Cryogenic 
desuperheater by the yoke, actuator or any of 
its accessories.
depending upon the type of actuator fitted, 
various stem couplings are used. measure 
accurately, and record the dimensions 
A and B (see Figure 7) for reassembly 
purposes. Also record positions of any levers 
or specials fixings, sketching if necessary, 
prior to removal. if any work is required on 
the actuator, then please refer to the actuator 
manufacturer’s manual.

Summary of Contents for Yarway

Page 1: ...body or use the hoisting lug if provided Do not use the water inlet connection yoke actuator or any of its accessories for lifting Leave the flange covers in place during transportation until ready to install in the pipework When installing the A T Temp Cryogenic desuperheater use gaskets and bolting material in accordance with the relevant piping code for example ASME ANSI B31 3 or EN Place the g...

Page 2: ... Pneumatic or E P positioner Figure 1 Check for damages Check for damages Figure 2 Figure 3 Liquid flange positions Process line Process gas flow Handwheel positions Process line Process gas flow The minimum pipe run required downstream of the A T Temp Cryogenic desuperheater varies with each individual application and would be specified by Yarway at the enquiry stage This straight run is needed t...

Page 3: ...cting to the A T Temp Cryogenic desuperheater mounting flange see Figure 6 Figure 5 Yarway supplies the A T Temp Cryogenic desuperheater as follows Identification number xx 37 xxxxx Fabricated type with non balanced stem xx 47 xxxxx Fabricated type with semi balanced stem and oversized trim all with the spray cylinder tack welded to the body extension pipe Note horizontal orientated A T Temp Cryog...

Page 4: ...rdination between instrument signals and temperature are attained adjustment of the set point can be made and the system transferred to automatic operation It is recommended to record the various process coordinates over a sustained period to verify operation adjusting where necessary Maintenance Note maintenance of the A T Temp Cryogenic desuperheater is straight forward and does not require any ...

Page 5: ...ng wire brush and or honing device Cleanless of the packing area is vital for proper valve sealing Do not use grease or lubricants in combination with PTFE Chevron type packing The actual packing design is mentioned on the project related valve drawing Only ever use genuine Yarway components as they are supplied as matched sets see Figure 9 Disassembly see Figure 8 The A T Temp Cryogenic desuperhe...

Page 6: ... material removed Insert the A T Temp Cryogenic desuperheater into the pipework and check that the nozzle is orientated correctly with the spray with the direction of the gas flow Apply a suitable lubricating compound to the bolts and nuts and tighten evenly in accordance with the manufacturer s recommendations Before connecting the liquid line flush through and check for any contamination or rest...

Page 7: ...plate SA 182 F304L 19 Name plate AISI 316 20 Lock nut Stainless steel 21 Coupling SA 182 F304L 23 Securing washer Stainless steel 24 Vapor flange SA 182 F304 F304L dual certified 25 Guiding PTFE 26 Spring AISI 631 17 7 PH 27 Shoulder bolt SA 320 B8 CL 2 28 Securing washer Stainless steel 29 Flange female SA 182 F304L 30 Flange male SA 182 F304L 31 Extension pipe SA 312 TP304L 32 Piston rings Alumi...

Page 8: ...rred Before placing the A T Temp Cryogenic desuperheater into service stroke valve spindle a few times and inspect other components such as actuator seals etc to ensure correct functioning Follow the procedure for installation as detailed in the operating and maintenance instruction manual Note materials and data of units supplied may deviated from this Instruction Manual Please consult order docu...

Reviews: