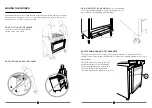
background image

26

27

The fixed consumer

 gas


supply

 outlet should be at 

approximately the same height as the cooker 
connection point, pointing downwards and 
approximately 150mm to the side of the cooker. The 
hose should be clear of the floor when the cooker is 
in the installed position. Ensure that the safety chain 
is installed correctly so that the chain prevents strain 
on the hose connections when the cooker is pulled 
forward. 

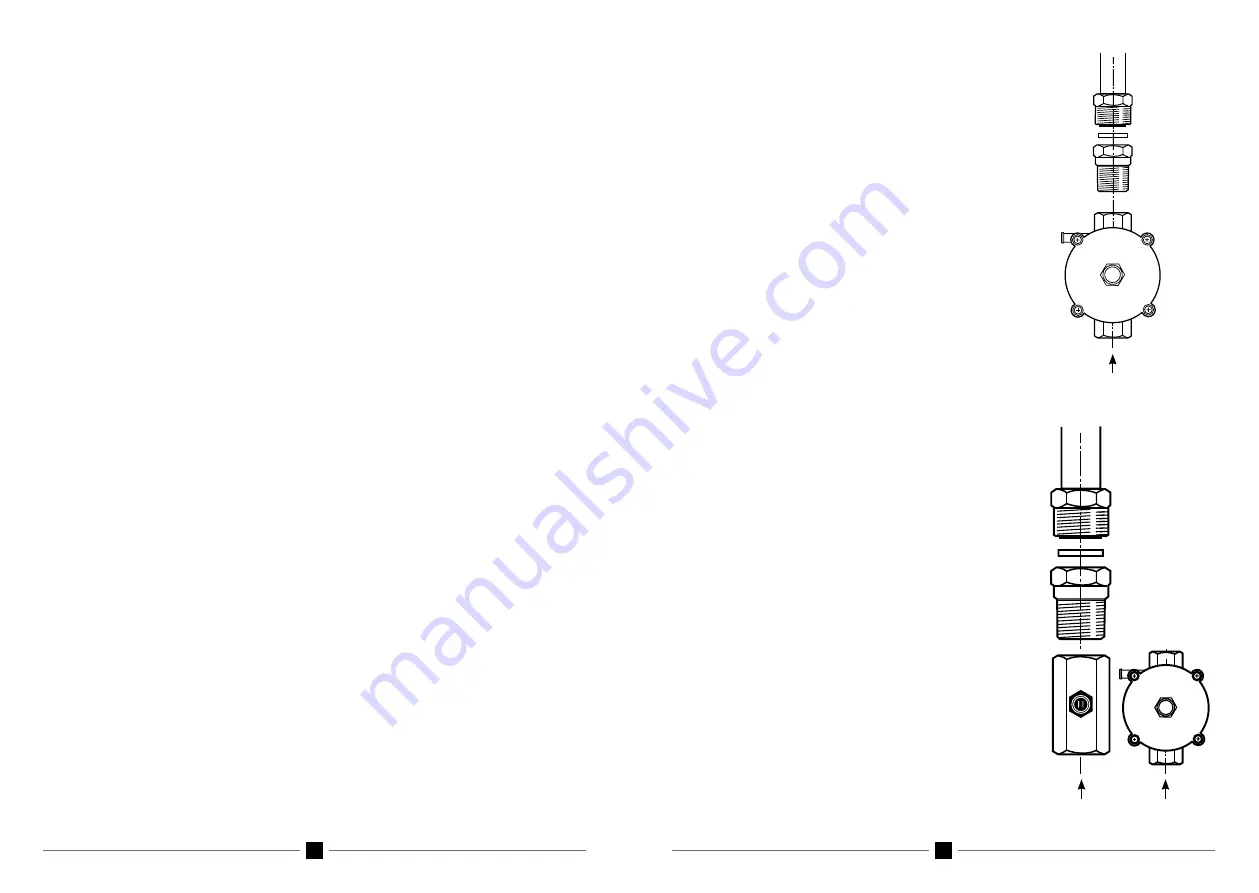
If the connection is for natural gas the test point 
pressure should be adjusted to 1.00kPa with the wok 
burner operating at maximum. 

GAS CONNECTION

If installing for use with LPG ensure that an AGA 
approved gas regulator suitable for a supply pressure 
of 2.75kPa is part of the tank supply and the test point 
pressure is adjusted to 2.75kPa. 

-  There is a connection kit supplied with the cooker.


.

-

 It is recommended that an isolating valve and union


be

fitted, to enable simple disconnection for servicing.

These are to be in an accessible location.

-

 Check connections are gas tight with soapy water or

other approved method.

-  Under no circumstances use a naked flame in

checking for leaks.

-

 Check Gas Adjustments (refer 

installation - gas

checks and adjustments

).

-

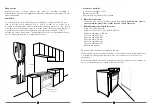
REGULATOR PLACEMENT - We strongly advi

s

e

to locate the Natural Gas regulator close to the

gas inlet and away from the heat of the cooker.

Regulator failure due to heat exposure is not

covered under warranty.

-

 When satisfied that the upright cooker is operating

correctly, instruct the customer in its safe operation.

Ensure the customer understands fully by having


them

operate the upright cooker in all its functions.
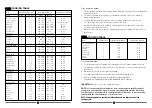
NA

T GAS

LP

G GAS

Natural Gas

LPG Gas

OR

Gas Flow

Gas Flow

Gas Flow

INSTALLATION - ELECTRICAL CONNECTION

Before connecting the plug into the power socket, follow these instructions: 

• The electrical supply for the upright cooker must be a 240 Volt 50 Hz.

• The fuse and electrical wiring of the dwelling must support the load of the appliance.

•  The 3-pin plug, used to connect the electricity, must be easily reached when the

upright cooker is in its installed position.

•  The upright cooker must be earthed. Connect the upright cooker to a properly

earthed and rated power socket, as appropriate.

•  The flexible cord of the upright cooker must not be subject to direct heat and must be

positioned after installation so that its temperature does not exceed 75°C.

IMPORTANT:

 If a power socket needs to be installed or relocated, the work must be 

done by a licensed electrician. 

In New Zealand the cooking range must be connected to the supply by a supply cord 
fitted with an appropriately rated plug that is compatible with the socket-outlet fitted to 
the final sub-circuit in the fixed wiring that is intended to supply the cooking range. 

INSTALLATION - GAS CONNECTION

These technical instructions have been prepared for use by Authorised persons. This 
unit 

MUST ONLY BE INSTALLED BY AN AUTHORISED PERSON – PROOF IS 

REQUIRED FOR WARRANTY SERVICE CLAIMS. 

The cooker has been manufactured with Natural Gas injectors fitted. For use with LPG 
the cooker must be converted. The conversion kit is supplied. Information on converting 
the cooker is included with these instructions.

The requirements of the local gas and electrical authorities must be adhered to, 
consult AS5601 as appropriate. 

Gas inlet fitting is 1/2” BSP (male) thread. 

This appliance can be connected with rigid pipe as specified in AS5601 table 3.1. 

This appliance is approved for hose connection in compliance with AS5601, clause 
5.12.1.8. The flexible hose must comply with AS/NZS 1869 (AGA Approved), 10mm ID, 
class B or D, between 1 – 1.2 m long and in accordance with AS5601 for a high level 
connection. The hose should not be subjected to abrasion, kinking or permanent 
deformation and should be able to be inspected along its entire length. Unions’ 
compatible with the hose fittings must be used and all connections tested for gas leaks. 

Summary of Contents for GlemGas IT965MVN2

Page 1: ...you require clarification This cooker must be installed by a qualified licensed installer in accordance with these instructions If you do not retain proof of correct installation your warranty will be voided If your cooker is found to be incorrectly installed you will be liable for all service costs If a warranty call is made and the cooker is found to be incor rectly installed you will be charged f...

Page 2: ...n of this appliance It will help you get the best performance and make full use of the appliance s features The safety precautions and warnings are listed for your safety and the safety of others when operating this appliance Please keep this manual in a safe place for future reference This appliance has been designed for use in cooking of domestic household food Any form of usage other than cooki...

Page 3: ...ER SAFETY CHAIN AND ANTI TILT BRACKETS The upright cookers have a safety chain to prevent damage to the gas pipes if the upright cooker is moved and anti tilt brackets to prevent accidental tipping of the cooker Safety chain The chain must be secured to the wall behind the upright cooker by fitting an expansion plug with hook to the wall at the same height as the safety chain The chain may then be...

Page 4: ...ren away from the glass oven door while cooking is in progress if touched the glass could cause burns Drop down doors Don t let children sit down or play with the oven door Do not use the drop down door as a stool to reach above cabinets Do not put any weight on an open oven door Grill Grilling must always be done with the oven door closed Pots and pan handles Always turn pan handles to the side o...

Page 5: ...VAL AND RE INSTALLATION Glem and Emilia cookers have the latest oven door hinge design technology from Glem Gas For the removal and re installation of the oven door with the new hinges please follow these procedures TO RE INSTALL THE DOOR IMPORTANT Hold the door at an angle so there is a 150mm gap at the top Hook the hinges in first with the groove in the bottom of the hinge sitting on the roller ...

Page 6: ... inside the oven DO NOT USE a steam cleaner to clean the cooker TO CLEAN YOUR COOKER Do not use strong detergents or acids as this can cause rust spotting Call 1300 307 917 if you are unsure DETERGENTS CAN CAUSE RUST SPOTTING EVEN ON STAINLESS STEEL CALL 1 300 307 917 FOR TECHNICAL ADVICE ON CLEANING OPERATION OF GAS HOB GAS BURNERS The combination of high speed burners with those of a standard ty...

Page 7: ...iners in the centre of the shelves Rotisserie On the ML 106 cooker there is a rotisserie feature in the small oven The rotisserie motor operates when the grill function is selected Operate the rotisserie with the door closed PRH PRH PRH PRH PRH PRH PRH PRH GAS Oven Preheating After the oven has been switched on keep the door open for a minute then close the door gently so there is no risk of extin...

Page 8: ...s to become fully familiar with the characteristics of your new oven NOTE Some cookers have a cooling fan that continues to run after the end of the cooking cycle Cakes Static Fan oven Static Fan oven Chocolate Cake 2 2 3 180 190 180 35 40 Cream Caramel 3 2 3 130 150 130 30 35 Cup Cakes 1 1 2 190 200 180 190 18 20 35 cakes Fruit Cake 3 2 3 175 190 165 180 35 45 Jam Tarts 2 2 3 185 200 185 200 40 5...

Page 9: ... has elapsed Delayed start cooking time the timer sets how long the oven runs for and the time of day that the oven switches off BAKING TROUBLE SHOOTING Problem Cause Solution Cooking unevenly Wrong location in oven Use shelf to place food in centre of oven Wrong size tray Try alternatives Heat variations in oven Turn food whole cooking Burning on top Oven not preheated Turn oven on and wait for l...

Page 10: ...program at any time press and hold the MENU then press MENU twice and then the and at the same time Do not forget to switch off the oven and temperature setting and the end of the cycle GETTING STARTED When you first connect the power the display will flash on and off This is normal Your cooker is fitted with a touch control timer programmer The timer has a key lock function and to activate it a k...

Page 11: ...oker 4 Knobs and Control Panel All models All knobs are removable Clean behind the knobs and around the control panel to prevent grease and grime build up that can cause jamming of the knobs gas taps etc The stainless steel panel should be cleaned with stainless steel cleaners do not use anything abrasive 5 Cleaning of Oven Door The outer glass should be cleaned with a specific glass and mirror cl...

Page 12: ...low these safety precautions during cleaning Avoid the ignitors becoming wet as this is an electrical part and moisture can cause it to malfunction Avoid water spilling into hob burner holes when burners have been removed Always dry unit before use never let water and detergents sit in and on unit CARE OF CATALYTIC LINERS Some models have catalytic liners installed within the oven cavity They are ...

Page 13: ... or anti clockwise as appropriate Glem Gas Australasia Pty Ltd and their appointed agents decline any responsibilities in the case of installation not according to these instructions Rangehoods Rangehoods and overhead exhaust fans must be installed according to manufacturers instructions Rangehoods should be installed not lower than 750 mm above the cooktop Ventilation A cooker should not be insta...

Page 14: ...t 50 Hz The fuse and electrical wiring of the dwelling must support the load of the appliance The 3 pin plug used to connect the electricity must be easily reached when the upright cooker is in its installed position The upright cooker must be earthed Connect the upright cooker to a properly earthed and rated power socket as appropriate The flexible cord of the upright cooker must not be subject t...

Page 15: ...LD NOT BE USED TO SEAL JOINTS AN APPROPRIATE GAS SEALING TAPE OR COMPOUND SHOULD BE USED IF IN DOUBT ON ANY INSTALLATION POINTS PLEASE CALL 1300 307 917 FOR MORE INFORMATION GAS CHECKS AND ADJUSTMENTS AIR SETTING Oven burner Check the aeration setting of the oven burner and if necessary adjust by following these procedures Remove the shelves and vitreous enamelled floor taking care not to damage t...

Page 16: ...e sure the ignitor is clean and dry this is the cylindrical white point at the edge of the burner Make sure that the burner is correctly assembled Make sure that the electricity is turned on The flame suddenly looks different This usually means that the burner is not assembled correctly GAS OVEN Oven wont light Make sure the gas supply is turned on and the knob turned to maximum temperature Make s...

Page 17: ...the serial number or other details on it have been removed or rendered illegible b If the appliance is connected to any gas type or voltage other than shown on rating plate c If the appliance has been subjected to misuse abuse accident or want of care d If the appliance has been installed operated or maintained contrary to the instructions supplied by Glem Gas Australasia Pty Ltd e If any defect o...

Page 18: ...l us info glemgas com au h If you live outside the service area of the Glem Gas Australasia service agents this warranty does not cover the cost of transport of the appliance for service or the service agent s travelling time 3 This warranty does not cover any glass damage or replacement of light bulbs 4 Glem Gas Australasia Pty Ltd accepts no liability pursuant to this Warranty for any cost or co...

Reviews: