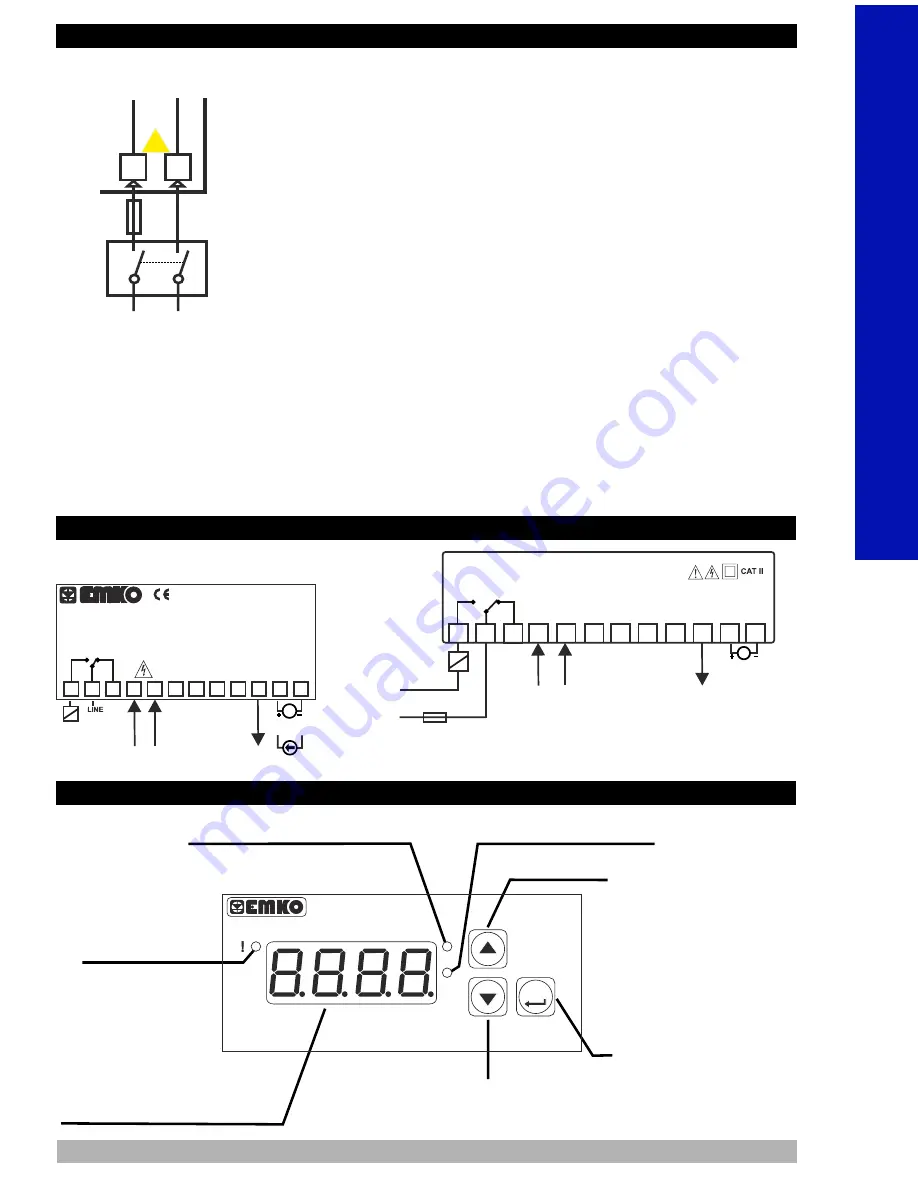
3.2 Device Label and Connection Diagram
3.1 Supply Voltage Input Connection of the Device
Note-1:
“L” is (+), “N” is (-) for 24V
Supply Voltage
Z
Make sure that the power supply voltage is same indicated
on the instrument.Switch on the power supply only after
that all the electrical connection have been completed.
Supply voltage range must be determined in order. While
installing the unit, supply voltage range must be
controlled and appropriate supply voltage must be
applied to the unit. Controlling prevents damages in unit
and system and possible accidents as a result of incorrect
supply voltage.
c
There is no power supply switch or fuse on the device. So
a power supply switch and a fuse must be added to the
supply voltage input. Power supply switch and fuse must
be put to a place where user can reach easily.
Power supply switch must be two poled for seperating
phase and neutral. On/Off condition of power supply
switch is very important in electrical connection. On/Off
condition of power supply switch must be signed for
preventing the wrong connection.
External fuse must be on phase connection in
supply
input.
External fuse must be on (+) line connection in
supply
input.
V
Z
c
230V
V
CONNECTION DIAGRAM
6
Connection of Supply
Voltage Input
c
a
EXTERNAL
FUSE
(1A T)
Note-2
Supply
Switch
Supply Voltage
4
5
L
N
Note-1
Note-2 :
External fuse is recommended.
4.Front Panel Definition and Accessing to the Menus
Must be determined in order.
230 V
(± %15) 50/60 Hz or
115 V
(± %15) 50/60 Hz or
24 V
(± %15) 50/60 Hz or
24 V
(-%15,+%10) 50/60 Hz
V
V
V
W
2
P/N : ESM-3700 - 5.20.0.1/00.00/0.0.0.0
Y
ca
OUTPUT
230 V
± 15%
50/60Hz - 1.5VA
V
3
4
1
5
NO
NC
C
5A@250V
V
6
7
8
9
10 11 12
CAT II
12V
± 30%
Z
Max. 30 mA
0-60mV, 0-1V, 0-10V
0-20mA, 4-20mA
Z
Voltage Input
Z
Current Input
9
10
a
L
N
2
5
6
1
L
5A T FUSE
3
N
OUTPUT
NO
NC
C
5A@250V
V
4
7
8
11 12
L N
Z
Voltage Input
Z
Current Input
12V
± 30%
Z
Max. 30 mA
230 V
± 15%
50/60Hz - 1.5VA
V
LOAD
LOAD
Process Indicator
ESM - 3700
P
AS
ASET
It is used to decrease the value,in
main operation screen show the
minimum measurement process
Note-1
It is used to enter
to the Alarm Set
Value Changing
Mode,
Programming
Mode and used as
OK button
It is used to increase
the value, in main
operation screen show
the maximum
measurement process
value, in programming
mode It is used to
access to the parameter
Note-1
Led Indication of Programming
Mode is Active
Led Indication of Alarm Set Value
Changing Mode is Active
Alarm Output
Active Led
Display Process Value,
Alarm Set Value and
Parameters
ENGLISH


