background image

4

upper bracket located at the other end of the DMT. Again, pay close attention 

to mark the correct mounting holes for the model you’re installing.
NOTE:  Ultimately, the wall location where you’ll be installing your EW series 

speaker will have a stud or other framing member very close by. You may 

want to use a stud-finder (available at your local hardware store) to locate the 

nearest stud. It is highly recommended you place your EW series mounting 

brackets where at least two of the bracket’s screws can be placed into a stud 

or other framing member. Then, follow the drywall mounting steps below 

for the other two remaining holes per mounting bracket. Mounting your EW 

series speaker this way provides for a very secure installation. 
If the wall location doesn’t have a stud or other framing member nearby, 

and you need to install your mounting brackets onto drywall only, use a 

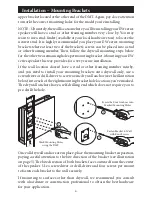
screwdriver or drill-driver to screw a zinc drywall anchor (see the illustration 

below) into each of the eight mounting bracket hole locations you’ve marked. 

The drywall anchors have a self-drilling end which does not require you to 

pre-drill the hole.  

Installation – Mounting Brackets

Once all drywall anchors are in place, place the mounting bracket in position, 

paying careful attention to the bite direction of the bracket (see illustration 

on page 5). The bite direction of both brackets faces outward from the center 

of the speaker. Use a screwdriver or drill-driver and four screws per mount 

to fasten each bracket to the wall securely.
If mounting to surfaces other than drywall, we recommend you consult 

with a hardware or construction professional to obtain the best hardware 

for your application.

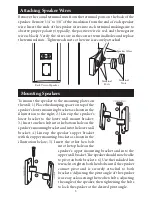
Mark Mounting Holes 

using the DMT

Screw the Four Anchors into 

Marked Mounting Holes

Fasten Bracket to Wall 

with Four Screws

Summary of Contents for EW25

Page 1: ...ce ON WALL SPEAKERS Model EW25 Model EW30 Model EW35 USER INSTALLATION MANUAL...

Page 2: ...manual before connecting your speakers This will ensure you have an understanding of how to properly setup and operate your speakers for optimum performance Break In Period Allow 18 24 hours of liste...

Page 3: ...tweeter from damage and allow greater power handling The EW series specialized crossover design allows the speaker to be used horizontally or vertically The crossover system enables flat frequency re...

Page 4: ...entered in between the surround speakers Try experimenting with the surround channel speakers by angling them slightly towards or away from the listening position This angle can have a dramatic effect...

Page 5: ...arby and you need to install your mounting brackets onto drywall only use a screwdriver or drill driver to screw a zinc drywall anchor see the illustration below into each of the eight mounting bracke...

Page 6: ...e right 2 Line up the speaker s lower bracket to the lower wall mount bracket 3 Insert one hex bolt into the bottom hole on the speaker s mounting bracket and into the lower wall bracket 4 Line up the...

Page 7: ...y flex and lift the grille out of the recessed track 4 Gently pull the other side of the grille from its recessed track To re insert grille 1 Insert one side of the grille into the recessed track on o...

Page 8: ...ly Dome 1 Silk Poly Dome 1 Silk Poly Dome Impedance 6 Ohms 6 Ohms 6 Ohms Crossover Frequencies 220Hz 2 2kHz 220Hz 2 2kHz 220Hz 2 2kHz Dimensions Height 25 Width 7 Depth 5 Height 30 Width 7 Depth 5 Hei...

Page 9: ...ducts Charges for unauthorized service and transportation cost are not reimbursable under this warranty This warranty becomes void if the product has been damaged by alteration misuse or neglect The w...

Page 10: ...4041 Toll Free 800 543 2205 Fax 801 543 3300 www emptek net It is EMP Tek policy to continuously incorporate improvements into products all specifications are subject to change without notice Copyrigh...

Reviews: