background image

45

V1/2018-EM-Classic

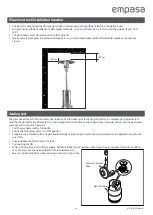
Fuel gas smell

Liquid propane gas and natural gas have artificial odorants, which have been added specifically to enable the detection of fuel 
gas leaks. In case of leaking gas, you will normally be able to smell the gas. Since propane (liquid gas) is heavier than air, you 
will be able to smell the gas in low height near the ground. 

TAKE IMMEDIATE ACTION EVERY TIME YOU SMELL GAS!!

Ÿ

Do not conduct any acts that could ignite the gas. Do not operate any electric switches. 

Ÿ

Do not unplug any power or extension cables. Do not ignite any matches or other ignition sources. Do not use your phone. 

Ÿ

Ensure that all persons immediately leave the building and remove themselves from the danger zone. 

Ÿ

Propane gas (liquid gas) is heavier than air and can settle in low height. When suspecting a propane gas leak, stay away 
from low sections. 

Ÿ

Use your neighbour's phone and call the fuel gas supplier and the fire brigade. No longer enter the building or the area.  

Ÿ

Stay outside the building and away from the danger zone until it/they have been declared safe by the fire brigade or the 
gas supplier.  

Ÿ

Finally, have the fuel gas service technician and the fire brigade conduct a test of the leaked gas. Ensure that you ventilate 
well the building or area prior to returning. Properly trained service technicians must repair all leaks, test for further leaks 
and then turn device on again. 

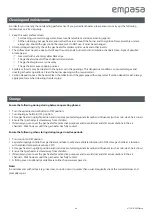
Activation

To Turn on the heater

1. Turn on the valve on the gas supply cylinder completely.
2. Press and turn the variable control knob to PILOT position (counter-clockwise 90°).
3. Press down the variable control knob and hold for 30 seconds. While holding down the variable control knob, press the 
igniter button several times until the pilot flame lights. Release the variabel control knob aafter the pilot flame lights.

Note:

- If a new tank has just been connected, please allow at least one minute for the air in the gas pipline to purge out 

through the pilot hole.

- When lighting the pilot flame make sure that the variable control knob is continuously pressed down while pressing 

the igniter button. Variable control knob can be released after the pilot flame lights.

- Pilot flame can be watched and checked from the small round window with sliding lid located at the bottom of the 

flame screen (to the left or right side of the controller).

- If the pilot flame does not light or it goes out, repeat step 3.

4. After the pilot flame lights, turn the variable control knob to maximum position and leave it there for 5 minutes or more 
before turning the knob to desired temperature positon.

To turn OFF the heater

1. Turn the variable control knob to PILOT position.
2. Press and turn the variable control knob to OFF position.
3. Completely turn off the valve on the gas bottle.

Pilot

LO

OFF

HI

Ignitor

Variable control knob

Summary of Contents for Classic light HMXD-A

Page 1: ...t Bitte vor Montage und Inbetriebnahme sorgf ltig alle Punkte durchlesen Anleitung aufbewahren und bei Weitergabe des Produktes mit aush ndigen V1 2018 EM Classic Modell Nr HMXD A Abb hnlich 0063 Deut...

Page 2: ...Produktmerkmale Montage Aufstellort Dichtheitspr fung Brenngasgeruch Inbetriebnahme Au erbetriebnahme Reinigung Wartung Entsorgung Fehlerbehebung Service CE Konformit tserkl rung Seite 3 Seite 4 Seite...

Page 3: ...B C E F D G H I J Reflektor Flammenschirm Brennersocke Lufteinlassgitter Gasregler Reglergeh use Standrohr Gasflaschengeh use Standrohrhalter Standfu Sockel A B C D E F G H I J LO H I Off Igniter P i...

Page 4: ...t ck M8x10 Schraube M6x10 ss Fl gelmutter M8 Unterlegscheibe 6mm Schraube M6x10 Hutmutter M6 Schraubenschl ssel Mutter M6 Schraube M6x10 Gasflaschenhalter Mutter M8 R der AA BB CC DD EE FF GG HH II 5x...

Page 5: ...age des Gasheizstrahler und die Lagerung der Gasflasche m ssen in bereinstimmung mit den geltenden Bestimmungen erfolgen Die Montage dieses Ger tes muss von einer fachkundigen Person durchgef hrt werd...

Page 6: ...ann S mtliche Schutzverkleidungen und Sicherheitsvorrichtungen die zur Wartung des Gasheizstrahlers entfernt wurden m ssen vor dem Betrieb des Gasheizstrahlers wieder angebracht werden Wechseln Sie di...

Page 7: ...riert sein dass eine Gasentnahme aus der sich in Betrieb befindlichen Gasflasche erfolgen kann Schlie en Sie niemals einen ungeregelten Propanbeh lter an den Gasheizstrahler an Der Gummischlauch der d...

Page 8: ...Montage 8 Standrohrhalter I mit 3x Schrauben AA auf Standfu Sockel J befestigen Standrohr G auf Standrohrhalter I mit Schrauben CC und Muttern BB befestigen 1 2 V1 2018 EM Classic 3x 1 2 3...

Page 9: ...ohrhalter I aufsetzen Nehmen Sie den Brennerkopf mit dem breits angebrachten Schlauch und f hren Sie den Schlauch nach unten in das Stahlrohr Bringen Sie den mitgelieferten Regler Druckminderer an dem...

Page 10: ...ohr einsetzen Brenner mit 4x Schrauben FF befestigen 3x Distanzst cke EE mit 3x Unterlegscheiben DD auf Flammschirm B schrauben 5 Reflektor A mittels 9x Schrauben II 9x Unterlegscheiben HH und 9x Mutt...

Page 11: ...Gasflasche einsetzen und anschlie en Achten Sie auf festen und dichten Anschluss Gasflaschengeh use wieder absenken 8 Reflektor A auf Flammenschirm B aufsetzen und mit 6x Unterlegscheiben DD und 3x Fl...

Page 12: ...g durchgef hrt werden wegen m glichem unsachgem em Transport oder weil zu viel Druck auf den Gasheizstrahler ausge bt wird Der Gasheizstrahler muss mit einer vollen Flasche gepr ft werden Stellen Sie...

Page 13: ...en Propangas Fl ssiggas ist schwerer als Luft und kann sich in niederer H he absetzen Bei Verdacht auf ein Propanleck m ssen Sie sich von allen niedrigen Bereichen fernhalten Verwenden Sie das Telefon...

Page 14: ...Glasr hre stets vorsichtig vor Lagerung Achten Sie bei der Lagerung zwischen den Betriebsphasen auf folgende Punkte Stellen Sie die Fl ssiggasflasche auf die Stellung AUS Lagern Sie den Gasheizstrahl...

Page 15: ...zen Luft aus Leitungen sp len Batterie gegen gleichen Typ tauschen Alle Anschl sse kontrollieren und festziehen Verschmutzten Bereich reinigen Thermoelement austauschen Anschl sse kontrollieren Gasfla...

Page 16: ...0 18 00 Uhr Web www empasa de Hinweis Irrt mer nderungen und Druckfehler vorbehalten Aktuellste Version als PDF im Downloadbereich unter www empasa de Vertrieb Versand empasa GmbH Im Herrmannshof 10 D...

Page 17: ...adiant de terrasse Classic light Avant le montage et la mise en service veuillez lire soigneusement tous les chapitres Conserver la notice et la remettre en cas de cession V1 2018 EM Classic Mod le No...

Page 18: ...t ristiques du produit Montage Lieu d installation V rification de l tanch it Odeur du gaz combustible Mise en service Mise hors service Nettoyage Maintenance limination Correction des d fauts Apr s v...

Page 19: ...ClassicR flecteur Tamis anti flamme Socle du br leur Grille d entr e d air R gulateur de gaz Coffre r gulateur Tube vertical Compartiment bouteille de gaz Support tube vertical Pied Socle A B C D E F...

Page 20: ...lecteur Rondelle M8x10 Vis M6x10 ss crou papillon M8 Rondelle 6mm Vis M6x10 crou borgne M6 Cl anglaise Vis crou M6 Vis M6x10 Support bouteille de gaz Vis crou M8 Roulettes AA BB CC DD EE FF GG HH II 5...

Page 21: ...ontage et la mise en service lisez le mode d emploi Le montage du chauffage radiant gaz et le stockage de la bouteille de gaz doivent tre effectu s en conformit avec les r glementations en vigueur Le...

Page 22: ...peuvent tr bucher ou dans une zone o le tuyau pourrait tre endommag accidentellement Tout rev tement de protection et tout dispositif de s curit retir s pour l entretien du chauffage radiant gaz doiv...

Page 23: ...rejet de vapeur provenant de la bouteille en fonctionnement Ne raccordez jamais un r servoir propane non r glement sur le chauffage radiant gaz Le flexible en caoutchouc reliant le r gulateur l entr e...

Page 24: ...Montage 24 Support du tube vertical I avec 3x vis AA sur la pied socle J fixer Fixer le tube vertical G sur le support du tube vertical I avec les vis CC et crous BB 1 2 V1 2018 EM Classic 3x 1 2 3...

Page 25: ...la bouteille de gaz H sur le support du tube vertical I Prendre la t te du br leur avec un tuyau d j attach et alimenter le tuyau vers le bas dans le p le principal Fixer le r gulateur fourni l extr...

Page 26: ...tallique gaz dans le tube vertical Fixer le br leur avec 4x vis FF Visser 3x carteurs EE avec 3x rondelles DD sur le tamis anti flamme B 5 Assembler le r flecteur A l aide des 9x vis II des 9x rondell...

Page 27: ...s rer et raccorder la bouteille de gaz Veillez ce que les raccords soient stables et tanches Rabaisser le compartiment de la bouteille de gaz 8 Poser le r flecteur A sur le tamis anti flamme B et fixe...

Page 28: ...fectu e sur le site de l installation en raison d une ventuelle mauvaise manipulation pendant le transport ou d une pression excessive appliqu e sur le chauffage Le chauffage doit tre test avec une bo...

Page 29: ...les fuites v rifier la pr sence d autres fuites et rallumer ensuite l appareil pour vous Mise en service POUR ALLUMER LE CHAUFFAGE 1 Tourner fond la vanne d alimentation en gaz sur la bouteille 2 Pou...

Page 30: ...en cas de pr sence de d p ts de carbone Proc dez toujours avec minutie pour le nettoyage des tubes de verre Veillez lors du stockage entre les phases d utilisation aux points suivants Positionnez la b...

Page 31: ...ou remplacer l ouverture Purger l air des conduites Remplacer par une pile du m me mod le Contr ler et resserrer tous les raccords Nettoyer la zone encrass e Remplacer le thermocouple V rifier les ra...

Page 32: ...sa de Indication Sous r serves d erreurs de modifications et d erreurs d impression Derni re version sous format PDF dans la zone de t l chargement l adresse www empasa de Vente Exp dition empasa GmbH...

Page 33: ...ual Patio radiation heater Classic light Please read carefully all points prior to assembly and usage Keep manual and pass on alongside product V1 2018 EM Classic Model no HMXD A Illustration similar...

Page 34: ...contents V1 2018 EM Classic Component overview Parts overview Proper use Liability General information Safety information Gas requirements Product characteristics Assembly Installation location Leak t...

Page 35: ...A B C E F D G H I J Reflector Radiation shade Burner base Air inlet grid Gas control Control housing Standpipe Gas bottle housing Standpipe holder Foot Base A B C D E F G H I J LO H I Off Igniter P il...

Page 36: ...er 8mm Spacer M8x10 Screw M6x10 ss Wing nut M8 Washer 6mm Screw M6x10 Cap nut M6 Wrench Nut M6 Screw M6x10 Gas bottle holder Nut M8 Wheels AA BB CC DD EE FF GG HH II 5x 6x 6x 9x 3x 4x 3x 15x 9x 9x 1x...

Page 37: ...ion Read the instructions for assembly and activation Assembling the gas heater and storing the gas bottle must adhere to the applicable requirements This device requires assembly by a knowledgeable p...

Page 38: ...hose might be accidentally damaged All protective cladding and safety devices removed for gas heater maintenance must be reattached prior to gas heater usage Exchange the gas bottle in a well ventila...

Page 39: ...l Assembly must meet the regional requirements If such requirements do not exist implement the respectively defined standards for storage and handling of liquid gases Dented rusty or damaged propane g...

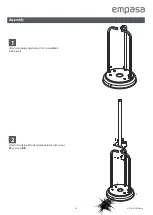
Page 40: ...Assembly 40 Attach standpipe holder I with 3x screws AA to foot base J Attach standpipe G to standpipe holder I with screws CC and nuts BB 1 2 V1 2018 EM Classic 3x 1 2 3...

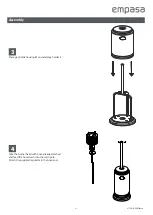
Page 41: ...1 Place gas bottle housing H on standpipe holder I Take the burner head with hose already attached and feed the hose down into the main pole Attach the supplied regulator to the hose end 4 3 V1 2018 E...

Page 42: ...ner with gas steel pipe into standpipe Fasten burner with 4 x screws FF Fasten 3x spacers EE with 3x washers DD on radiation shade B 5 Fasten reflector A using 9x screws II 9x washers HH and 9x nuts J...

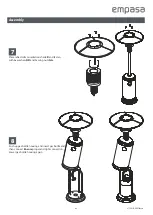
Page 43: ...le housing and insert gas bottle and then connect Ensure proper and tight connection Lower gas bottle housing again 8 Place reflector A on radiation shade B and fasten with 6x washers DD and 3x wing n...

Page 44: ...leaving the factory A complete gas tightness test must be conducted at the assembly site since transportation conditions might have been improper or because the gas heater was exposed to too much pre...

Page 45: ...chnicians must repair all leaks test for further leaks and then turn device on again Activation To Turn on the heater 1 Turn on the valve on the gas supply cylinder completely 2 Press and turn the var...

Page 46: ...deposits exist Always apply great care when cleaning the glass pipe Storage Ensure the following during storing between operating phases Turn liquid gas bottle to OFF position Store gas heater in upr...

Page 47: ...n gas valve Fill liquid gas bottle Clean or replace opening Rinse air supply pipes Exchange with battery of same type Check and tighten all connections Clean contaminated area Exchange thermal element...

Page 48: ...m Web www empasa de Hinweis This manual is subject to changes and printing errors The most recent version is available as PDF in download section of www empasa de Sales Delivery empasa GmbH Im Herrman...

Page 49: ...CE Konformit tserkl rung D claration de conformit CE Declaration of conformity 49 V1 2018 EM Classic...

Reviews: