background image

7

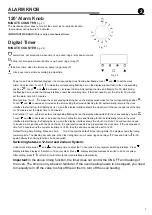
Fig. 2.1

MINUTE COUNTER 

(fig. 2.1)

The mechanical timer does not control the circuit, just a reminder function,

 the maximum timing time is 120 minutes.

IMPORTANT WARNING: This is only a mechanical timer.

2

ALARM KNOB
120’ Alarm Knob

Digital Timer

Alarm clock: set time period, when time is up, buzzer rings, relay does not work

Stop: set time period, when the time is up, buzzer rings, relay off

End: set time, when the time is up, buzzer rings, relay off

Clock: user can set time according to actual time

Power on and clock interface displays , the corresponding clock flashing bar flashes, touch      and       to set the clock

Alarm clock function: Touch         to make the corresponding flashing bar on the display window flash to the corresponding 

position       . Touch       and       to decrease or  increase the time. After setting the time and flashing for 5S, start timing, 

the flashing bar is on and the display interface shows the remaining time. If the user needs to set the time for 30 minutes, 
set the alarm time to 30 minutes.  
Stop function: Touch       to make the corresponding flashing bar on the display window flash to the corresponding position       . 
Touch       and       to decrease or increase the time, setting the time and flashing for 5S ,automatically return to the clock 

interface to start timing, the flashing bar is on, and the display interface shows the clock time. If the user needs to set the time 

for 30 minutes, set the alarm time to 30 minutes. 
End function: Touch        to make the corresponding flashing bar on the display window flash to the corresponding position       . 
Touch       and       to decrease or increase the time, setting the time and flashing for 5S ,automatically return to the clock 

interface to start timing, the flashing bar is on, and the display interface shows the clock time. Note: The end function needs 

to be used in conjunction with the clock, that is, the end function needs to be greater than the clock time. If the  user needs to

time for 30 minutes and the current clock time is 12:00, then the end time needs to be set to 12:30.

Default Timing Time Setting: Press and hold        for 3S to enter the default 2-hour timing state. The display shows the timing 
remaining time. The flashing bar will cycle. When the timing time is up, buzzer rings and relay off. Press and hold        for 3S 

again halfway then timing function can be cancelled.

Switching between 12-hour and 24-hour System:

Under clock state, press       and       at the same time to enter the 12-hour and 24-hour system switching interface. Press       ,

display interface displays 12 ,switch to 12-hour system. Press       ,display interface displays 24,switch to 24-hour system. 

After setting, press        or after 5S, it will return to the clock interface automatically.

Important:

In the above timing function, the timer does not control the ON,OFF and heating of  

the oven. The timer is only a buzzer reminder. If the oven heating needs to be stopped, you need  

to manually turn off the valve to shut off the air then to turn off the oven heating.

MINUTE COUNTER 

(fig. 2.2)

Fig. 2.2

Summary of Contents for EMPV-24WO08

Page 1: ...ation must conform with local codes or in the absence of codes the National Fuel Gas Code ANSIZ223 1 Iatest edition Electrical installation must be in accordance with the National Electrical Code ANSI NFPA70 latest edition and or local codes IN CANADA Installation must be in accordance with the current CAN CGA B149 1 National Gas Installation Code or CAN CGA B149 2 Propane Installation Code and or...

Page 2: ...mestic application and therefore should not be used in a commercial environment The appliance guarantee will be void if the appliance is used within a none domestic environment i e a semi commercial commercial or communal environment WARNING NEVER use this appliance as a space heater to heat or warm the room Doing so may result in carbon monoxide poisoning and overheating of the oven WARNING The G...

Page 3: ...Please preserve this booklet carefully It may be useful in future either to yourself or to others in the event that doubts should arise relating to its operation This appliance must be used only for the task it has explicitly been designed for that is for cooking foodstuffs Any other form of usage is to be considered as inappropriate and therefore dangerous The manufacturer declines all responsibi...

Page 4: ...cting other appliances in the proximity of the oven cannot become entrapped in the oven door Do not line the oven walls with aluminium foil Do not place shelves broiler pan pans or other cooking utensils on the base of the oven chamber The manufacturer declines all liability for injury to persons or damage to property caused by incorrect or improper use of the appliance To avoid any possible hazar...

Page 5: ...rpose If you should decide not to use this appliance any longer or decide to substitute an older model before disposing of it it is recommended that it be made inoperative in an appropriate manner in accordance to health and environmental protection regulations ensuring in particular that all potentially hazardous parts be made harmless especially in relation to children who could play with old ap...

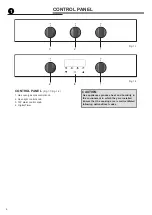
Page 6: ...ght control knob 3 120 alarm control knob 4 Digital Timer Fig 1 1 3 CAUTION Gas appliances produce heat and humidity in the environment in which they are installed Ensure that the cooking area is well ventilated following national local codes CONTROL PANEL 1 2 1 Fig 1 2 2 4 1 ...

Page 7: ...he alarm time to 30 minutes End function Touch to make the corresponding flashing bar on the display window flash to the corresponding position Touch and to decrease or increase the time setting the time and flashing for 5S automatically return to the clock interface to start timing the flashing bar is on and the display interface shows the clock time Note The end function needs to be used in conj...

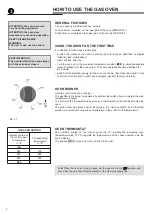
Page 8: ...ant The control of the temperature is assured by a thermostatic probe positioned inside the oven The probe must be always kept in its housing in a clean condition as an incorrect position or encrustment may cause an alteration in the control of the temperature GENERAL FEATURES The gas oven is provided with two burners a Oven burner mounted on the lower part of the oven 8500 BTU hr b Broil burner m...

Page 9: ...need to reset the knob to OFF and then turn it on again 3 Once the oven burner has lit close the oven door slowly and adjust the burner according to the power required If the flame extinguishes for any reason the safety valve will automatically shut off the gas supply to the burner VERY IMPORTANT NOTE If it can t be lighted after repeating for multiple times 3 times it may be considered as a line ...

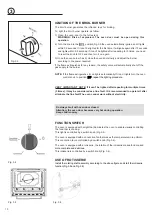
Page 10: ...way 3 3 Once the oven burner has lit close the oven door slowly and adjust the burner according to the power required If the flame extinguishes for any reason the safety valve will automatically shut off the gas supply to the burner NOTE If the flame extinguishes it can lights automatically If it can t lights turn the oven control knob to position repeat the lighting procedure VERY IMPORTANT NOTE ...

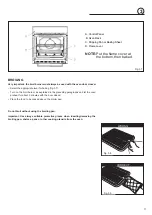
Page 11: ...et the oven preheat for about 5 minutes with the door closed Place the food to be cooked above the broiler pan Do not broil without using the broiling pan Important Use always suitable protective gloves when inserting removing the broiling pan shelves pans or other cooking utensils from the oven WRONG CORRECT Fig 3 8 Fig 3 9 3 B Oven Rack C Dripping Pan or Baking Sheet D Flame cover NOTE Put the f...

Page 12: ...tomato sauce vinegar etc can damage the enamel if left too long PAINTED PARTS AND SILK SCREEN PRINTED SURFACES Clean using an appropriate product Always dry thoroughly IMPORTANT these parts must be cleaned very carefully to avoid scratching and abrasion You are advised to use a soft cloth and neutral soap STAINLESS STEEL ELEMENTS Stainless steel parts must be rinsed with water and dried with a sof...

Page 13: ...URemove the lamp and replace with a lamp resistant to high temperature 575 Refit glass cover of the lamp holder NOTE Oven bulb replacement is not covered by your guarantee REMOVING THE OVEN DOOR To facilitate oven cleaning it is possible to remove the door Please follow the instructions carefully Open the door completely fig 4 2 Lift up and turn the small levers situated on the two hinges grip the...

Page 14: ...ain in contact with enamel parts i e inside the oven Do not use abrasive cleaners or powders that will scratch the surface of the stainless steel and the enamel Do not attempt to repair the internal workings of your oven VEBIG 24 NSS model only Do remove the protective film before the first use Fire risk Do not store flammable material in the oven FOR YOUR SAFETY Under no circumstances should any ...

Page 15: ...only materials and finishes that will withstand temperature up to 190 F 88 C and that are moisture resistant When cabinets are covered with laminates an appropriate heat resistant adhesive must be used Consult your cabinet manufacturer for proper specifications The cabinet must have solid sides back and bottom The bottom must be solid either at floor level or with the bottom edge of the cutout Any...

Page 16: ...d Ventilation The installer must refers to local national codes 10 Gas Manifold Pressure Natural gas 4 0 W C P 11 The misuse of oven door e g stepping sitting or leaning on them can result in potential hazards and or injuries WARNING ELECTRICAL GROUNDING INSTRUCTIONS The oven must be electrically grounded in accordance with local codes or in the absence of local codes with the National Electrical ...

Page 17: ...R DO NOT INSTALL THE OVEN BENEATH THE WORK COUNTER On the lover side the oven must lay on a support standing the oven weight Oven support surface MUST be solid All openings in the wall or floor where the oven is to be installed MUST be sealed Oven location should be away from strong draft areas such as windows doors and strong heating vents For SAFETY CONSIDERATIONS the oven SHALL BE FASTENED to t...

Page 18: ...ole shall be 10 1 16 255 8 mm from the centre of cutout to the left side and 20 35 64 522 mm from the front corner of cutout to the back Grounded outlet The electric cord with 3 prong ground plug has a length of 48 1220 mm Grounded outlet should be located in an area 7 7 8 200 mm below the bottom of cutout and only on the right side of the cabinet from the centre to the right side of the cabinet A...

Page 19: ...ible location in the gas line external to the appliance for the purpose of turning on or shutting off gas to the appliance In Massachusetts such shutoff devices should be approved by the Board of State Examiners of Plumbers Gas Fitters This valve should be located in the same room as the oven and should be in a location that allows ease of opening and closing in a position where it can be reached ...

Page 20: ... a gas supply line a combination of pipe fittings must be used to obtain an in line connection to the oven All strains must be removed from the supply and fuel lines so oven will be level and in line Use joint compounds and gaskets that are resistant to action of natural or propane gas on all male pipe threads Do not over tighten gas fitting when attaching to pressure regulator Over tightening may...

Page 21: ...adian Electrical Code CSA and local codes and ordinances If a mating outlet is not available it is the personal responsibility and obligation of the customer to have a properly polarized and grounded 3 prong outlet installed by a qualified electrician WARNING Electrical Shock Hazard Plug into a grounded 3 prong outlet Do not remove ground prong Do not use an adapter Failure to follow these instruc...

Page 22: ...tall it on the fixed bracket Thermostat valve failure Replace the thermostat valve Fan damaged Replace the fan Cooling fan does not work The thermostat controlling the cooling fan damaged Replace thermostat Hot air motor does not work Fan damaged Replace the fan Abnormal sound of fan There is foreign matter in the fan blowing the blade Clean up foreign matters to avoid blowing the fan blades locki...

Reviews: