background image

12430-3-0903

 Page 7

Figure 3

Checking Manifold Pressure

Both Propane and Natural gas valves have a built-in pressure
regulator in the gas valve. Natural gas models will have a
manifold pressure of approximately 4.0" w.c. (.996kPa) at the
valve outlet with the inlet pressure to the valve from a minimum
of 5.0" w.c. (1.245kPa) for the purpose of input adjustment to a
maximum of 7.0" w.c.  (1.743kPa). Propane gas models will have
a manifold pressure approximately 10.0" w.c. (2.49kPa) at the
valve outlet with the inlet pressure to the valve from a minimum
of 11.0" w.c. (2.739kPa) for the purpose of input adjustment to a
maximum of 13.0" w.c. (3.237kPa).

A 1/8" N.P.T. plugged tapping, accessible for test gauge connec-
tion, is located on the outlet side of the gas control.

The built-in regulator comes on at approximately 1/4th pressure
and full on in 10 seconds.

CLEARANCES

Clearances

1. In selecting a location for installation, it is necessary to

provide adequate accessibility clearances for servicing and
proper installation. A front clearance of 36" (91.4cm) is
recommended. Do not block outlet or inlet air openings on
the front grill.

2. The DVC-35 minimum wall depth is 3/4" (19mm) and

maximum wall depth is 10" (254mm). The maximum wall
depth may be extended using the model DV-1190 extended
flue kit. The use of tubes not supplied by the manufacturer
results in unsatisfactory performance.

3. The DVC-35 can be attached to the wall or recessed into the

wall up to 9 1/2" (241mm) in depth but the minimum 3/4"
(19mm) vent/air intake system wall depth must be main-
tained. Example: If furnace is recessed into the wall at a depth
of 9 1/2" (241mm), the minimum wall depth must be 10 1/4"
(260mm).

4. The wall in which the furnace is recessed has (0) zero

clearance to the furnace sides and top.

5. When using side discharge registers, SOR-1 or SOK-1, the

furnace cannot be recessed into the wall.

6. Clearance to sidewall or combustible material is 4" (102mm).
7. Ceiling clearance is 4" (102mm).
8. Floor and rear wall clearance is (0) zero inches.
9. Clearance of 18" (457mm) is required to sidewall or combus-

tible material when flush mounted SOR-1, side outlet regis-
ter is used.

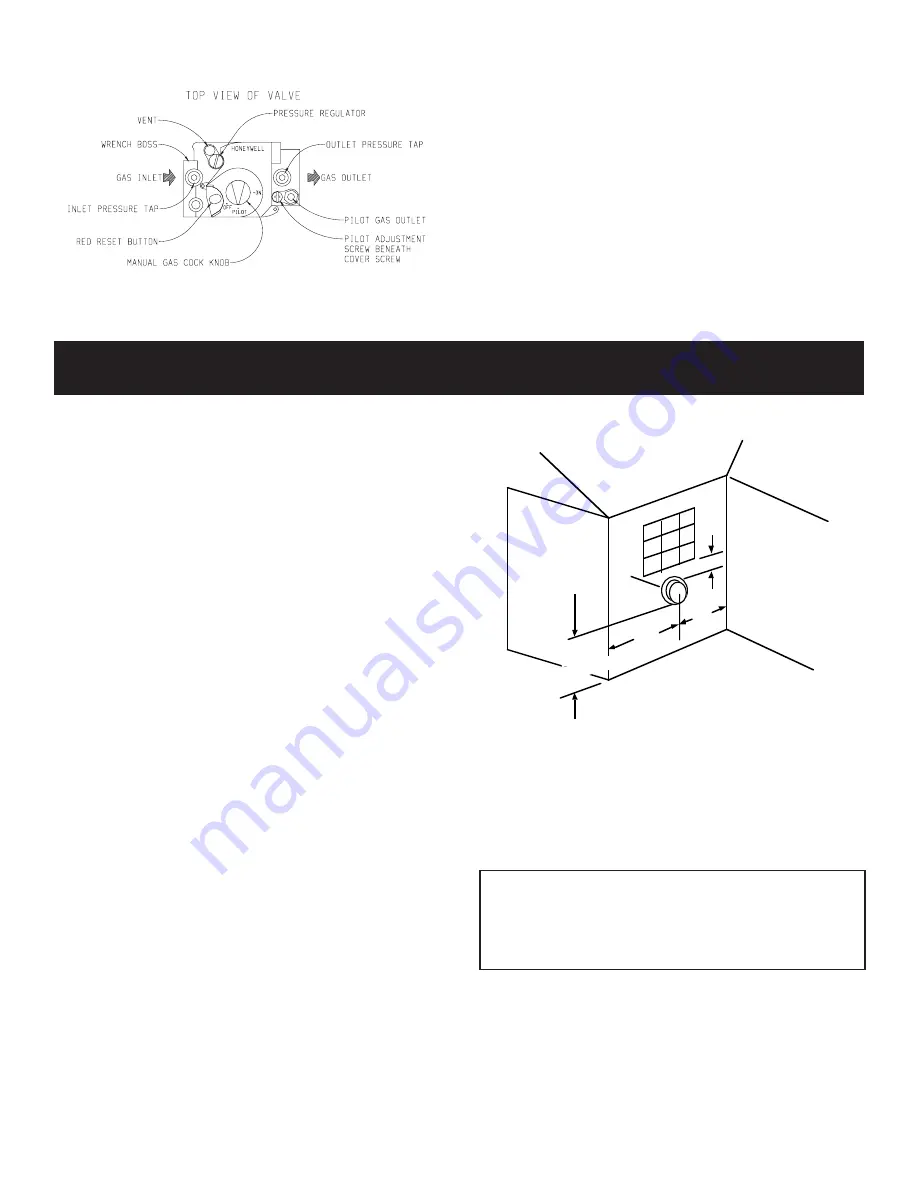
10. The minimum distance from the center of the vent cap to the

nearest outside corner or obstruction is 12" (305mm).

12" m

in.

12" min.

12" min.

9" min.

   VE NT LOCATION
M aintain spacing of vent away from 
landscaping and building overhangs.

VE NT

above 

grade

Figure 4

The vent terminal of this direct vent appliance shall be located at
least 9" (229mm) from any opening through which flue gases
could enter a building. The bottom of the vent terminal and the air
intake shall be located at least 12" (305mm)  above grade. See
vent location, Figure 4.

WARNING: The nearest point of the vent cap should be
a minimum horizontal distant of six (6) feet (1.83m) from
any pressure regulator. In case of regulator malfunction,
the six (6) feet (1.83m) distance will reduce the chance of
gas entering the vent cap.

Summary of Contents for DVC-35-1IP

Page 1: ...plier s instructions Ifyoucannotreachyourgassupplier call the fire department Installation and service must be per formed by a qualified installer service agency or the gas supplier WARNING If not ins...

Page 2: ...Standing Pilot Lighting Instructions 11 DVC 35IP Intermittent Pilot Lighting Instructions 12 Pilot Flame Characteristics 13 Main Burner Flame Characteristics 14 Wiring 14 15 Service and Maintenance S...

Page 3: ...by a qualified service person More frequent cleaning may be required due to excessive lint from carpeting bedding materials etc It is imperative that control compartments burners andcirculatingairpass...

Page 4: ...service or make adjustments in an area where the conditions are such that you may not detect the odor if there has been a leak of LP Gas Odor fade due to oxidation by rust or adsorption on walls of n...

Page 5: ...ing vehicle Qualified Installing Agency Installationandreplacementofgaspiping gasutilizationequipment or accessories and repair and servicing of equipment shall be performedonlybyaqualifiedagency Thet...

Page 6: ...orized installer for installation or relocation Compoundsusedonthreadedjointsofgaspipingshallberesistant to the action of liquefied petroleum gases The gas lines must be checked for leaks by the insta...

Page 7: ...ts in unsatisfactory performance 3 The DVC 35 can be attached to the wall or recessed into the wall up to 9 1 2 241mm in depth but the minimum 3 4 19mm vent air intake system wall depth must be main t...

Page 8: ...1 25mm provided screws 9 Installation of SOR 1 is completed Side outlet kit SOK 1 10 254mm boot assembly with regis ter for warm air discharge into an adjoining room may be installed on either side o...

Page 9: ...2mm diameter air inlet tube is placedasfaraspossibleontothecollaroftheairdropassembly Mark the 6 152mm diameter air inlet tube 1 2 13mm beyondtheoutsidewall Remove6 152mm diameterairinlet tube from co...

Page 10: ...the wind on one side of the air inlet section will result in back pressure on the flue section smothering the flame and eventual pilot outage When the vent cap is to be installed on vinyl siding or i...

Page 11: ...control knob slightly and turn clock wise to OFF Do not force 5 Replace control access panel lower front panel LIGHTING INSTRUCTIONS 1 STOP Read the safety information above 2 Set the thermostat to l...

Page 12: ...n to inspect the appliance and to replace any part of the control system and any gas control which has been under water 1 STOP Read the safety information above 2 Set the thermostat to lowest setting...

Page 13: ...tor which lights a pilot that in turn lights the main burner The gas valve used in this system is a step opening whichopensatalowerpressureforignitionandthenstepstoafull inlet pressure of 4 H2 O press...

Page 14: ...r in the absence of local codes with the National Electrical Code ANSI NFPA 70 or Canadian Electrical Code CSA C22 1 if an external electrical source is utilized This appliance is equipped with a thre...

Page 15: ...OUTLET PRESSURE REGULATOR ADJUSTMENT UNDER CAP SCR EW GAS FLOW IG NITOR C ONTROL TO 24 V THERMOSTA T TO 24 V COMMON ON TRANSFOR MER TO 24V HOT ON TRANSFORMER WIRING I P MODEL GAS VALVE AND WIRING IGNI...

Page 16: ...Check pilot adjustment for being full open counterclockwise to open 3 Ifgasisavailableinthesupplytubing thepilotorificeand orpilotburnerisprobablyrestrictedbyaspiderweb Clean pilot assembly and religh...

Page 17: ...Second Flame Failure Recycle Delay YES YES YES NO Pilot Valve Ignition OFF Wait for Flame Signal to Disappear 1 Ignitor will turn OFF about 30 seconds into the trial for ignition if the pilot flame ha...

Page 18: ...and Back ON Main Burner Lights Replace SmartValve Control Check Transformer and Line Volt Supply Check that Pilot Flame Makes Good Contact with Pilot Burner Flame Rod Check for Good Electrical Connect...

Page 19: ...666 INNERFRONTASSEMBLY CANADA 21 DV 1253 INNERSHIELDCOVERPLATE 2 REQUIRED 22 DV 1252 INNERSHIELD LEFT INCLUDES NO 22 23 DV 1257 EXCHANGERASSEMBLY 24 R 3162 FILTER 25 R 3163 FILTERRETAINER 26 R 3232 PI...

Page 20: ...VIEW Empire Comfort Systems Inc Nine Eighteen Freeburg Ave Belleville Illinois 62220 2623 PH 1 800 851 3153 PH 1 618 233 7420 FAX 1 800 443 8648 FAX 1 618 233 7097 E MAIL info empirecomfort com WEB S...

Reviews: